
I’m going to be honest with you. The perfect Buffalo Chicken Mac and Cheese has to have two things, and they are non-negotiable: an outrageously creamy sauce that never, ever gets grainy, and a crispy, golden-brown crunchy topping. For years, I struggled to find a recipe that truly mastered both.
So many versions I tested were a compromise. They were either gloriously creamy but ended up soupy and slick after baking, or they were baked firm but came out tragically dry and clumpy. A good mac and cheese shouldn’t force you to choose.
This is the recipe where I finally cracked the code.
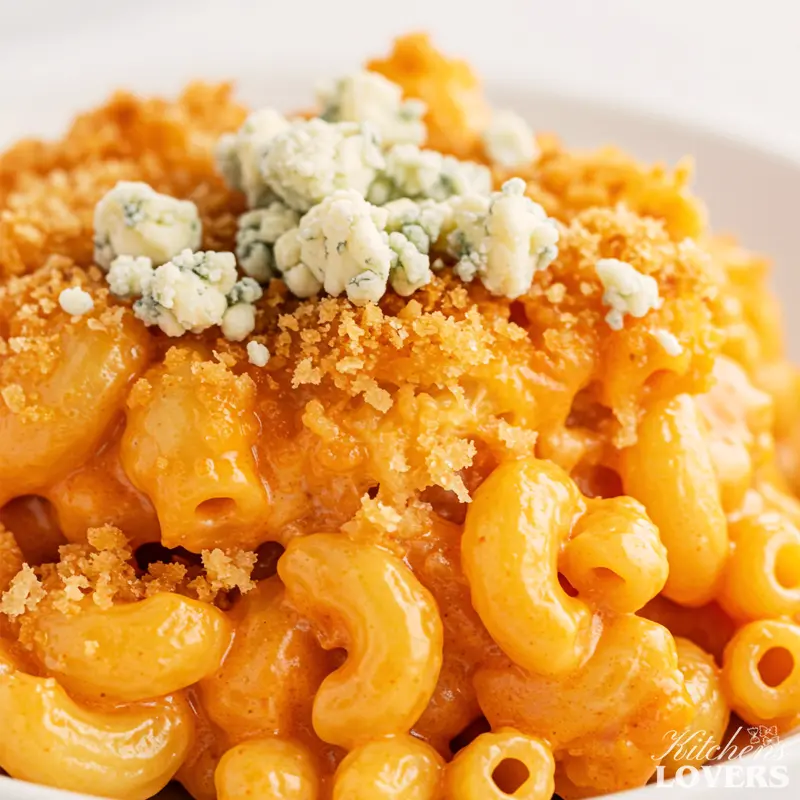
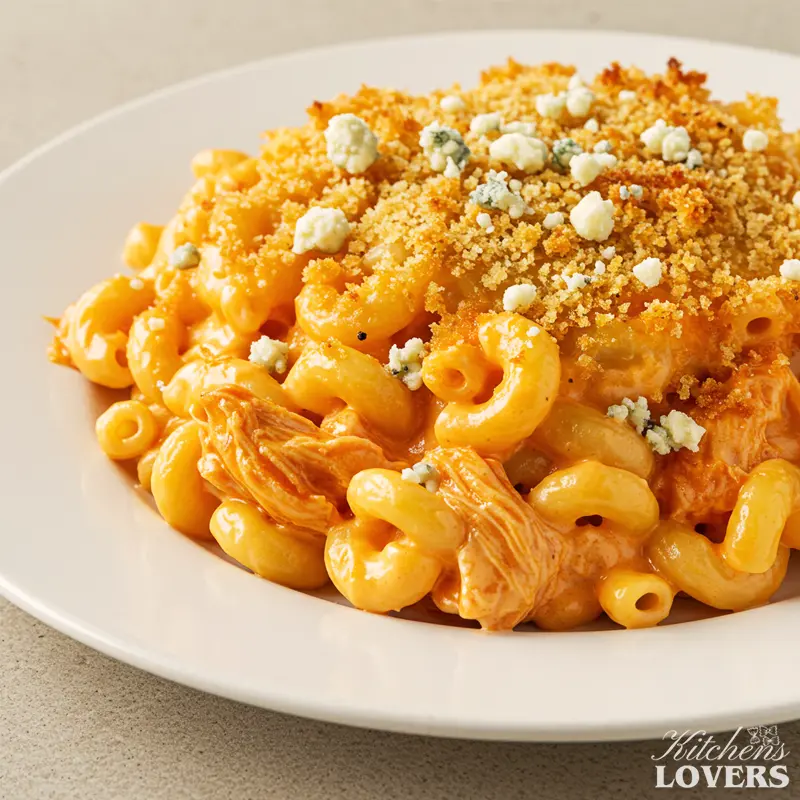
This is the ultimate experience: a bubbling, gooey, and velvety-smooth cheese sauce packed with spicy Buffalo chicken, all sealed under a blanket of buttery, crunchy panko breadcrumbs. It’s the best of both worlds, and after dozens and dozens of tests in my own kitchen, it’s absolutely foolproof. Get ready to make the last Buffalo Chicken Mac and Cheese recipe you’ll ever need.
Why This Recipe Is the Best
- Maximum Creaminess, Zero Graininess: We use a simple but powerful technique to build a cheese sauce that stays silky smooth and stable, even after baking.
- The Ultimate Crunchy Topping: A combination of panko breadcrumbs and melted butter creates that irresistible golden-brown crust every great baked mac and cheese needs.
- Perfect Flavor Balance: The sharp cheddar, tangy blue cheese, and spicy buffalo sauce are layered perfectly, ensuring a bold but not overwhelming flavor in every single bite.
- Flavor-Packed Chicken: We don’t just dump in boring chicken. I’ll show you how to season it perfectly so it’s a star, not an afterthought.
Key Ingredients
You’ll notice this ingredient list is pretty straightforward, but there are a couple of specific choices I’ve made after dozens of tests. Trust me on these—they are the secret to guaranteeing a flawless, restaurant-quality result every single time.
The Secret to the Creamiest Sauce
The real star here, and my secret weapon for a foolproof cheese sauce, is evaporated milk. Why not regular milk or heavy cream? Simple. Evaporated milk has less water and a higher concentration of milk proteins. These proteins act as powerful emulsifiers, which is just a fancy way of saying they help the fat from the cheese and butter blend perfectly into the sauce without separating. This is your insurance policy against a broken, oily, or grainy sauce. It creates a velvety texture that holds up beautifully, even in the oven.
Why You Must Shred Your Own Cheese
I know, I know—it’s an extra step. But this is the single most important thing you can do for your mac and cheese. Those bags of pre-shredded cheese are coated with additives like cellulose and potato starch to keep the shreds from clumping. While that’s great for the packaging, it’s a disaster for your sauce. Those starches prevent the cheese from melting evenly and smoothly, resulting in that gritty, grainy texture we’re working so hard to avoid. So please, grab a block of cheese and a box grater. It takes two minutes and makes all the difference in the world.
Full Ingredient List
- Pasta: 1 lb elbow macaroni or other short pasta like shells or cavatappi.
- Chicken: 1.5 lbs boneless, skinless chicken breasts, cooked and shredded. A rotisserie chicken is a fantastic time-saver here!
- Butter: 1/2 cup (1 stick) unsalted butter, divided.
- Flour: 1/2 cup all-purpose flour. This is the foundation of our roux.
- Evaporated Milk: Two 12-ounce cans.
- Cheese: 12 oz sharp cheddar cheese, shredded from a block, plus 4 oz Monterey Jack cheese, also shredded from a block.
- Buffalo Sauce: 1 cup of your favorite brand of buffalo wing sauce (I prefer Frank’s RedHot).
- Seasonings: 1 tsp garlic powder, 1 tsp onion powder, 1/2 tsp smoked paprika, plus salt and black pepper to taste.
- Blue Cheese: 4 oz crumbled blue cheese, for layering and topping.
- Panko Breadcrumbs: 1 cup for that crispy topping.
Essential Equipment
The great news is you don’t need any fancy, expensive gadgets for this recipe. Just a few kitchen staples that do the job perfectly.
Your Trusty 9×13 Casserole Dish
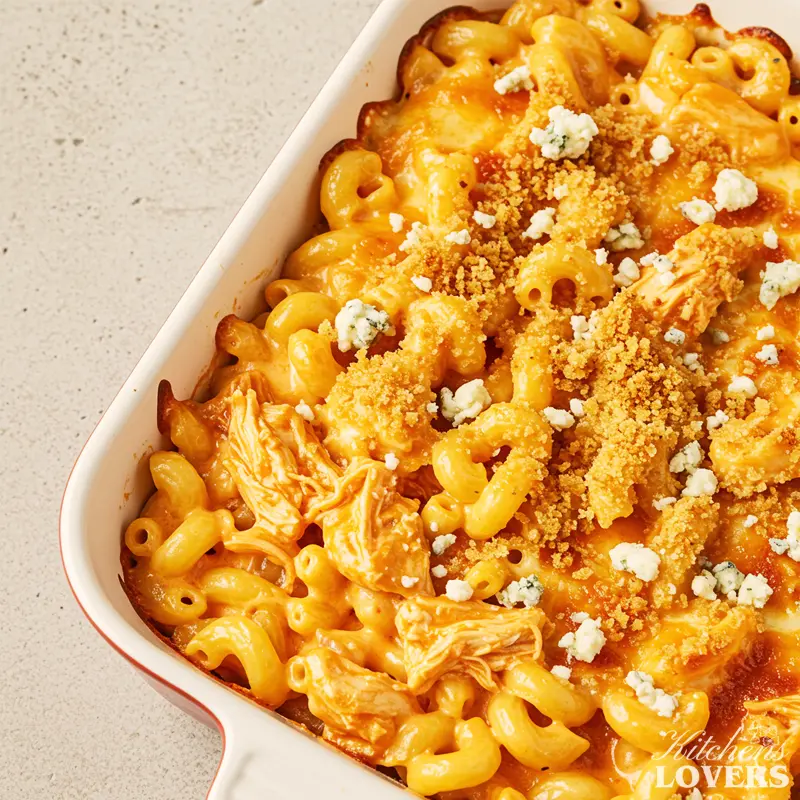
This is the hero piece of equipment for this recipe. A standard 9×13 inch baking dish (glass or ceramic, both work wonderfully) provides the perfect depth and surface area. It ensures you get the ideal ratio of creamy, gooey mac and cheese on the inside to crispy, golden-brown topping on the outside. A dish that’s too deep won’t give you enough crunchy topping, and one that’s too shallow can cause the mac and cheese to dry out. This size is just right.
A Sturdy Box Grater
As I mentioned, this tool is non-negotiable for achieving a velvety sauce. You absolutely must shred your own cheese to avoid the anti-caking agents that ruin homemade mac and cheese. A simple, sturdy box grater is your best friend here. It’s a small step that makes a world of difference.
You’ll Also Need:
- A large pot for boiling the pasta.
- A large, heavy-bottomed pot or Dutch oven for making the cheese sauce.
- A whisk to ensure your sauce is lump-free.
Expert Tips for Flawless Results (Proactive Troubleshooting)
Over the years, I’ve learned that success in the kitchen isn’t just about the recipe—it’s about the technique. Here are the three non-negotiable rules I follow for this dish. Think of this as my personal masterclass to guarantee your Buffalo Chicken Mac and Cheese is perfect, right from the very first try.
How to Guarantee a Non-Grainy Cheese Sauce
We’ve already talked about shredding your own cheese and using evaporated milk. The final, critical step happens when you combine them. After your flour-and-butter roux is cooked and you’ve whisked in the evaporated milk to make a smooth base, you absolutely must turn off the heat. Let the base cool for just a minute. Then, add your freshly shredded cheese one handful at a time, whisking until it’s completely melted before adding the next. If you dump all the cheese into a bubbling, boiling-hot sauce, the dairy proteins will curdle and the fat will separate. This is the #1 cause of grainy, oily sauce. Be patient here. Off the heat, one handful at a time. This gentle approach coaxes the cheese into melting into a velvety, flawless sauce.
The Secret to Pasta That Isn’t Mushy
Nobody wants a soupy mac and cheese where the pasta has dissolved into mush. The secret is to drastically undercook your pasta in the boiling water. Look at the package directions for “al dente” and then boil it for a full 2 to 3 minutes less than that. The pasta should be quite firm and still have a significant bite. Why? Because the pasta isn’t done cooking yet! It will continue to cook and absorb that incredible cheese sauce as you stir it all together, and it will cook even more in the oven. This method ensures that your final baked macaroni has the perfect, satisfying chew, not a mushy texture.
Getting the Perfect Golden-Brown Topping
Have you ever baked a casserole and ended up with a topping that’s half pale and half burnt? The fix is incredibly simple. Don’t just sprinkle dry panko breadcrumbs over the top. Instead, melt your remaining butter in a small bowl and toss the panko in it until every single crumb is lightly coated. Then sprinkle this buttery mixture evenly over the casserole. Coating the panko in butter first ensures it toasts to a perfect, even, golden-brown and develops an unbelievable crunch in the oven. It’s the difference between a good topping and a great one.
Step-by-Step Instructions
Alright, this is where the magic happens. We’ll build this in a few simple phases so it feels easy and organized. Let’s get cooking!
Phase 1: Prep and Cook Pasta
- Preheat and Prep: First things first, get your oven preheating to 375°F (190°C). Lightly grease your 9×13 inch casserole dish with butter or nonstick spray.
- Cook the Pasta: Bring a large pot of heavily salted water to a rolling boil. Add your pasta and cook it for 2-3 minutes less than the package directs for al dente. This is crucial! The pasta should be very firm. Drain it immediately and set it aside.
- Prepare the Topping: In a small bowl, melt 2 tablespoons of the butter. Add the 1 cup of panko breadcrumbs and toss them with a fork until every crumb is evenly coated in the butter. Set this aside.
- Prepare the Chicken: If you are not using a pre-cooked rotisserie chicken, this is the perfect time to cook your chicken breasts. Season them with salt and pepper and bake, pan-sear, or boil them until cooked through, then shred the meat with two forks.
Phase 2: Build the Velvety Cheese Sauce
- Make the Roux: In a large Dutch oven or heavy-bottomed pot, melt the remaining 6 tablespoons of butter over medium heat. Once it’s melted and sizzling, whisk in the 1/2 cup of all-purpose flour. Keep whisking constantly for about 60-90 seconds. The mixture will bubble and transform into a smooth paste that smells nutty and toasty. You’ve just made a roux!
- Add the Milk: While still whisking, slowly stream in the two cans of evaporated milk. Go slowly at first to prevent lumps, then pour in the rest. Continue to whisk, scraping the bottom of the pot, until the sauce is completely smooth.
- Thicken the Sauce: Increase the heat to medium-high and bring the sauce to a gentle simmer, whisking often. Let it bubble gently for about 2-3 minutes until it’s thick enough to coat the back of a spoon.
- The Most Important Step: Now, turn the heat completely OFF. Remove the pot from the hot burner. This is the secret to a non-grainy sauce. Let it cool for just a moment.
- Melt the Cheese: Add your freshly shredded sharp cheddar and Monterey Jack cheese to the sauce, one big handful at a time. Whisk until each handful is fully melted and incorporated before adding the next. (Remember, do this OFF the heat!). The sauce should be glossy, thick, and perfectly smooth.
- Add the Flavor: Stir in the garlic powder, onion powder, smoked paprika, salt, and pepper. Then, gently stir in the 1 cup of Buffalo sauce until it’s beautifully combined, followed by your cooked and shredded chicken.
Phase 3: Assemble and Bake
- Combine: Pour the cooked and drained pasta into the pot with your glorious cheese sauce. Stir gently until every single piece of pasta is coated.
- Layer the Casserole: Pour half of the mac and cheese mixture into your prepared casserole dish and spread it into an even layer. Sprinkle about half of the crumbled blue cheese over the top. Add the remaining mac and cheese on top of that.
- Top and Bake: Sprinkle the remaining blue cheese crumbles evenly over the surface, then top with your prepared buttery panko breadcrumbs, making sure they cover everything from edge to edge.
- Bake to Perfection: Place the dish in the preheated oven and bake for 25-30 minutes, or until the sauce is bubbling around the edges and the panko topping is a deep golden-brown.
- Rest Before Serving: This is a tough one, but it’s important! Let the mac and cheese rest for at least 10-15 minutes before serving. This allows the sauce to set up, ensuring every scoop is perfectly creamy and not runny. Garnish with a little fresh parsley or sliced green onions if you’re feeling fancy.
Pro Variations to Customize Your Mac
While the baked casserole is my go-to for the ultimate experience, a truly great recipe should be able to adapt to your life. Sometimes you need a hands-off dinner, and sometimes you’re looking for a slightly lighter option. I’ve tested both of these variations thoroughly, and they are fantastic.
Variation 1: The ‘Set-it-and-Forget-it’ Crockpot Method
This version still delivers that incredible creamy sauce but lets your slow cooker do most of the work. We just build the stable sauce base on the stovetop first to guarantee it won’t break. This is the key to a perfect Crockpot mac and cheese!
- Build Your Sauce Base on the Stovetop: This quick step is the secret to a perfect Crockpot sauce. In a large pot on the stovetop, melt the 1/2 cup of butter and whisk in the 1/2 cup of flour to create a roux, just like in the main recipe. Cook for 1 minute, then slowly whisk in the two cans of evaporated milk until a smooth, thick base sauce forms.
- Transfer to Slow Cooker & Add Flavors: Pour the sauce base into the basin of a large slow cooker. Stir in the shredded, cooked chicken, the Buffalo sauce, and all the seasonings (garlic powder, onion powder, paprika, salt, and pepper).
- Slow Cook: Cover and cook on LOW for 2-3 hours for the flavors to meld.
- Melt the Cheese: Turn the slow cooker to the “Keep Warm” setting. Just like in the stovetop version, you’ll add the freshly shredded cheese in handfuls, stirring well after each addition until the cheese is completely melted and the sauce is smooth. Do this gently to avoid breaking the sauce. Stir in the blue cheese crumbles.
- Cook Pasta Separately: About 20 minutes before you’re ready to serve, cook your pasta on the stovetop according to the package directions for al dente. Drain it well.
- Combine and Serve: Pour the hot, drained pasta directly into the slow cooker and stir to combine. Let it sit for about 5-10 minutes for the sauce to thicken slightly, and serve straight from the crockpot.
Variation 2: The ‘Lighter’ Mac and Cheese (Smart Swaps)
If you’re looking for the same bold flavors with a few smart adjustments, this version is for you. We can trim down some of the richness without sacrificing that creamy texture. To do this, I like to replace some of the butter-and-flour roux with a secret vegetable ingredient: pureed cauliflower. Simply steam about 2 cups of cauliflower florets until very tender, then blend them with a splash of chicken broth until silky smooth. You can then make the recipe as directed, but reduce the butter and flour by half and add the cauliflower puree to the evaporated milk base to help thicken it. You can also swap the pasta for a whole wheat variety for extra fiber and use a good quality reduced-fat sharp cheddar (make sure to shred it yourself!). The flavor is still huge, but it’s a version you can feel a little better about indulging in.
Storing, Freezing & Reheating
Let’s be real: one of the best things about a big, beautiful casserole is having leftovers. But mac and cheese can be tricky. Done wrong, reheating it can result in a dry, oily mess. So here is my tried-and-true method to make your leftovers taste almost as good as they did on day one.
Storing Leftovers in the Fridge
Once the mac and cheese has cooled completely (never put a hot dish in the fridge!), transfer it to an airtight container. It will keep beautifully in the refrigerator for up to 4 days. Expect the sauce to thicken and firm up considerably as it chills—that’s completely normal, and we’ll fix it during reheating.
Can You Freeze This Mac and Cheese?
Here’s the deal: I don’t recommend it. While you can technically freeze it, dairy-based sauces have a strong tendency to separate and become grainy when they are thawed and reheated. The pasta can also get a bit mushy. If you absolutely must freeze it, store it in an airtight, freezer-safe container or individual portions wrapped in plastic wrap and then foil. It can be frozen for up to 2 months. Thaw it completely in the refrigerator overnight before attempting to reheat.
The Best Way to Reheat (And Make It Taste Fresh-Baked!)
Forget the microwave! It will make the pasta rubbery and the sauce oily. The oven is your best friend for restoring this dish to its former glory. This method gently reheats the inside while re-crisping the topping. It will change the way you look at leftovers.
- Preheat and Prep: Preheat your oven to 350°F (175°C). Place the desired amount of leftover mac and cheese in a small, oven-safe baking dish.
- Restore the Creaminess: Here is the secret step. For a single serving, add about a tablespoon of milk and stir it gently into the mac and cheese. If you’re reheating a larger portion, add a bit more. The pasta starches absorb moisture as they sit, and this splash of milk rehydrates the sauce, bringing back its original velvety texture.
- Cover and Bake (The “Steam” Phase): Cover the baking dish tightly with aluminum foil. This traps the steam and ensures the mac and cheese heats through evenly without drying out. Bake for 20-25 minutes, or until it’s hot and bubbly.
- Uncover and Bake (The “Crisp” Phase): Now, remove the foil. This exposes the panko topping to the direct heat of the oven. Bake for another 5 minutes, or until the topping is sizzling and has regained its beautiful, golden-brown crunch. Let it rest for a minute before diving in.
What to Serve With This Dish
This Buffalo Chicken Mac and Cheese is one of the most popular dishes in my entire collection of Spicy pasta recipes, and it’s a powerhouse of flavor all on its own. Because it’s so rich and satisfying, you don’t need complicated side dishes. The goal here is balance. We want something fresh, crisp, or acidic to cut through that incredible cheese sauce and refresh your palate between bites.
A Crisp, Tangy Green Salad
A simple salad is my number one go-to. Think peppery arugula or crisp romaine lettuce, maybe some thinly sliced red onion, and a super simple lemon vinaigrette.
- The Flavor Logic: The bright acidity from a lemon or red wine vinaigrette is the perfect counterpoint to the rich, fatty cheese sauce. It cuts right through the richness, cleanses your palate, and gets you ready for the next amazing spoonful of mac and cheese.
Simple Roasted Broccoli
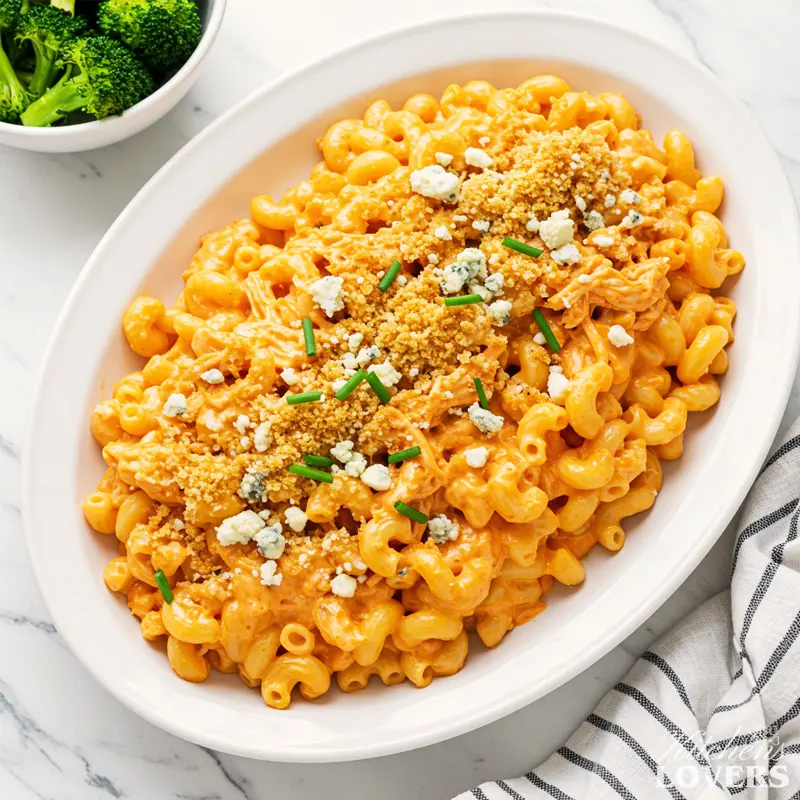
Toss some broccoli florets with a little olive oil, salt, and pepper, and roast them in a hot oven until the edges are nicely charred and crispy. It’s incredibly easy and incredibly effective. Roasted asparagus or green beans work wonderfully here, too.
- The Flavor Logic: That slightly bitter, nutty flavor you get from roasting vegetables provides a fantastic contrast to the creamy, savory flavors of the pasta. The firm texture of the broccoli also stands up well and prevents the whole meal from feeling too soft.
The Classic: Celery and Carrot Sticks
Sometimes the simplest answer is the best one. You can never go wrong with a plate of crisp, cold celery and carrot sticks on the side, maybe with a little extra blue cheese or ranch dressing for dipping if you like.
- The Flavor Logic: There’s a reason wings are always served with celery—it works! The cool, watery crunch is the ultimate refresher for a spicy, savory palate. It’s a classic pairing that provides both temperature and texture contrast, making each bite of the mac and cheese feel just as exciting as the first.
Frequently Asked Questions (FAQs)
Here are the answers to some of the most common questions I get. If you follow the core recipe, you shouldn’t run into any issues, but it always helps to know the why behind the method!
Baking & Make-Ahead Tips
This is usually caused by one of two things. First, the sauce-to-pasta ratio might be off. Some recipes are just too stingy with the sauce! I’ve formulated this recipe to have a very generous, almost excessive amount of sauce before baking, because the pasta will continue to absorb liquid as it sits and as it bakes. The second culprit is simply overbaking. You’re not trying to cook the casserole; you’re just heating it through until it’s hot and bubbly and the topping is golden. Baking it for too long will cause the sauce to break and the noodles to soak up every last drop of moisture.
Absolutely! This is a great dish to prep a day in advance. Simply follow all the steps right up to the final bake. Assemble the entire casserole in the baking dish, but do not add the buttery panko topping. Allow the casserole to cool completely, then cover it tightly with foil and refrigerate for up to 24 hours. When you’re ready to bake, add the prepared panko topping and bake as directed. You may need to add about 10-15 minutes to the initial covered baking time since you’re starting from a cold dish.
Cheese & Sauce Troubleshooting
The most important rule is to always use a block of cheese that you shred yourself. Beyond that, you want a good melting cheese. A sharp cheddar is a must for that classic tangy flavor, but I always mix it with something milder and creamier, like Monterey Jack or Colby, for the perfect balance and “cheese pull.” Other fantastic options that melt into a beautifully smooth sauce are Gouda (especially smoked Gouda), Gruyère for a nutty flavor, or Fontina. It’s all about the protein and fat structure; as experts on the science of cooking note, the best melting cheeses have a specific moisture content that prevents them from becoming greasy or stringy. It’s a fascinating bit of food science, and if you want to go deeper, The Guardian has a great article explaining The science behind why some cheeses melt better than others.
This is the number one fear of every mac and cheese maker! If you follow my core method, you will avoid this, but it’s almost always caused by one of these three missteps:
You used pre-shredded cheese. The cellulose and potato starch they’re coated with are the enemy of a smooth sauce.
The sauce was too hot when you added the cheese. You must turn the burner off and let the sauce cool for a moment. Dumping cold cheese into a boiling-hot liquid will shock the dairy proteins and cause them to seize up and curdle.
You didn’t use enough fat. The butter and flour roux creates a stable emulsion that holds the sauce together. Skimping on this foundation can lead to a broken sauce.
The Science of a Flawless, Velvety Cheese Sauce
We’ve talked a lot about what to do to get a perfectly creamy mac and cheese, but if you understand why these steps work, you’ll never fear a grainy sauce again. This is where my 30 years in the kitchen, experimenting and learning, really pays off. It’s all about a little food science.
The Mighty Roux: Your Sauce’s Stable Foundation
Think of a roux as your sauce’s bulletproof vest. It’s nothing more than cooked flour and butter, but its role is absolutely critical.
- Thickening Power: When flour cooks with fat (like butter), the starch granules swell and thicken the liquid (our evaporated milk), creating the viscous base of our sauce. This is what gives mac and cheese its luxurious body.
- Preventing Separation: But even more importantly, the fat in the butter surrounds each tiny flour particle. This helps to emulsify—or uniformly blend—the subsequent liquids and fats we add. Without a proper roux, the fats from the cheese would want to separate and leave you with an oily, broken sauce sitting in a watery puddle. The roux holds everything together in a beautiful, stable suspension.
Emulsifying Salts: The Cheese Whisperers
You’ve probably noticed that when some cheeses melt, they become stringy or even separate into an oily mess. This is often because they lack strong “emulsifying salts.” Good melting cheeses—especially aged cheddars and Monterey Jack, which we use—naturally contain compounds like citrates and phosphates.
- Binding Agents: These “emulsifying salts” are naturally occurring salts that act as powerful binding agents. They have a remarkable ability to help the fat and water components of cheese (and our milk sauce) integrate smoothly.
- Smooth Texture: When cheese is heated gently (crucially, off the direct heat as we do!), these salts go to work, relaxing the protein structure of the cheese. This allows the fat and water to mix into a smooth, homogeneous, non-stringy, and non-greasy sauce. That’s why slowly adding shredded cheese off the heat is so critical: it activates these tiny emulsifiers to give you that truly velvety texture we crave.
I’d Love to Hear From You!
I truly believe this is the ultimate recipe for baked Buffalo Chicken Mac and Cheese, and I am so excited for you to try it in your own kitchen. There’s nothing better than pulling that bubbling, golden-brown casserole out of the oven and knowing you absolutely nailed it.
If you make this recipe, please leave a comment and a star rating below! I read every single one, and I’d love to know how it turned out for you. And I have to ask: What’s your must-have topping for a baked mac and cheese?
For all my fellow Buffalo sauce fans, you absolutely have to try my streamlined, stovetop-only Buffalo Chicken Pasta—it’s perfect for a quick weeknight dinner. And for those who like to walk on the spicy side, don’t miss my fiery Nashville Hot Chicken Mac and Cheese or the restaurant-quality Chili Cajun Chicken Pasta.
Want more foolproof, family-tested recipes delivered straight to your inbox? Sign up for the KitchensLovers newsletter and get my best dinner ideas for free!
About the Author:
Kate Thompson created KitchensLovers.com to simplify dinner for real-life families. She develops easy, flavor-packed chicken pasta recipes tested dozens of times to guarantee results. Her motto: ‘Easy Pasta, Every Time.’
This recipe was last tested and updated in September 2025 to ensure perfect results.
Ultimate Baked Buffalo Chicken Mac and Cheese
Equipment
- 9×13 inch Casserole Dish
- Box Grater
- Large Pot (for pasta)
- Large Dutch oven or heavy-bottomed pot (for sauce)
- Whisk
Ingredients
For the Mac and Cheese
- 1 lb elbow macaroni or other short pasta like shells
- 1.5 lbs boneless skinless chicken breasts (cooked and shredded)
- 6 tablespoons unsalted butter
- 1/2 cup all-purpose flour
- 2 cans 12 oz each evaporated milk
- 12 oz sharp cheddar cheese shredded from a block
- 4 oz Monterey Jack cheese shredded from a block
- 1 cup Buffalo wing sauce e.g., Frank’s RedHot
- 1 tsp garlic powder
- 1 tsp onion powder
- 1/2 tsp smoked paprika
- Salt and black pepper to taste
- 4 oz crumbled blue cheese divided
For the Crispy Topping
- 1 cup panko breadcrumbs
- 2 tablespoons unsalted butter melted
Instructions
Phase 1: Prep and Cook
- Preheat oven to 375°F (190°C). Lightly grease a 9×13 inch casserole dish.
- Cook pasta in heavily salted water for 2-3 minutes LESS than package directions for al dente. Drain and set aside.
- In a small bowl, mix the 1 cup of panko with 2 tablespoons of melted butter. Set aside.
- If not using pre-cooked chicken, cook and shred the chicken breasts.
Phase 2: Build the Sauce
- In a large Dutch oven, melt the remaining 6 tablespoons of butter over medium heat. Whisk in the flour and cook for 1 minute until nutty.
- Slowly whisk in the evaporated milk until smooth. Bring to a simmer and cook for 2-3 minutes until thickened.
- Turn the heat OFF. Add the shredded cheddar and Monterey Jack cheese in handfuls, whisking until smooth after each addition.
- Stir in the garlic powder, onion powder, smoked paprika, salt, pepper, Buffalo sauce, and shredded chicken.
Phase 3: Assemble and Bake
- Add the drained pasta to the cheese sauce and stir to combine.
- Pour half of the mac and cheese into the prepared dish. Top with half of the crumbled blue cheese. Add the remaining mac and cheese.
- Sprinkle with the remaining blue cheese, then top with the buttery panko breadcrumb mixture.
- Bake for 25-30 minutes, until the sauce is bubbling and the topping is golden brown.
- Let the mac and cheese rest for 10-15 minutes before serving to allow the sauce to set.
Notes
- Guarantee a Non-Grainy Sauce: Always turn the heat OFF before adding the cheese. Add your freshly shredded cheese one handful at a time to the warm (not boiling) sauce base, whisking until smooth before adding the next.
- Avoid Mushy Pasta: Cook the pasta 2-3 minutes LESS than the package directs for al dente. It will finish cooking in the oven to the perfect texture.
- The Science of a Flawless Sauce: A roux (cooked butter and flour) is critical. It thickens the sauce and creates a stable emulsion, preventing the fats from the cheese from separating and turning the sauce oily. Gentle heat helps the natural emulsifying salts in aged cheddar relax the cheese’s protein structure, ensuring a velvety smooth melt.
