
You know that specific craving. It’s the one that has you thinking about those tender chicken medallions, that vibrant, garlic-and-wine-infused sauce clinging to every single strand of angel hair pasta, and the signature flavor you can only get at Olive Garden. Like many of you, I spent years chasing that magic in my own kitchen, only to be frustrated by sauces that would break into a slick, greasy mess. That disappointment is what fueled my mission, leading me right into the science of classic cooking to solve this problem for good.
Sound familiar? That broken, separated sauce is the #1 reason home cooks get frustrated with chicken scampi. And that is exactly why I’m so excited to share my recipe with you today.
Today, I’m sharing the secret that changed everything for me: a classic French technique called monter au beurre. It sounds fancy, but it’s a simple, foolproof method of swirling cold butter into the pan off the heat to create a stunningly silky, stable sauce. This is how professional kitchens guarantee a flawless result, and it will make your chicken scampi even better than the restaurant version. I promise.
Why This Recipe Is the Only One You’ll Ever Need:
- Authentic Copycat Flavor: We’ve tested this dozens of times to perfectly replicate the savory, garlic-forward taste that makes Olive Garden’s version so iconic.
- The Foolproof Silky Sauce: My method uses a classic French technique that prevents the sauce from ever becoming greasy or separated. It’s my secret weapon for consistent, restaurant-quality results.
- Perfectly Tender Chicken, Every Time: We use a simple method to create juicy chicken cutlets that cook quickly and are unbelievably tender.
- Built for Your Kitchen: This isn’t just a recipe; it’s a roadmap. I’ve included pro tips and answers to common problems to ensure you nail it on your very first try.
Key Ingredients & Smart Swaps
A truly great chicken scampi is all about the interplay of a few fresh, high-quality ingredients. You’re going to build a sauce that’s bright, aromatic, and deeply savory using pantry staples.
The Stars of the Show
While every ingredient plays a role, these three are absolutely critical for achieving a restaurant-quality result:
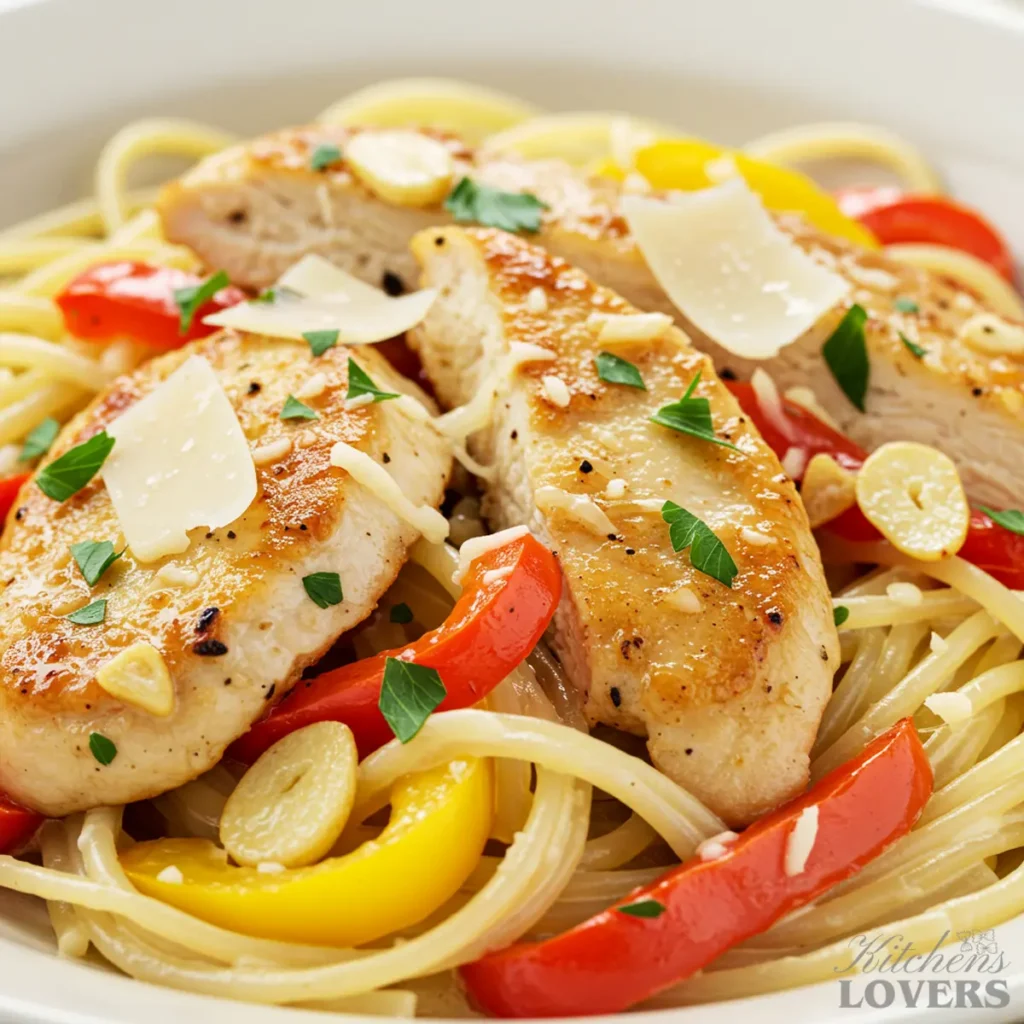
- Thin-Cut Chicken Breast Cutlets: This is non-negotiable for tender chicken. Using thin, evenly pounded cutlets (or buying them pre-sliced) ensures they cook in a flash, preventing them from becoming tough or rubbery. It also creates more surface area for that delicious flour crust to cling to, which will later help thicken our pan sauce.
- Fresh Lemon & Quality Chicken Broth: Since we are not using wine, this duo is doing the heavy lifting to create the sauce’s vibrant flavor. Freshly squeezed lemon juice provides that essential scampi “zing” and acidic brightness. We pair it with a good low-sodium chicken broth, which builds a savory foundation without making the dish overly salty. The quality of these two ingredients is what will make your sauce taste complex and lively.
- The Real Secret to the Sauce: Cold Butter. This isn’t just butter; it’s the key to your flawless pan sauce. You’ll notice I specify it must be kept cold, and this is the most important step for the monter au beurre technique we’ll use later. As the cold butter cubes melt slowly into the warm sauce off the heat, they create a stable, creamy emulsion that will never turn greasy. Room-temperature butter will simply melt into a separated oil slick. This is our non-negotiable secret weapon!
Full Ingredient List
- For the Chicken:
- 1.5 lbs boneless, skinless chicken breasts, sliced into thin cutlets
- All-purpose flour
- Kosher salt & freshly ground black pepper
- For the Signature Scampi Sauce & Veggies:
- Olive oil
- Unsalted butter, cut into cubes and kept cold
- 1 medium red onion, thinly sliced
- 1 red and 1 yellow bell pepper, thinly sliced (these provide the signature color and sweet bite essential to the Olive Garden version)
- 6-8 cloves garlic, minced
- Red pepper flakes (optional, for a little heat)
- Low-sodium chicken broth
- Juice of 1 whole lemon (about 3-4 tablespoons)
- Fresh flat-leaf parsley, chopped
- The Pasta:
- 12 oz. Angel Hair Pasta. Its thin profile is essential for the delicate sauce to cling to properly.
Smart Swaps for Your Kitchen
| Ingredient | Substitution | Notes & Tips |
| Chicken Cutlets | Chicken breast tenderloins or large shrimp (1.5 lbs, peeled and deveined). | Tenderloins are a great shortcut. If using shrimp, you’ll sear them for only 1-2 minutes per side. |
| Bell Peppers | Thinly sliced zucchini, asparagus tips, or halved cherry tomatoes. | Add zucchini or asparagus with the peppers. Stir in cherry tomatoes at the very end with the pasta. |
| Angel Hair Pasta | Spaghetti or linguine. | It will still be delicious, but Angel Hair is the classic Olive Garden choice for its texture. |
| Chicken Broth | Vegetable broth. | This will work in a pinch, but the flavor will be lighter and less savory. |
Essential Equipment
You don’t need a cabinet full of professional gear to make spectacular chicken scampi. In fact, it’s quite the opposite. This is a simple, one-pan-sauce dish. But having the right pan makes all the difference between a frustrating experience and a flawless result.
Here’s All You’ll Need:
- A large, light-colored skillet (12-inch)
- A large pot
- Tongs
- A small whisk
Now, let’s talk about why these specific tools are so important.
Trust me on this: your single most important tool is a large, wide, light-colored skillet.
- A Large, Wide Skillet (12-inch is perfect): This is your MVP. The wide surface area lets you sear the chicken cutlets in a single layer, giving them a beautiful golden-brown crust without steaming them. Critically, it also gives you enough room to toss the angel hair pasta directly in the finished sauce, coating every single strand without spilling over the sides.
- Why Light-Colored? (Stainless Steel or Enameled Cast Iron): This is my non-negotiable pro tip. The magic of a pan sauce comes from the fond—those flavorful browned bits left after searing the chicken. In a light-colored pan, you can see exactly what’s happening. You can watch the fond develop to a perfect golden-brown and ensure your minced garlic sizzles to a fragrant, nutty color. In a dark, nonstick pan, it’s almost impossible to see, and you risk burning those flavorful bits, making your entire sauce bitter.
- A Large Pot: For boiling the pasta. You need plenty of water for the angel hair to cook evenly without clumping.
- Tongs: These are essential for handling the chicken and pasta. Using tongs instead of a fork prevents you from piercing the cutlets, which keeps all those flavorful juices locked inside. They are also gentle enough to toss the delicate angel hair without breaking the strands.
- A Small Whisk: This is your best friend when it comes time to monter au beurre—it will help you emulsify those cold butter cubes into the sauce smoothly and efficiently.
Expert Tips for Flawless Results
After making this dish for 30 years, I’ve learned that the difference between good and truly unforgettable chicken scampi comes down to a few small but critical details. These are the things other recipes don’t tell you. Master these three tips, and I guarantee your dish will be flawless every single time.
1. The Secret to a Silky, Never-Broken Scampi Sauce
This is it. This is the single most important technique you will learn for this dish, and it is the absolute cure for the greasy, separated sauce that plagues so many home cooks. The secret is the professional technique called monter au beurre (pronounced “mon-tay oh burr”), which simply means “to mount with butter.”
Here’s the science and the method: Fats and liquids don’t like each other. When you just dump butter into a hot, simmering sauce, the fat melts instantly and separates from the broth, creating that disappointing oil slick. The professional solution is to create an emulsion—a stable mixture of fat and liquid.
How to Do It:
- Heat is the Enemy: Once your sauce base (the broth, lemon juice, garlic, and veggies) is hot and flavorful, you must take the skillet off the burner entirely.
- Use COLD Butter: This is non-negotiable. While the pan is off the heat, toss in your cold, cubed butter.
- Whisk, Don’t Stir: Start whisking or swirling the pan immediately. The cold butter will melt slowly into the warm liquid, and the gentle agitation from the whisk will break the fat into microscopic droplets that get suspended evenly throughout the sauce. This creates a beautifully creamy, slightly thickened, and perfectly stable sauce that will never look greasy. It’s a game-changer.
2. The Key to Tender Chicken Cutlets
Have you ever had chicken scampi where the chicken was tough and rubbery? It’s the worst. The cause is almost always uneven cooking. To fix this, we have to prepare the chicken properly before it ever hits the pan.
The goal is to get your chicken breasts to a uniform, thin-and-even thickness (about 1/4-inch). You can buy “thin-sliced cutlets,” but I prefer to do it myself for the best results. Place a chicken breast inside a zip-top bag and gently pound it with the flat side of a meat mallet or a rolling pin, starting from the thickest part and working your way out. A light, even touch is all it takes.
This single step guarantees two things: First, the chicken will cook incredibly quickly (just 2-3 minutes per side). Second, every single bite will be perfectly tender and juicy because no part of the cutlet is overcooking while you wait for a thicker section to cook through.
3. Why Angel Hair Is Non-Negotiable (And How to Time It Perfectly)
There’s a reason Olive Garden serves their scampi with angel hair, and it’s a matter of balance. A rich, heavy sauce needs a thick pasta like fettuccine to stand up to it. But our scampi sauce is light, delicate, and vibrant. It requires a pasta that won’t overwhelm it. Angel hair is the perfect vehicle; its whisper-thin strands get beautifully coated in the sauce without dominating each bite.
But be warned: Angel hair is unforgiving because it cooks in a flash—we’re talking 2 to 3 minutes, tops. So here’s the pro tip for perfect timing: Do not even think about dropping that pasta into the boiling water until your sauce is 95% done. The chicken should be cooked and resting, the veggies should be tender, and the sauce base should be simmering. The very last thing you will do is cook the pasta, drain it, and immediately toss it into the finished sauce. This timing ensures perfectly al dente pasta that’s ready to soak up that glorious, silky sauce.
How to Make the Best Chicken Scampi of Your Life
This is where the magic happens. We’ll move step-by-step to build this dish from the ground up. Get your ingredients prepped and ready to go (mise en place), as things will move quickly once we start cooking. And don’t forget to put a large pot of salted water on to boil for the pasta!
Time Needed: 45 minutes.
1.Prepare the Chicken
- Pound and Season: If your chicken breasts aren’t already thin-sliced, work with one at a time. Place a breast inside a large zip-top bag and use the flat side of a meat mallet or a rolling pin to gently pound it to a uniform 1/4-inch thickness. This is key for that tender, juicy result. Season both sides of your chicken cutlets generously with kosher salt and black pepper.
- Dredge in Flour: Spread about a half-cup of all-purpose flour on a shallow plate. Lightly press each seasoned cutlet into the flour, coating both sides. Shake off any excess—you just want a thin, even dusting. This simple crust will create a beautiful golden sear and help thicken the pan sauce later.
2.Sear the Chicken to Golden Perfection
- Heat the Skillet: In your large, light-colored skillet, heat 1 tablespoon of olive oil and 1 tablespoon of the butter over medium-high heat. The butter will start to foam and sizzle when it’s hot enough.
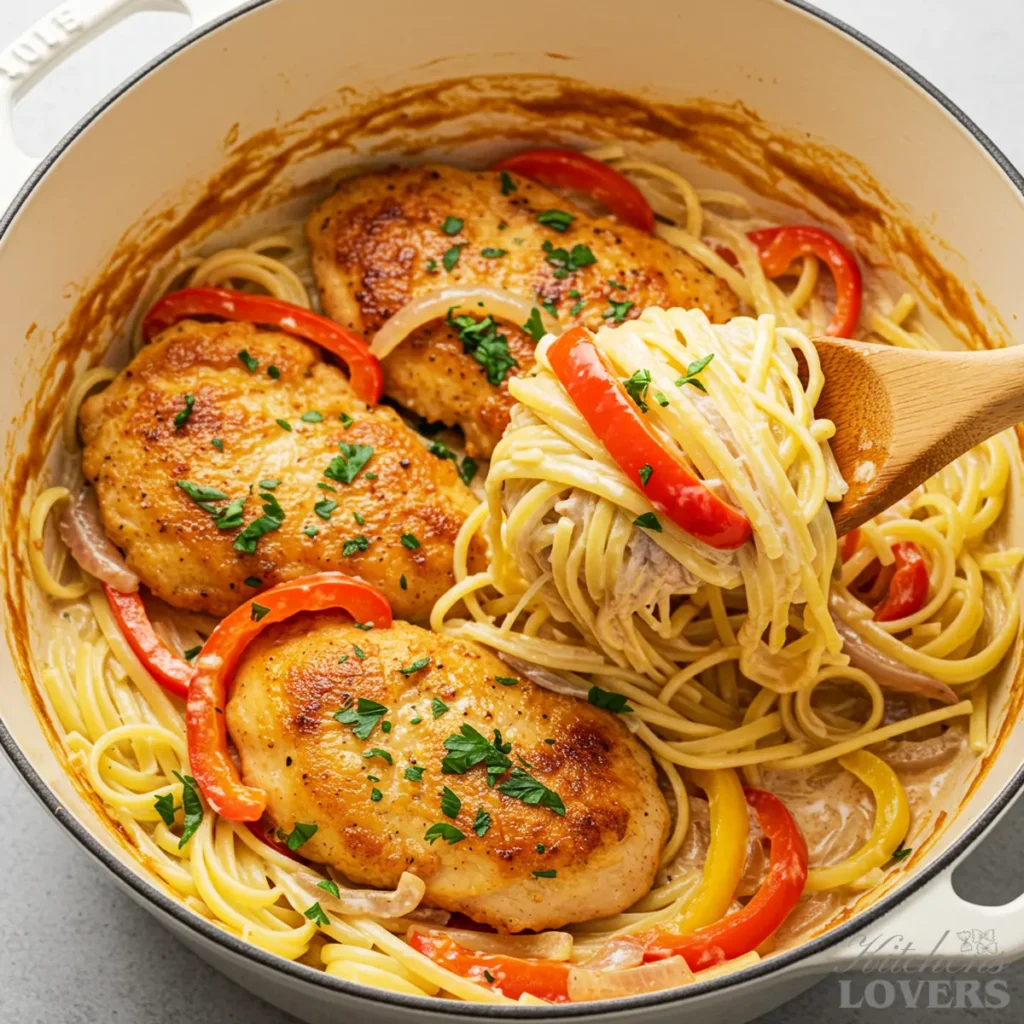
- Sear in Batches: Carefully place the flour-dusted cutlets in the hot pan, making sure not to overcrowd it. (You’ll likely need to do this in two batches). Let the chicken sear, undisturbed, for about 2-3 minutes per side. You’re looking for a deep golden-brown crust. That color is flavor!
- Set Aside: Once seared, use tongs to remove the chicken to a clean plate and set it aside. Don’t wipe out the pan! All those beautiful browned bits on the bottom are the foundation of our entire scampi sauce.
3.Sauté the Veggies and Build Flavor
- Cook the Peppers and Onions: Reduce the heat to medium. If the pan looks dry, add another splash of olive oil. Add your thinly sliced peppers and onions to the skillet. Cook, stirring occasionally, for 5-7 minutes, until they soften and the onion becomes translucent.
- Bloom the Garlic: Add the minced garlic and a pinch of red pepper flakes (if using) to the center of the pan. Sauté for just 30-60 seconds, stirring constantly. You’ll know it’s ready when that nutty, irresistible garlic aroma perfumes your kitchen. Don’t let it burn, or it will turn bitter.
4.Create the Silky Pan Sauce
- Deglaze and Simmer: Pour in the chicken broth and fresh lemon juice. As you pour, immediately use a wooden spoon or whisk to scrape up all those beautiful browned bits from the bottom of the pan. This process, called “deglazing,” unlocks a massive layer of concentrated chicken flavor that forms the true backbone of your sauce. Bring the liquid to a simmer and let it bubble for about 2-3 minutes to allow the flavors to meld together.
- (Time to Multitask!): This 2-3 minute simmer is your perfect window of opportunity. Drop your angel hair into the boiling water now. By the time your pasta is perfectly al dente, your sauce will be ready for its final, game-changing step.
- THE MOST IMPORTANT STEP—FINISH OFF THE HEAT: Turn off the stove burner and move the skillet completely off the heat. Now, add your cold butter cubes all at once. Immediately begin to whisk the sauce as the butter melts. You’ll see it transform before your eyes, turning from a thin liquid into a creamy, glossy, and beautifully emulsified sauce that coats the back of a spoon.
5.Combine, Garnish, and Serve
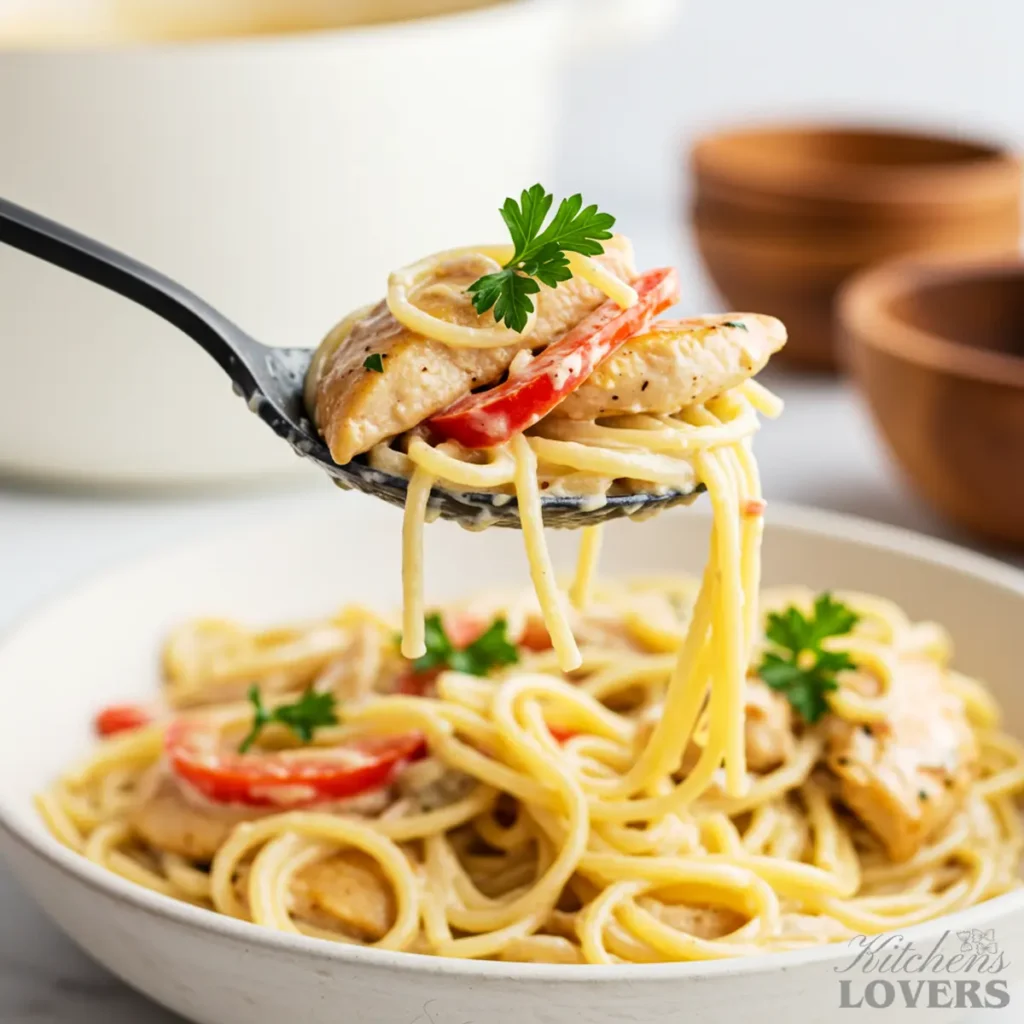
- Bring It All Together: Drain your pasta and add it directly to the skillet with the sauce. Add the seared chicken back into the pan along with any juices that collected on the plate. Toss everything together gently with your tongs until every strand of pasta is slicked with that glorious sauce.
- Garnish and Serve Immediately: Stir in the fresh, chopped parsley. Give it a final taste and add another pinch of salt or a squeeze of lemon if you think it needs it. Serve immediately in warm bowls, topped with extra parsley. Enjoy.
Pro Variations to Customize
While our classic Chicken Scampi is a showstopper all on its own, sometimes you want to take things to the next level for a truly special occasion. These are my two favorite ways to elevate the dish into something unforgettable.
The Ultimate Upgrade: Chicken AND Shrimp Scampi
Adding succulent shrimp turns this into a luxurious meal that feels incredibly special, yet it only adds a few minutes to the cooking time. It’s the perfect move when you’re hosting dinner or just want to treat yourself.
What You’ll Need:
- 1 lb large shrimp (16-20 count per pound), peeled and deveined. Leaving the tails on looks more professional, but tails-off is easier to eat—your call!
How to Adjust the Method:
The key here is to cook the shrimp separately to ensure nothing is overcooked. The shrimp cooks even faster than the chicken.
- Pat the Shrimp Dry: Before seasoning, make sure your peeled shrimp are very dry. Use a paper towel to pat them down. A dry surface is essential for getting a good, quick sear instead of just steaming them. Season the shrimp lightly with salt and pepper.
- Sear Shrimp After the Chicken: Proceed with Step 2 of the main recipe, searing your chicken cutlets and setting them aside on a plate.
- Cook the Shrimp: In that same skillet, add another tablespoon of butter. Once it’s melted and sizzling, add your seasoned shrimp in a single layer. Cook for just 1-2 minutes per side, until they are pink, opaque, and starting to curl. They cook lightning-fast.
- Set Aside with the Chicken: As soon as they are cooked, immediately use tongs to remove the shrimp from the skillet and place them on the same plate as your resting chicken.
- Proceed with the Recipe: Continue with Step 3, sautéing your veggies right in the pan that now has all that amazing chicken and shrimp flavor infused in it.
- Combine at the End: When you reach Step 5, simply add the cooked shrimp back into the skillet along with the chicken, pasta, and any accumulated juices. Toss gently to combine and serve.
Variation #2: Scampi with a Crunchy Garlic & Herb Breadcrumb Topping
Sometimes the best upgrade isn’t another protein but a perfect textural contrast. A crunchy, savory breadcrumb topping (known as pangrattato in Italy) provides a stunning, audible crunch that contrasts beautifully with the silky sauce and tender pasta. This is a true restaurant-level touch.
What You’ll Need:
- 1/2 cup Panko breadcrumbs (Panko is essential for its light, extra-crispy texture)
- 1 tablespoon unsalted butter
- 1 clove garlic, minced (or 1/4 tsp garlic powder)
- 1 tablespoon fresh parsley, finely chopped
- A pinch of salt
How to Do It:
- Toast the Breadcrumbs: In a small, separate skillet, melt the butter over medium heat until it foams.
- Add Panko & Garlic: Add the Panko breadcrumbs and minced garlic. Stir continuously for 2-3 minutes until the crumbs are fragrant and turn a beautiful, even golden brown. Be vigilant here, as they can burn quickly.
- Finish Off the Heat: Remove the skillet from the heat. Stir in the chopped parsley and a small pinch of salt.
- Serve Immediately: Sprinkle the crunchy breadcrumb topping generously over each individual bowl of chicken scampi just before serving. Do not mix it into the main skillet, as it will get soggy. The goal is that final, crispy bite.
Storing, Freezing & Reheating
Let’s be honest, part of the joy of a great pasta dish is looking forward to the leftovers. But chicken scampi can be tricky. You’ve worked hard to create that beautiful, silky sauce, and the wrong reheating method can destroy it in seconds. Here is my tested, guaranteed method to make sure your leftovers are just as good as day one.
Storing Instructions
Proper storage is your first line of defense.
- Fridge: Allow the chicken scampi to cool to room temperature, then transfer it to an airtight container. It will keep beautifully in the refrigerator for up to 3 days.
- Freezer: I strongly advise against freezing this dish. The delicate angel hair pasta will become mushy upon thawing, and more importantly, the emulsified butter sauce is very likely to break completely during the freezing and reheating process, resulting in a greasy, separated mess. This dish is best enjoyed fresh or refrigerated.
The Foolproof Reheating Method (Hint: Stay Away From the Microwave!)
The number one enemy of your scampi sauce is high, direct heat. Putting this dish in the microwave is a recipe for disaster. The intense, uneven heat will instantly obliterate the emulsion, breaking your beautiful sauce into a puddle of watery broth with a greasy oil slick on top. The pasta will be rubbery, and the magic will be gone.
My foolproof method uses a gentle touch on the stovetop to protect the sauce.
- Use a Cold Skillet: Place your desired portion of leftover chicken scampi into the skillet before turning on the heat. Starting cold is another part of the gentle process, preventing the pan from getting too hot too fast.
- Add a Splash of Liquid: Before turning on the heat, add a splash (about 1-2 tablespoons) of chicken broth or water. This is the most crucial step. It creates a gentle steam that helps loosen the pasta and reheat the sauce without “shocking” the emulsion.
- Go Low and Slow: Place the skillet over low heat and cover it. Let it warm up gently, stirring or tossing it with tongs every minute or two, for about 5-7 minutes or until it’s warmed all the way through.
By warming it slowly and with a little extra liquid, you allow the butter emulsion to “wake up” gently instead of breaking. The result is a sauce that’s just as silky and delicious as when you first made it.
What to Serve With This Dish
To transform this from a simple dinner into the full Olive Garden copycat experience, the side dishes are everything. You want pairings that complement the rich, buttery sauce without overwhelming it. This is how we do it in my house.
1. Endless-Style Garlic Breadsticks
This is non-negotiable! You need a warm, plush, garlic-dusted breadstick for one essential reason: to sop up every single last drop of that glorious, silky scampi sauce from the bottom of your bowl. Whether you buy a pack of frozen breadsticks or make your own, a little melted garlic butter and a sprinkle of salt are all you need to complete the illusion.
2. The Famous House Salad
You know the one—a simple bowl of crisp iceberg and romaine lettuce, a few red onion rings, tomato wedges, black olives, and a couple of those signature pepperoncini peppers. The key is the dressing. A bright, zesty Italian vinaigrette provides a cool, sharp crunch that cuts through the richness of the pasta. That acidic bite is the perfect counterpoint that refreshes your palate, making every bite of scampi feel like the first.
3. Simple Steamed Asparagus or Broccoli
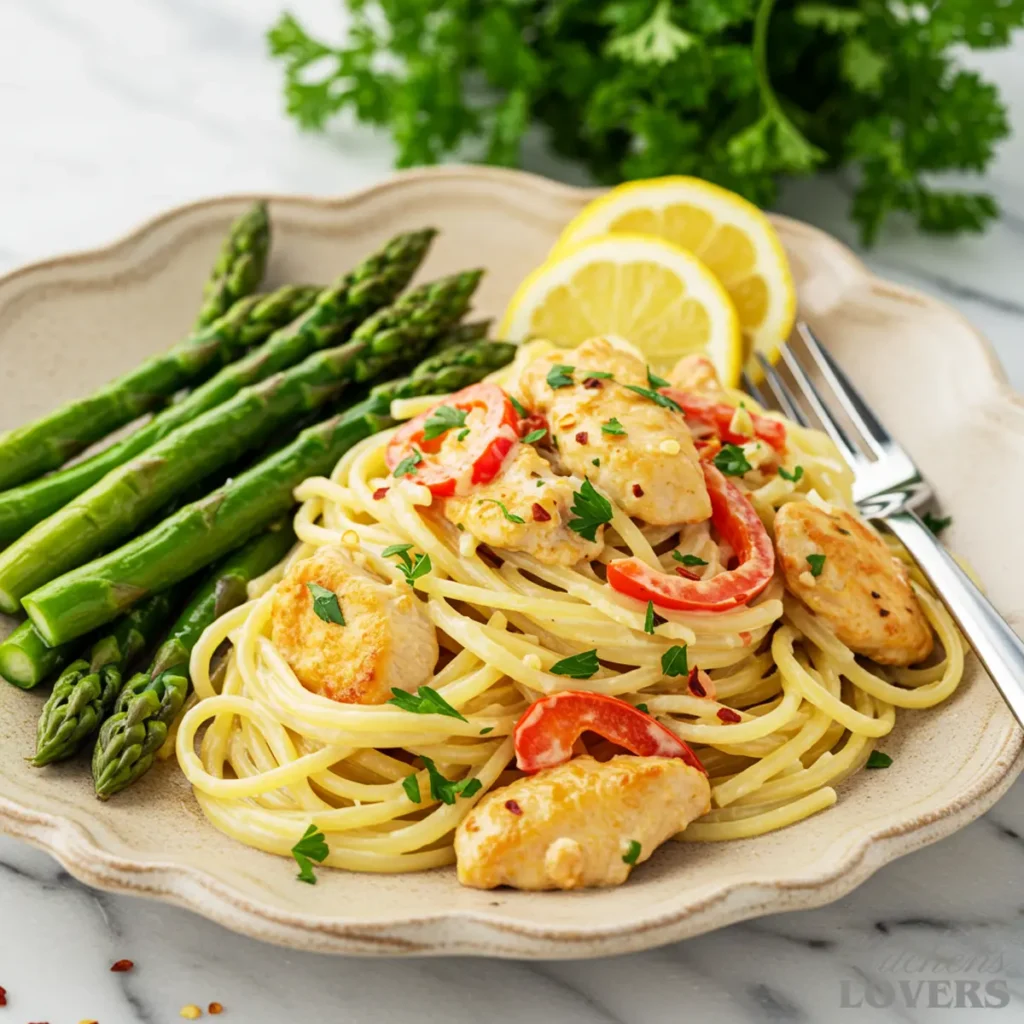
Sometimes the most elegant pairing is the simplest. A bundle of tender-crisp asparagus or broccoli, lightly steamed and finished with a tiny squeeze of lemon and a pinch of salt, adds beautiful color and a fresh, clean flavor to the plate. It’s a healthy, simple side that lets the chicken scampi remain the undisputed star of the show. This focus on a simple, fresh side is a key restaurant secret. In fact, these steamed vegetables are the exact same pairing I recommend for my bright and zesty Chicken Piccata Pasta recipe—another classic dish that brings 5-star flavor to your table in under 30 minutes.
Frequently Asked Questions (FAQs)
I get it—tackling a beloved restaurant classic can feel intimidating, and you want to get it right! Over the years, I’ve answered hundreds of questions about this recipe. Here are the answers to the ones that come up most often, so you can cook with total confidence.
Authenticity & Sauce
Yes, absolutely. This recipe was meticulously developed to be the ultimate copycat of the Olive Garden Chicken Scampi you know and love. We’ve captured the signature flavor profile created by the sautéed red and yellow bell peppers, sliced red onion, and generous amount of garlic. We insist on using thin chicken cutlets and delicate angel hair pasta, just like the restaurant. The only difference? Our sauce technique is even better, guaranteeing a silky, non-greasy result that puts even the restaurant version to shame.
This is the #1 most common problem with scampi, and the answer is simple: your sauce broke. This happens when the butter melts too quickly in a liquid that is too hot, causing the fat and the liquid to separate. It’s not your fault; most recipes don’t tell you how to prevent this! The guaranteed fix is the monter au beurre technique we use in this recipe. By removing the pan from the heat and whisking in cubed, cold butter, you create a stable, creamy emulsion instead of an oil slick. Following Step 4 of our instructions precisely will prevent a greasy sauce forever.
Substitutions & Pasta Choice
Yes! In fact, this recipe was written from the ground up to be completely wine-free. We accomplish this by creating a vibrant, flavorful sauce using a combination of quality, low-sodium chicken broth for a savory base and a generous amount of freshly squeezed lemon juice to provide that essential, bright, acidic “scampi” flavor. You get all the complexity and zing without a single drop of alcohol.
You can, but I highly recommend sticking with angel hair for the most authentic experience. The reason comes down to sauce-to-pasta balance. Our scampi sauce is light and delicate, not thick and heavy. It’s designed to perfectly cling to and coat the whisper-thin strands of angel hair. A thicker pasta, like spaghetti or fettuccine, would dominate the dish and wouldn’t get the same elegant coating. If you must substitute, go with the thinnest spaghetti you can find.
Rate, share, and let’s connect!
And there you have it—a restaurant-quality Chicken Scampi that I know will become a new favorite in your dinner rotation. Nothing makes me happier than seeing my recipes come to life in your kitchens.
I’d love to know how your Olive Garden Chicken Scampi turned out! Please leave a star rating below and share your experience in the comments. I’d especially love to hear your thoughts! What was your biggest ‘a-ha!’ moment with the monter au beurre sauce technique? Or if you added your own twist, share your tip below—it could help the next cook who makes this recipe!
For more easy, restaurant-quality pasta inspiration, be sure to check out my complete guide to Crave-Worthy Chicken Pasta.
And if you love the bright, satisfying flavors in this dish, I know you’ll also be a huge fan of my Creamy Lemon Chicken Pasta, another easy weeknight meal that tastes like a five-star dish.
For more of my tried-and-true, family-tested recipes, sign up for the KitchensLovers newsletter! You’ll get my latest creations delivered right to your inbox. No fluff, no spam—just easy, delicious dinners, every single time.
About Kate Thompson
Kate Thompson created KitchensLovers.com to simplify dinner for real-life families. She develops easy, flavor-packed chicken pasta recipes tested dozens of times to guarantee results. Her motto: ‘Easy Pasta, Every Time.’”
The Science of a Perfect Pan Sauce (A 60-Second Guide to Emulsification)
Ever wondered why a restaurant pan sauce feels so velvety and luxurious on your tongue, while a homemade version can sometimes feel thin or even greasy? The answer isn’t magic, it’s science. Specifically, it’s the science of emulsification.
At its core, a successful sauce is an emulsion: a stable mixture of fat and water, two things that famously don’t like to mix. Think of a simple vinaigrette—countless tiny droplets of oil are suspended in the vinegar, held together temporarily by the force of you shaking the jar.
Our scampi sauce is the same, but far more stable.
The Problem (Why Sauces Break):
When you toss a pat of room-temperature butter into a simmering pan, the butterfat melts almost instantly. The heat is too intense, and the fat molecules separate from the water and milk solids in the butter, pooling into that dreaded oil slick on top of your sauce.
The Solution (The Science of Monter au Beurre):
This classic French technique is a foolproof method to create a perfect, stable emulsion. Here’s the science behind why our method works every time:
- Kill the Heat: By moving the pan off the burner, you dramatically lower the temperature. This is the most crucial action. It ensures the butter won’t “shock” and break on contact.
- Use COLD Butter: Solid, cold butter melts slowly even in a warm pan. This slow melt is the secret. It gives you time to perform the next step.
- Agitate (Whisk or Swirl): As you continuously whisk or swirl the pan, you are physically breaking down the slowly melting butter into microscopic droplets. The water-based liquid in the pan (the broth and lemon juice) then rushes to surround these tiny fat droplets, holding them in a perfect, tight suspension.
The result is a sauce that is physically thickened by the emulsified fat. It feels creamy and rich, not greasy, and has a beautiful, glossy shine.
This isn’t a recipe-specific trick; it is a foundational technique of professional cooking. Understanding this simple bit of food science is one of the biggest things that separates amateur from professional results. For those who love to go deeper, respected culinary sites like The Spruce Eats explain this essential technique in detail. Now you have that secret, and you can use it to make any pan sauce flawless.
This recipe was last tested and updated in August 2025 to ensure perfect results.
Olive Garden Chicken Scampi (The Ultimate Copycat Recipe)
Equipment
- A large, light-colored skillet (12-inch)
- A Large Pot
- Tongs
- A Small Whisk
Ingredients
For the Chicken
- 1.5 lbs boneless skinless chicken breasts, sliced or pounded into 1/4-inch thick cutlets
- 1/2 cup all-purpose flour for dredging
- Kosher salt and freshly ground black pepper to taste
For the Signature Scampi Sauce & Veggies
- 1 tbsp olive oil
- 5 tbsp unsalted butter divided – 1 tbsp for searing, 4 tbsp cut into cold cubes for the sauce
- 1 medium red onion thinly sliced
- 1 red bell pepper thinly sliced
- 1 yellow bell pepper thinly sliced
- 6-8 cloves garlic minced
- 1/4 tsp red pepper flakes optional
- 1 cup low-sodium chicken broth
- 1 whole lemon juiced (about 3-4 tbsp)
- 1/4 cup fresh flat-leaf parsley chopped
For the Pasta
- 12 oz Angel Hair Pasta
Instructions
Step 1: Prepare the Chicken
- Pound the chicken breasts to a uniform 1/4-inch thickness if not already thin-sliced. Season both sides generously with salt and pepper.
- Spread flour on a shallow plate. Press each chicken cutlet into the flour to coat both sides, shaking off any excess.
Step 2: Sear the Chicken
- Heat 1 tbsp olive oil and 1 tbsp butter in a large skillet over medium-high heat. Once sizzling, place chicken cutlets in the pan in a single layer (work in batches if needed).
- Sear for 2-3 minutes per side until deep golden-brown. Remove chicken to a clean plate and set aside. Do not wipe out the pan.
Step 3: Sauté Veggies & Build Flavor
- Reduce heat to medium. Add sliced peppers and onions to the skillet. Cook, stirring occasionally, for 5-7 minutes until softened.
- Add minced garlic and red pepper flakes (if using). Sauté for 30-60 seconds until fragrant.
Step 4: Create the Silky Pan Sauce
- Pour in the chicken broth and lemon juice, scraping up all the browned bits from the bottom of the pan. Bring to a simmer for 2-3 minutes. This is the perfect time to drop your angel hair into boiling water—it will cook in 2-3 minutes.
- Turn off the burner and move the skillet COMPLETELY OFF THE HEAT. Add the 4 tbsp of cold butter cubes. Immediately whisk as the butter melts, creating a creamy, emulsified sauce.
Step 5: Combine and Serve
- Drain the cooked pasta and add it directly to the skillet. Return the seared chicken and any accumulated juices to the pan.
- Toss everything together with tongs until the pasta is fully coated. Stir in the fresh parsley. Serve immediately.
Notes
- The Secret to a Silky Sauce: The key is to take the skillet completely OFF the heat before whisking in COLD butter cubes. This creates a stable emulsion that will not turn greasy.
- Tender Chicken Cutlets: Pounding the chicken to an even 1/4-inch thickness is not optional! It guarantees the chicken cooks quickly and evenly, so it stays tender and juicy.
- Angel Hair Timing: This pasta cooks in just 2-3 minutes. Do not add it to the boiling water until your sauce is just about finished.
