
Let’s be honest, the question “What’s for dinner tonight?” can sometimes feel like the heaviest question of the day. You want something incredible, something that tastes like you spent hours simmering and stirring, but you have… maybe 30 minutes.
I’ve been there. So. Many. Times. I remember one particularly chaotic Tuesday evening, juggling work deadlines and helping with homework. My youngest, Mark, who was a champion-level picky eater, had declared all jarred sauces were “too weird.” In a moment of near-surrender, I grabbed what I had: some quality canned tomatoes, thin-sliced chicken breasts, garlic, and the faithful bag of pasta in the pantry. What happened next was kitchen magic. Mark didn’t just eat it—he asked for a second helping.
That was the night this very chicken pasta marinara sauce recipe was born. It’s been tweaked and perfected over the years, becoming a true cornerstone of my entire collection of Crave-Worthy & Restaurant-Style Recipes and our family’s emergency comfort meal.And now, it can be yours. This isn’t just another recipe; it’s your new secret weapon for winning dinner every single time.
Why This Recipe Is the Ultimate Solution
- Actually Fast, Actually Easy: This isn’t “fast” if you have a sous chef. It’s designed for real life. We use smart shortcuts that build massive flavor in just 30 minutes, with one main pan.
- A Sauce with Slow-Simmered Depth: I’ll show you how my specific technique blooms the aromatics to develop a rich, complex marinara flavor in just a few minutes.
- Perfectly Tender Chicken, Guaranteed: No dry, tough chicken here. My specific method ensures the chicken is perfectly cooked and juicy, infusing flavor right into the sauce.
- The Picky Eater Stamp of Approval: This is the dish that won over my toughest critic. It has that classic, comforting flavor profile that kids (and adults!) genuinely love.
Key Ingredients & Smart Swaps
This recipe relies on simple pantry staples to build a show-stopping meal. No fussy, hard-to-find ingredients here—just good, honest flavors.
- 4 thin-sliced chicken breasts
- 2 teaspoons garlic powder
- Kosher salt and black pepper
- 1 tablespoon butter
- 2 tablespoons olive oil (divided)
- 2-3 cloves garlic (minced)
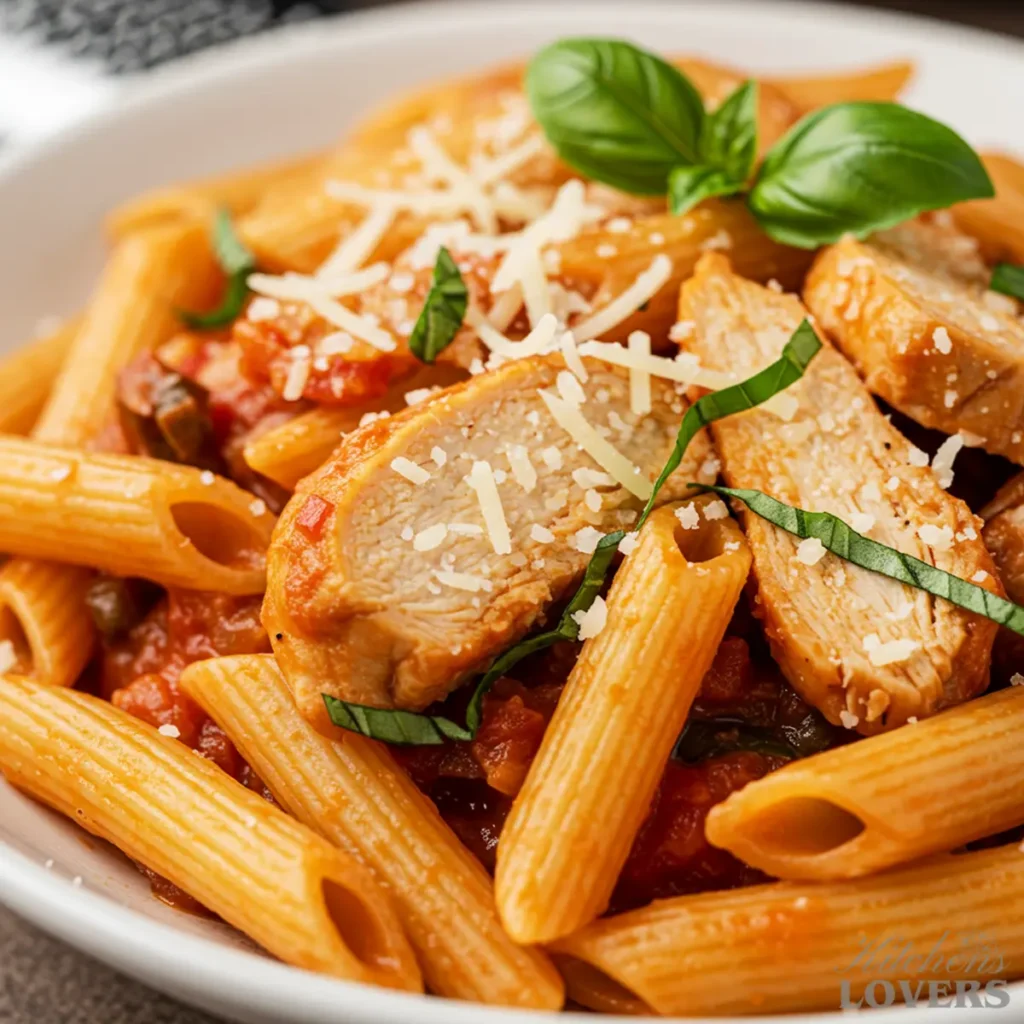
- 1 (28-ounce) can of crushed tomatoes
- 1 teaspoon dried oregano
- Pinch red pepper flakes.
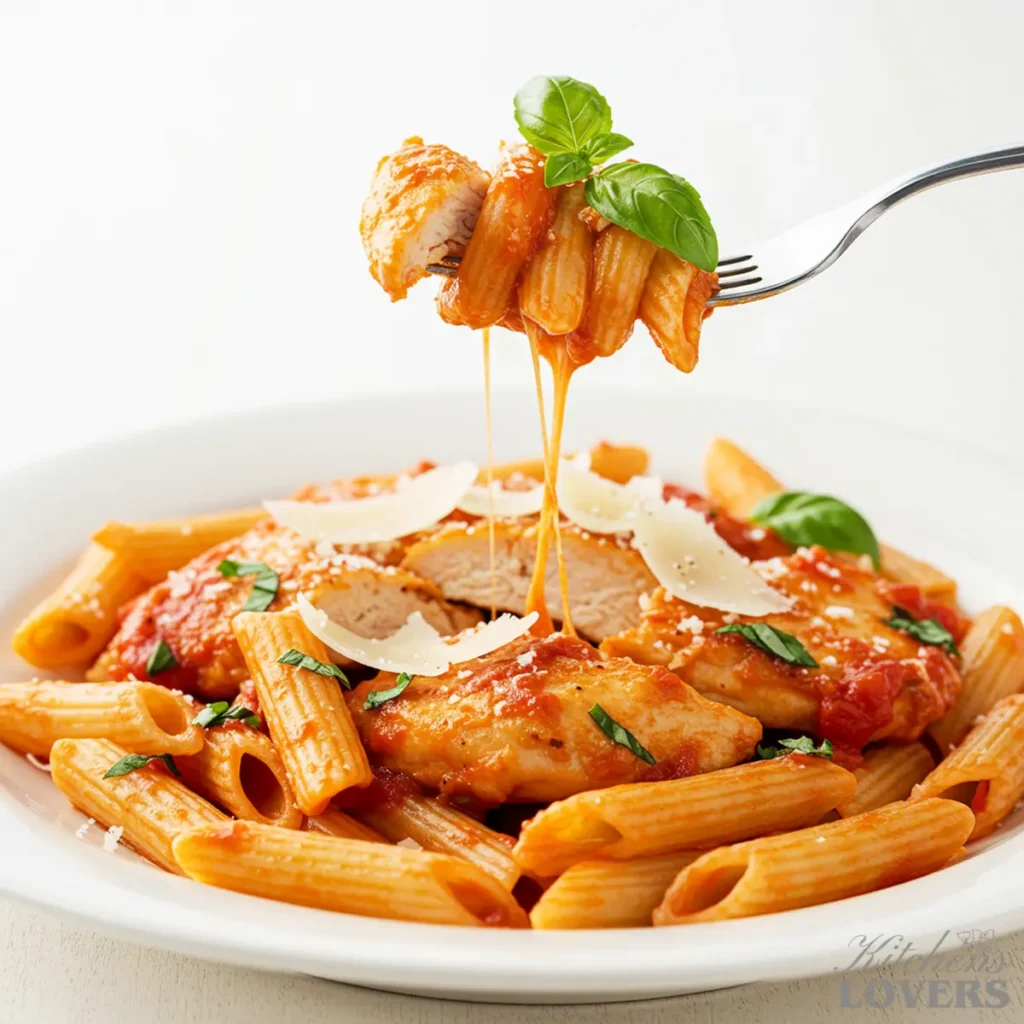
- 2-3 sprigs fresh basil (plus more for serving)
- 8 ounces of pasta (uncooked, like penne or ziti)
A quick note on a few of these choices. We use garlic powder on the chicken itself because it creates a beautiful, savory crust without any risk of burning—a problem you’d get using fresh minced garlic at this stage. And why use both butter and olive oil? It’s a classic chef’s trick: the olive oil gives you a higher smoke point for a perfect sear, while the butter adds that irreplaceable, rich flavor that takes the sauce to the next level.
The Two Stars of the Show
While every ingredient plays a role, there are two that truly make this recipe work its 30-minute magic.
- Why Thin-Sliced Chicken Breasts Are Essential: Have you ever made a chicken pasta dish where the chicken ended up… a little tough? Or took forever to cook through, forcing you to overcook your sauce? This is our secret weapon. Using thin-sliced chicken breasts ensures they cook incredibly fast and evenly. You get a perfect, tender bite every single time, and it allows us to build flavor in the pan without the long cook time. If you only have regular breasts, I highly recommend butterflying them yourself—it’s a game-changer.
- Why Crushed Tomatoes Are the Only Way to Go: For a quick marinara, the texture of your tomatoes is everything. Diced tomatoes stay too chunky. Whole tomatoes need a long simmer time to break down. Crushed tomatoes are the perfect middle ground; they have just enough texture to feel rustic and homemade, but they melt down into a velvety, luscious sauce in minutes. It’s the key to achieving that slow-simmered feel without any of the waiting.
Smart Swaps & Substitutions
I’m all about using what you have. Here are some simple swaps I’ve tested myself that work perfectly.
| Ingredient | Substitution | Why It Works |
| Pasta | Use any short-cut pasta you have! Penne, rigatoni, ziti, or bow-tie are great. Use gluten-free or whole wheat if you prefer. | The rustic marinara clings beautifully to shapes with ridges (like rigatoni or penne rigate), trapping sauce in every nook. This gives you the best sauce-to-pasta ratio in every single bite. |
| Crushed Tomatoes | Tomato puree (passata) will also work. If you only have canned diced or whole tomatoes, blend them quickly first. | This creates the ideal sauce velocity—thick enough to coat the pasta but smooth enough to feel luxurious. Unblended diced tomatoes won’t break down enough in a quick cook time. |
| Fresh Basil | If you don’t have fresh, substitute with 1 teaspoon of dried basil. | Dried herbs need heat and oil to rehydrate and release their essential oils. Adding dried basil with the oregano “blooms” its flavor, deeply infusing it into the sauce right from the start. |
| Chicken Breasts | You can use boneless, skinless chicken thighs cut into bite-sized pieces. | Thigh meat’s higher fat content makes it juicier and much harder to overcook. For perfect results and safety, cook the pieces until the internal temperature reaches 165°F (74°C). |
The One Pan That Makes It All Possible
Let’s talk about the real secret weapon behind this recipe’s “one-pot” magic. Yes, you read that right. The pasta, the sauce, the chicken—it all comes together in a single pan. But to pull this off flawlessly, your choice of pan is everything.
The Hero Tool: A Large, Heavy-Bottomed Skillet or Dutch Oven
This is the non-negotiable star of the show. You need one great pan that’s at least 12 inches wide with deep sides. The “heavy-bottomed” part is critical for two reasons. First, it distributes heat evenly, which is the key to getting a perfect, wall-to-wall golden-brown sear on the chicken without creating hot spots that will burn your garlic later. Second, it helps develop a beautiful fond—those sticky, browned bits left in the pan after searing the chicken. That fond is pure flavor, and it’s the foundation of our entire sauce. The pan’s large size is just as important; it ensures there’s enough room for the uncooked pasta to eventually be added directly into the sauce to cook. A small or flimsy pan will lead to crowding, steaming (instead of searing), and a potential mess. This single pan is your workspace for the entire dish.
Helpful Sidekicks for Your One-Pot Meal
With the hero pan chosen, a couple of simple tools make the process even smoother.
- Tongs: You’ll use these for flipping the chicken breasts. I’m firm on this: don’t use a fork! Poking holes in the chicken lets all those precious juices escape, leading to drier meat. Tongs let you gently turn the breasts, preserving every bit of tenderness.
- A wooden spoon or silicone spatula: When you deglaze the pan and build your sauce, this is what you’ll use. It allows you to scrape up every last bit of that flavorful fond from the bottom of the pan without scratching the surface. It’s your best friend for coaxing flavor into the sauce.
Expert Tips for Flawless Results
After making this chicken pasta marinara sauce more times than I can count, I’ve run into every possible pitfall. Think of me as your kitchen guardian angel; I’ve already made the mistakes so you don’t have to. Here’s how to sidestep the most common issues before they even start.
“Help! My chicken always turns out dry or rubbery.”
This is the number one fear when cooking chicken breasts, and I promise you, we can solve it for good. The culprit here is almost always the same thing: overcooking.
- The Fix: We fight this on two fronts. First, using thin-sliced breasts is our insurance policy, as they cook through in a flash. Second, you must trust the process. Sear them for just 2-3 minutes per side until golden brown and just cooked through. The biggest mistake is leaving them in the pan “for another minute just in case.” Pull them the moment they are done. They will rest on a plate while you make the sauce, and their final gentle heating in the warm marinara at the end is what guarantees they are perfectly juicy, not overcooked.
“What if my sauce is watery?”
Ah, the one-pot pasta dilemma. This happens when the liquid-to-pasta ratio is off. But don’t you dare add cornstarch! The solution is already in your pan.
- The Fix: Your best friend here is the pasta itself. As the pasta cooks in the sauce, it releases starches, which are natural and powerful thickeners. If it looks a little soupy at first, resist the urge to panic. Just let it simmer for another minute or two, stirring gently. The sauce will tighten up beautifully as that starchy magic happens. If, after the pasta is perfectly al dente, it’s still too thin for your liking, simply use a slotted spoon to remove the chicken and pasta to a bowl for a moment, then let the sauce alone reduce over medium heat for 3-4 minutes until it’s the perfect consistency.
“My tomato sauce tastes a bit sharp or acidic.”
Canned tomatoes are a modern miracle, but sometimes they can carry a harsh, acidic, or “tinny” flavor, especially before they’ve had a long time to simmer. We don’t have hours, so we use a pro-level shortcut.
- The Fix: Forget just dumping in sugar to mask the problem. My go-to trick is to add that small amount of butter along with the olive oil at the start. The milk solids in the butter mellow out the harsh edges of the acid in the tomatoes right from the get-go. If it still tastes a little sharp at the end, a tiny pinch of sugar (like, 1/4 teaspoon) can work wonders to create that perfect final balance. That combination is the simple, pro-level shortcut that reliably solves the problem without any guesswork. It works every time.
How to Make Chicken Pasta Marinara, Step by Step
This is where the magic happens. Grab your heavy-bottomed pan and let’s get cooking. Remember to read through the steps once before you begin—it’s the best habit any cook can have!
Time needed: 30 minutes
1. Prep and Season the Chicken
First, pat your thin-sliced chicken breasts completely dry with a paper towel. This is key for getting a great sear, not steaming them. Season both sides generously with the garlic powder, kosher salt, and freshly ground black pepper. Don’t be shy! This is your first layer of flavor.
2. Sear the Chicken (Don’t Overcook!)
Place your large skillet or Dutch oven over medium-high heat. Add 1 tablespoon of olive oil and the tablespoon of butter. Once the butter is melted and foaming, it’s ready. Gently place the seasoned chicken breasts in the pan. Make sure they have some space—don’t crowd them! Cook for about 2-3 minutes per side. You’re looking for a beautiful, deep golden-brown crust. Once they’re just cooked through, transfer them to a plate and set them aside. Fight every urge to slice into one!
3. Build the Sauce Foundation
Lower the heat to medium. Add the remaining tablespoon of olive oil to the same pan. Now, add your minced garlic and sizzle it for just 30-60 seconds until that nutty, irresistible aroma hits you. Be careful here—browned garlic is delicious; burnt garlic is bitter. Now, pour in the crushed tomatoes. They’ll hiss and bubble as they hit the hot pan. Use a wooden spoon to scrape up all those browned, flavorful bits (the fond!) from the bottom of the pan. This is non-negotiable for a deep-tasting sauce. Stir in the dried oregano and the pinch of red pepper flakes.
4. The One-Pot Magic: Cook the Pasta
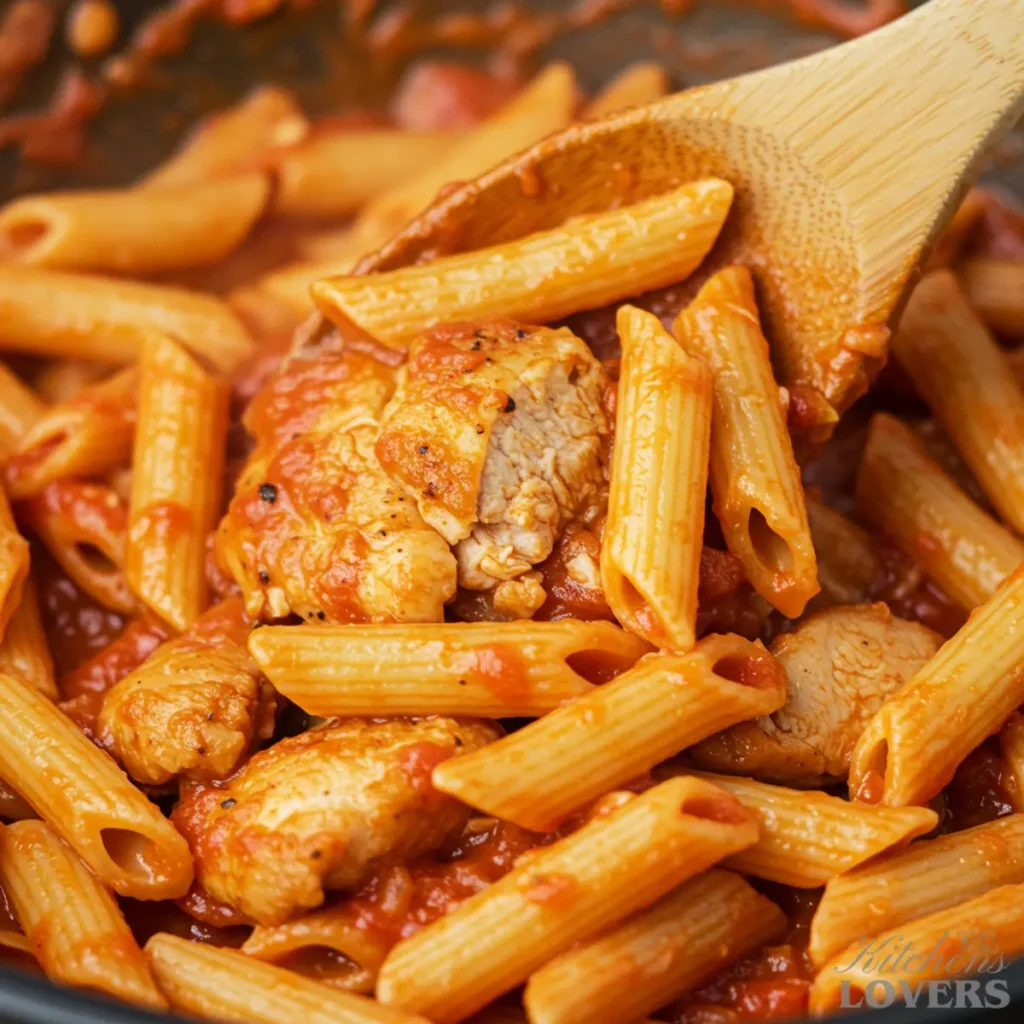
Okay, here’s where we break the rules. Bring the sauce to a lively simmer. Add 3 full cups of water (or chicken broth for extra flavor), a pinch of salt, and the fresh basil sprigs to the pan. Stir everything together. Now, pour the uncooked pasta directly into the sauce. Yes, really! Stir to make sure the pasta is submerged as best as possible. Let it cook at a steady simmer, stirring occasionally, for about 10-12 minutes, or until the pasta is cooked to your liking. The pasta will absorb the flavorful liquid, and its starches will thicken the sauce into a rich, creamy coating.
5. Bring It All Together
Once the pasta is al dente (tender with a slight bite), reduce the heat to low. Now, nestle the seared chicken breasts back into the pan, along with any juices that have collected on the plate. Spoon a little of the sauce over the chicken. Let everything mingle for another minute or two, just long enough for the chicken to warm through completely.
6. Serve Immediately
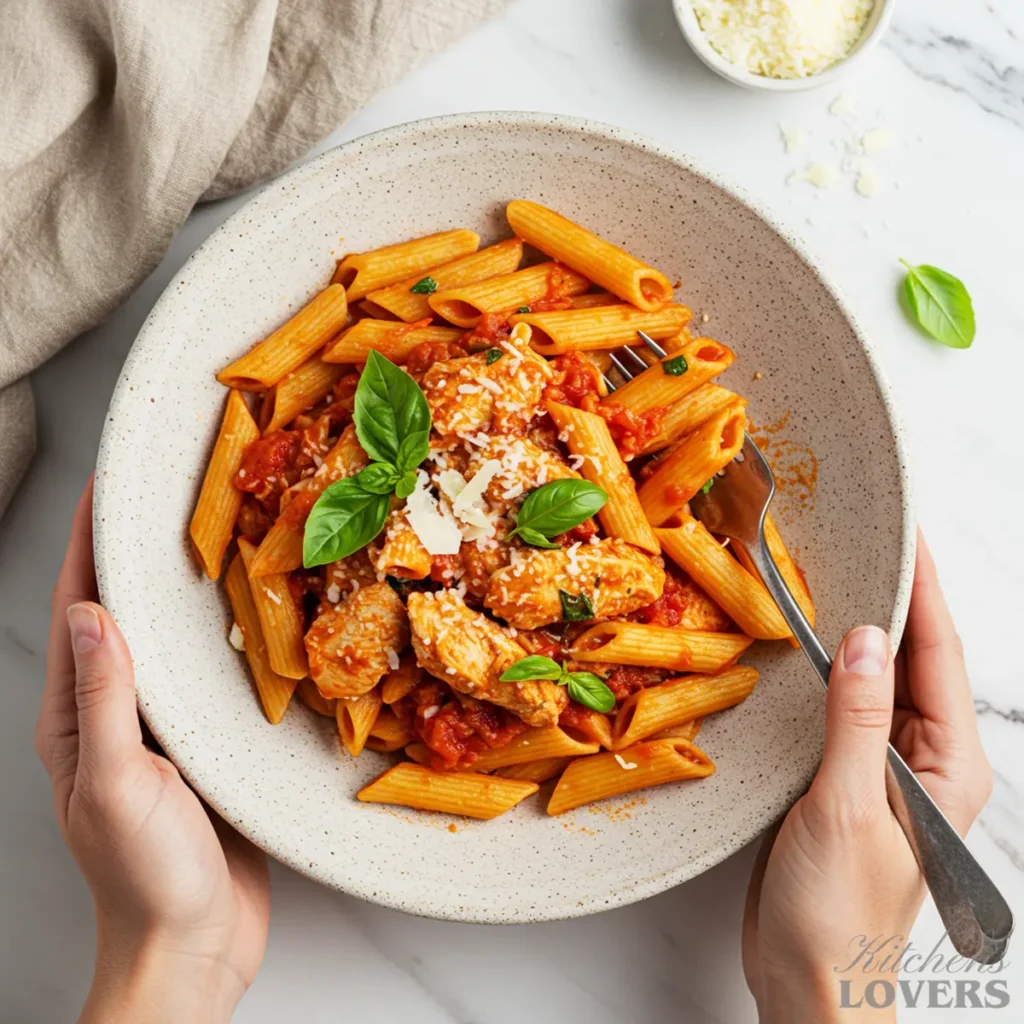
Take the pan right to the table! Discard the wilted basil sprigs, garnish with lots of fresh torn basil, and maybe add a generous sprinkle of parmesan cheese. Serve it up hot and enjoy the silence as everyone takes their first bite.
Pro Variations to Customize Your Dish
Once you’ve mastered the original recipe, you’ve officially earned a license to play. Think of the classic version as your perfect starting point. These are a few of my family’s favorite, time-tested variations that I know you’re going to love.
1. The “Creamy Dream” Rosa Variation
This is pure comfort in a pan. We’re talking about a rich, velvety tomato-cream sauce that coats every single piece of pasta. It’s unbelievably luxurious.
- How to do it: Follow the recipe exactly as written until you get to Step 5. When you add the chicken back to the pan, also pour in 1/2 cup of heavy cream. Stir it gently over low heat until the sauce turns a beautiful, creamy pink color and is warmed through. Do not let it boil, as this can cause the cream to separate. It’s a simple change that completely transforms the dish.
2. The Spicy & Savory Variation
If you like a bit of a fiery kick, this one’s for you. Adding spicy Italian sausage doesn’t just add heat; it infuses the entire sauce with a deep, savory pork flavor that is absolutely incredible. Trust me on this.
- How to do it: Before you even start with the chicken, brown 1/2 pound of spicy Italian sausage (casings removed) in your skillet over medium-high heat, breaking it apart with a spoon. Once it’s cooked through, use a slotted spoon to remove it to the same plate you’ll use for the chicken, leaving the rendered fat in the pan. Now, proceed with the recipe from Step 1, using that flavorful fat to sear your chicken. Add the cooked sausage back into the pan along with the chicken in Step 5. It’s a game-changer. The Italian sausage adds a wonderful kick of heat, and if you’re a true fan of bold and smoky flavors, you should also see how I use adobo peppers in my full Chipotle Chicken Pasta recipe.
3. The Loaded Veggie Variation
Looking to get more greens in or use up what’s in the fridge? This is how you do it without ending up with a watery mess.
- How to do it: The trick is to cook your veggies at the right time.
- For hearty vegetables like 1 chopped bell pepper, 1 cup of sliced mushrooms, or 1 diced zucchini, sauté them for 5-7 minutes right after you remove the chicken from the pan in Step 2. Then proceed with the garlic. Here is the secret to avoiding a watery sauce: when you get to Step 4, you must reduce the amount of added liquid. Add only 2.5 cups of water or broth instead of the full 3 cups. This compensates for the water the vegetables will release as they cook, guaranteeing a rich, flavorful sauce.
- For delicate greens like spinach or kale, you can stir in a few huge handfuls right at the very end, in Step 5. They will wilt down into the hot sauce in a minute or two.
Storing, Freezing & Reheating
There’s nothing better than knowing you have a container of this delicious pasta waiting for you for lunch the next day. But storing it correctly is key to preserving its flavor and texture.
Storing Leftovers
Leftovers are a gift! Once the pasta has cooled completely (never put a hot pan in the fridge), transfer it to an airtight container. It will keep beautifully for 3-4 days. Storing it properly prevents the sauce from drying out and the garlic notes from permeating everything else in your refrigerator.
A Note on Freezing
I get this question a lot, and I’m going to give you the honest-to-goodness truth: Pasta dishes with fully cooked noodles can be tricky to freeze. The pasta itself tends to absorb excess moisture and can become a bit soft or mushy upon reheating. It just won’t be as good as it was fresh.
- Your Best Bet (If You Plan Ahead): If you know you want to freeze this for a future meal, your absolute best move is to make the sauce with the chicken, freeze only that, and then cook fresh pasta on the day you plan to serve it. The sauce will freeze perfectly in an airtight container or freezer bag for up to 3 months.
- If you must freeze leftovers, you can. Just be aware of the texture change. Store it in a freezer-safe, airtight container for up to 2 months.
How to Reheat for Best Results
Please step away from the microwave. I know it’s fast, but it’s notorious for creating rubbery chicken and hot spots while leaving other parts ice cold. The stovetop is your best friend here, and it only takes a few extra minutes.
- The Method: Place the leftover chicken pasta marinara in a small skillet or saucepan over medium-low heat.
- Add a Splash of Liquid: Add a tablespoon or two of water or chicken broth to the pan. This is the most important step! It loosens up the congealed sauce, turning it velvety and delicious again as it heats.
- Heat Gently: Stir occasionally until everything is warmed through completely. This gentle, even heating preserves the texture of the chicken and allows the sauce to return to its former glory. It tastes almost as good as it did on night one. I promise it’s worth it.
What to Serve With This Dish
You’ve created a stunning one-pan meal, so the last thing you want to do is spend an hour making complicated side dishes. The beauty of this chicken pasta marinara is that it’s a complete meal on its own, but pairing it with one or two simple sides can elevate it into a full-on feast. My philosophy? Keep it simple, and focus on flavors that complement rather than compete.
A Simple Arugula Salad with Lemon Vinaigrette
This is my absolute favorite pairing. The richness of the tomato sauce and pasta just begs for something fresh, crisp, and a little bit sharp to cut through it and cleanse the palate between bites. A simple salad of baby arugula tossed in a zesty lemon vinaigrette does this perfectly. The peppery bite of the arugula is a beautiful contrast.
Proper Garlic Bread
You need something to make sure not a single drop of that incredible sauce goes to waste, right? Garlic bread is the classic, can’t-miss choice. Grab a crusty loaf of ciabatta or a baguette, slice it open, and slather it with a mixture of softened butter, minced fresh garlic, and a sprinkle of parsley. Bake at 375°F (190°C) for about 10-12 minutes until it’s golden and your whole house smells amazing.
Simple Roasted Broccoli or Asparagus
If you want to add another dose of green to the meal, simple roasted vegetables are the answer. My go-to is broccoli florets or asparagus spears. Just toss them on a sheet pan with a good drizzle of olive oil, a sprinkle of salt, and a crack of black pepper. Roast them in a hot oven (400°F / 200°C) until they are tender with those lovely little crispy, browned edges. Their earthy, slightly sweet flavor is a fantastic companion to the tangy marinara. It’s a simple technique.
Frequently Asked Questions (FAQs)
Here are a few more answers to some of the most common questions I get about this recipe. If you have another one, don’t hesitate to ask in the comments!
Health & Ingredients
Absolutely! The core recipe is already pretty balanced, but you can definitely make a few smart tweaks. For an easy health boost, use whole wheat pasta instead of regular semolina for extra fiber. You can also reduce the butter by half and ensure you’re using lean chicken breasts. The best way, in my opinion, is to load it up with vegetables using the ‘Loaded Veggie Variation’ I shared above—adding spinach, zucchini, or bell peppers is a fantastic way to increase the nutritional value without sacrificing flavor.
It absolutely can. While any standard can of crushed tomatoes will work just fine for a delicious sauce, if you happen to see a can of San Marzano tomatoes, grab them! They are a type of plum tomato grown in a specific region of Italy with a natural sweetness that creates a richer sauce. In fact, a taste test of the best canned tomatoes often shows a huge difference in quality between brands. Fire-roasted crushed tomatoes are another great option that adds a wonderful, smoky depth.
Prep & Flavor Adjustments
Yes, and this is one of my favorite time-saving strategies for busy weeks! You can make the entire sauce (Steps 3 and 4, but without the pasta or water) and store it in an airtight container in the fridge for up to 4 days. In fact, the flavor of the sauce often gets even better on the second day as the garlic and herbs meld. When you’re ready to eat, just bring the sauce to a simmer, add the water and uncooked pasta, and proceed with the recipe from there.
Of course. The pinch of red pepper flakes is in there to add a tiny bit of warmth and balance the sweetness of the tomatoes, not to make the dish overtly “spicy.” However, if you have sensitive palates (I’m looking at you, kids!), you can leave it out completely. The dish will still be absolutely delicious and packed with flavor from the garlic and oregano. This recipe was born out of winning over a picky eater, after all.
Your Turn to Make Some Magic!
There you have it—my family’s absolute favorite one-pan meal, ready to become yours.
I truly believe the best part of sharing recipes is hearing how they work in your kitchen. Tried this Ultimate Chicken Pasta Marinara Sauce recipe? I’d love to know what you think! Did you try one of the variations? Did it win over a picky eater in your house, too?
Please leave a comment and a star rating below to let me know how it went. I especially love seeing how you make these recipes your own—be sure to tell me about your version in the comments!
More Dinner Inspiration from My Kitchen
If you loved this recipe and the “Easy Pasta, Every Time” philosophy behind it, then your journey is just beginning. The next logical step is to dive into my complete cornerstone collection: Crave-Worthy & Restaurant-Style Chicken Pasta Recipes. It’s where I share all my family’s most beloved, tested, and perfected dishes.
Don’t Miss a Single Recipe!
Want more foolproof, family-tested recipes just like this one delivered right to your inbox? Sign up for the KitchensLovers newsletter! You’ll get my best tips, new recipes, and seasonal ideas designed to make your life easier and more delicious.
About Kate
Kate Thompson created KitchensLovers.com to simplify dinner for real-life families. She develops easy, flavor-packed chicken pasta recipes tested dozens of times to guarantee results. Her motto: ‘Easy Pasta, Every Time.’
This recipe was last tested and updated in June 2025 to ensure perfect results.
Chicken Pasta Marinara Sauce Recipe
Equipment
- A Large, Heavy-Bottomed Skillet or Dutch Oven
- Tongs
- A Wooden Spoon or Silicone Spatula
Ingredients
- 4 thin-sliced chicken breasts
- 2 teaspoons garlic powder
- Kosher salt and black pepper to taste
- 1 Tablespoon butter
- 2 Tablespoons olive oil divided
- 2-3 cloves garlic minced
- 1 28 ounce can crushed tomatoes
- 1 teaspoon dried oregano
- 1 pinch red pepper flakes
- 2-3 sprigs fresh basil plus more for serving
- 8 ounces pasta uncooked, like penne or ziti
- 3 cups water or chicken broth
Instructions
- Pat your thin-sliced chicken breasts completely dry with a paper towel. Season both sides generously with the garlic powder, kosher salt, and freshly ground black pepper.
- Place your large skillet or Dutch oven over medium-high heat. Add 1 tablespoon of olive oil and the tablespoon of butter. Once the butter is melted and foaming, gently place the seasoned chicken breasts in the pan. Cook for about 2-3 minutes per side until they’re golden brown and just cooked through. Transfer them to a plate and set them aside.
- Lower the heat to medium. Add the remaining tablespoon of olive oil. Add your minced garlic and sizzle it for just 30-60 seconds until aromatic. Pour in the crushed tomatoes and use a wooden spoon to scrape up all those browned bits (the fond) from the bottom of the pan. Stir in the dried oregano and the pinch of red pepper flakes.
- Bring the sauce to a lively simmer. Add 3 full cups of water (or chicken broth), a pinch of salt, and the fresh basil sprigs to the pan. Pour the uncooked pasta directly into the sauce. Stir to make sure the pasta is submerged. Let it cook at a steady simmer, stirring occasionally, for about 10-12 minutes, or until the pasta is al dente.
- Once the pasta is ready, reduce the heat to low. Nestle the seared chicken breasts back into the pan, along with any juices that have collected on the plate. Let everything mingle for another minute or two.
- Discard the wilted basil sprigs, garnish with lots of fresh torn basil and parmesan cheese. Serve immediately.
Notes
- Pro Tip – Watery Sauce: Don’t panic if the sauce looks watery at first. As the pasta cooks, it releases starches that will thicken it naturally.
- Pro Tip – Variations: To make a creamy rosa sauce, stir in 1/2 cup of heavy cream at the end over low heat.
- Pro Tip – Reheating: For best results, reheat leftovers gently on the stovetop with a splash of water or broth to loosen the sauce.
