
Let’s be honest. For years, I was on a mission—a borderline obsession—to solve the great “soggy chicken” dilemma. You know what I’m talking about. You spend all this time carefully breading and pan-frying beautifully golden chicken cutlets, only to bury them in a sea of pasta and sauce where they turn… well, soft. Defeated.
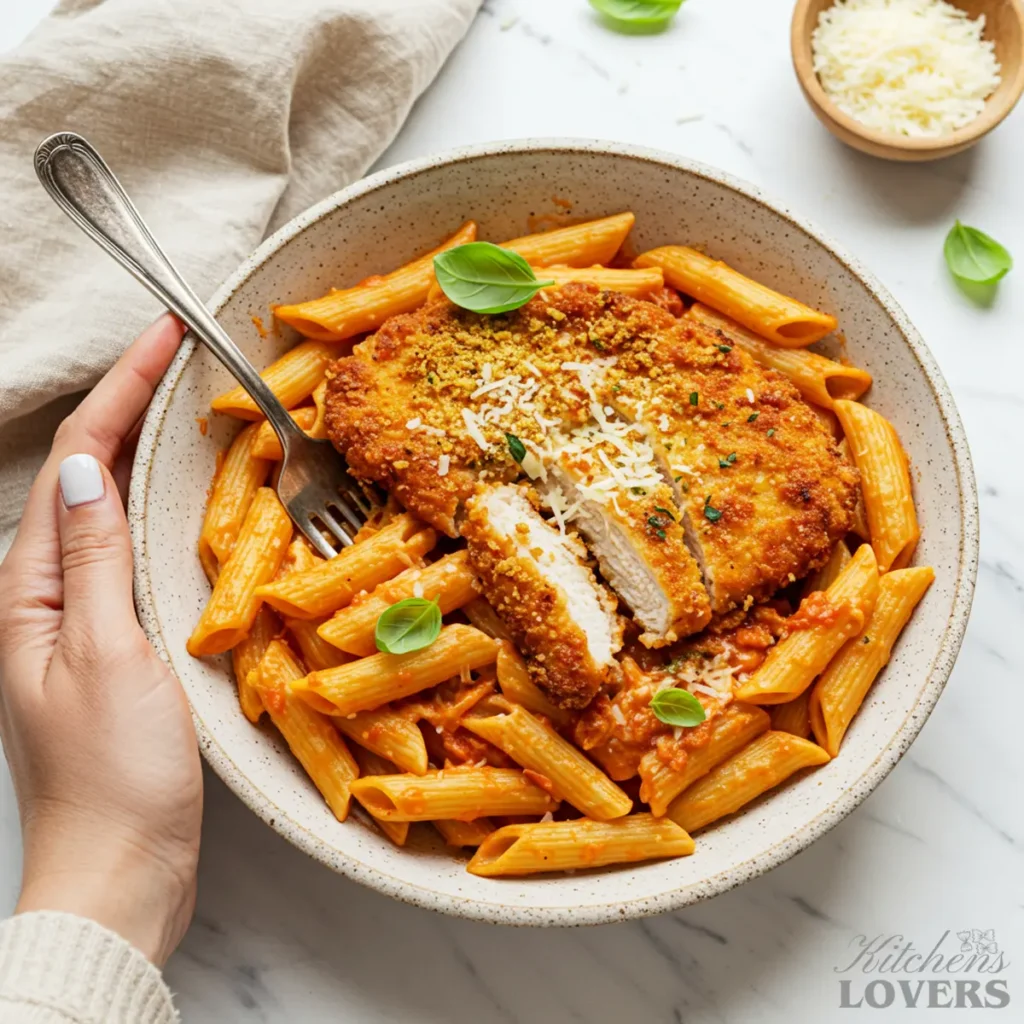
That first bite should be a glorious combination of textures: a shatteringly crisp crust, tender chicken, silky pasta, and a rich, bright tomato sauce, all crowned with that blanket of glorious, bubbly cheese. It shouldn’t be a one-note mush. After dozens (and I do mean dozens) of tests in my own kitchen, I cracked the code. This isn’t a one-pot meal that sacrifices texture for convenience. This is the real deal.
This is the Chicken Parmesan Pasta recipe that delivers on its promise every single time. We’re keeping that perfect chicken crispy right up until the moment it hits your fork.
Why This Recipe Works (And Others Don’t)
- Truly Crispy Chicken, Guaranteed: We use a specific three-step breading process, and, most importantly, we serve the magnificent, crispy cutlet over the pasta—not tossed into the sauce to get soggy. It’s a game-changer.
- Rich, From-Scratch Marinara: Forget bland, one-pot sauces. We build a quick but deeply flavorful tomato-basil sauce that tastes like it simmered all day, providing the authentic “chicken parm” foundation.
- Two Foolproof Methods: Whether you want a quick 30-minute stovetop dinner or the ultimate bubbly-cheese baked version, this recipe gives you clear instructions for both. Your kitchen, your rules.
- The Ultimate Crunchy Topping: We don’t just melt cheese on top. We create a garlic-and-herb panko topping that gets toasted separately, ensuring every bite has that irresistible crunch.
Of course. Great ingredients are the foundation of any unforgettable meal. Think of this list not just as a set of instructions, but as your roadmap to a truly restaurant-quality result right in your own kitchen. We aren’t cutting corners here; we’re building layers of incredible flavor from scratch.
Key Ingredients for the Perfect Chicken Parmesan Pasta
The Crispy Chicken Cutlets:
- 1 ½ lbs Boneless, Skinless Chicken Breasts (about 2 large breasts), sliced in half horizontally to create 4 thin cutlets
- ½ cup all-purpose flour
- 2 large eggs, beaten
- 1 ½ cups Panko Breadcrumbs
- ½ cup freshly grated Parmesan cheese
- 1 tsp Dried Oregano
- 1 tsp Garlic Powder
- 1 tsp salt
- ½ tsp Black Pepper
- ¼ cup olive oil, plus more if needed for frying
The Rich Marinara Sauce & Pasta:
- 12 oz rigatoni or penne: I strongly recommend a tube-like pasta like this. The ridges are perfect for catching every bit of our rich marinara sauce.
- 1 (28-ounce) can of high-quality crushed tomatoes: This is the heart of our sauce, so don’t skimp here. A quality brand makes a world of difference.
- 1 medium yellow onion, finely chopped
- 4 cloves garlic, minced
- ½ cup fresh basil, chopped or torn
The Bubbly Cheese & Panko Topping:
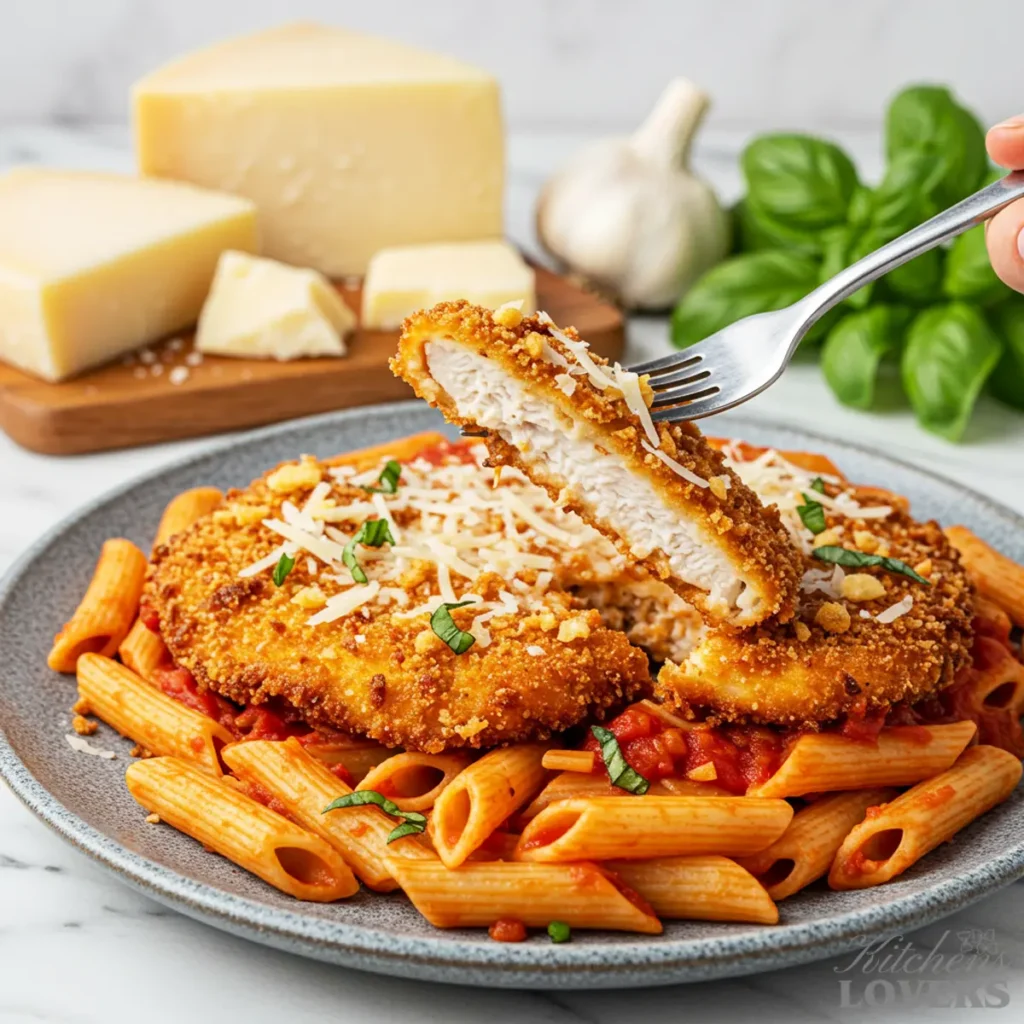
- 8 oz block of low-moisture mozzarella cheese: Pro Tip: For the ultimate gooey, melty cheese pull, you MUST buy it in a block and shred it yourself. Pre-shredded cheese is coated in anti-caking powders that absolutely kill a perfect melt. This is a non-negotiable for a restaurant-quality result.
- ½ cup Panko Breadcrumbs
- ¼ cup grated Parmesan cheese
- 2 tbsp Unsalted Butter, melted
The Two Secrets to a Genuinely Crispy Crust
1. Thinly Sliced Chicken Breasts: Starting with thin cutlets (about ½-inch thick) is non-negotiable. Why? First, it ensures the chicken cooks through quickly and evenly at the same rate the breading gets perfectly golden brown. No more cutting into a beautiful crust only to find the chicken inside is still undercooked. Second, it creates the ideal ratio of crispy coating to tender, juicy meat in every single bite.
2. All-Purpose Flour: Don’t skip the initial dredge in flour! It might seem like an insignificant step, but it’s the scientific foundation for a crust that won’t fall off. The light coating of flour absorbs any surface moisture on the chicken, creating a perfectly dry, starchy canvas for the egg wash to cling to. Without it, the egg will just slide off, taking your expensive breadcrumbs with it into the pan.
Smart Swaps & Substitutions
| Ingredient | Best Substitute | Notes & Why It Works |
| Thin Chicken Breasts | Thinly-pounded chicken thighs or pork cutlets. | Thighs offer richer flavor. Both need to be pounded to an even ½-inch thickness to ensure proper cooking time. |
| Panko Breadcrumbs | Coarse, homemade breadcrumbs or standard fine breadcrumbs. | Panko gives the lightest, crispiest texture, but if you’re in a pinch, others will work. The crust will just be a bit denser. |
| Fresh Basil | 1.5 teaspoons of dried basil. | Add dried basil in with the sauce to simmer and rehydrate. It won’t have the same vibrant punch but will provide that classic flavor. |
| Shred-Your-Own Mozzarella | Pre-shredded low-moisture mozzarella. | This is your fallback! As noted, pre-shredded cheese is often coated in starches to prevent clumping, which can hinder a perfect, gooey melt. |
The Right Tools for a Flawless Finish
You don’t need a kitchen full of complicated gadgets to pull this off. Not at all. But after making this dish countless times, I can tell you that a few key pieces of equipment make the process smoother and guarantee that glorious, restaurant-quality result we’re all after.
A Large, Oven-Safe Skillet (Your Recipe’s MVP):
If you have a 12-inch cast-iron skillet, now is its time to shine. The heavy bottom provides incredible, even heat for a perfect golden-brown sear on the chicken. But the real magic is its versatility. This single pan will sear your chicken, build your sauce, and then go straight into the oven or under the broiler for that final, bubbly cheese blanket. This means no messy transfer to another baking dish, a seamless workflow, and, frankly, less cleanup. If you don’t have cast iron, any large, deep, oven-safe stainless steel skillet will work beautifully too.
A Proper Breading Station:
This just means setting up three wide, shallow dishes (pie plates or pasta bowls are perfect). They give you enough room to properly coat the chicken in the flour, egg, and panko without cramping your style or making a huge mess of the countertop.
A Large Stockpot:
This is for cooking your pasta. The secret to perfectly cooked pasta that doesn’t clump is giving it plenty of room to move in lots of salted water. A large volume of water also maintains a rolling boil after you add the pasta, ensuring it cooks evenly from the moment it goes in.
Sturdy Kitchen Tongs:
I consider these essential. Tongs are for flipping the delicate chicken cutlets without piercing that beautiful crust you just created. A fork can puncture the breading, letting oil seep in and creating a greasy result. Tongs protect the crust. They’re also ideal for gently tossing the pasta with the sauce later on.
That’s it! Just the right tools for the job.
Expert Tips for Flawless Results (Proactive Troubleshooting)
Anyone can follow a recipe. But I want to arm you with the experience I’ve gained over the years so you can sidestep common problems before they even happen. Think of this as our pre-cooking game plan.
How do I get my breading to actually stick and stay crispy?
This is the million-dollar question, and solving it is the very soul of this recipe. Here is my foolproof system.
- The Triple-Coat Is Mandatory: The flour-egg-panko setup isn’t just a suggestion; it’s the foundation. First, a light coat of flour gives the wet egg something to cling to. Without it, the egg wash just slides off. Then the egg acts as the “glue” for the panko. It’s a chain of custody for your crust.
- Press the Panko Firmly: When you get to that final breading step, don’t just lightly dip. Use your dry hand to gently but firmly press the panko flakes onto all sides of the egg-washed cutlet. This mechanically locks the breading in place and ensures a thick, even crust that won’t abandon ship in the hot oil.
- Use a Wire Rack, Always: This is the most common mistake I see. When you pull the beautifully fried chicken from the pan, never, ever place it on a plate or paper towel. That traps steam underneath, instantly turning that crispy bottom into a soft, sad mess. An elevated wire rack is your best friend—it lets air circulate all around the cutlet, keeping it shatteringly crisp while it rests.
How do I know my oil is hot enough (and avoid greasy chicken)?
Greasy chicken is a direct result of oil that isn’t hot enough. When the oil is at the right temperature, it instantly sears the outside of the breading, creating a waterproof seal that locks moisture in and keeps excess oil out. If the oil is too cool, the breading just soaks it up like a sponge. Here’s how to nail it:
- Look for the Shimmer: Pour your oil into the skillet and watch it closely over medium-high heat. Before it starts to smoke, you’ll see the light catching on little “shimmers” or waves rippling across the surface of the oil. That’s your first sign that it’s nearly ready.
- The Panko Test: For absolute certainty, drop a single panko flake into the hot oil. If it immediately starts to sizzle and fry vigorously, your oil is ready. If it just sort of floats there looking bored, give the oil another minute or two to heat up. Don’t add the chicken until you get that immediate, enthusiastic sizzle.
What’s the best way to organize my workflow so I’m not overwhelmed?
A chaotic kitchen leads to mistakes. A calm, organized kitchen leads to deliciousness. This is a dish with a few moving parts, but you can master the timing with this simple plan of attack:
- Prep First (Mise en Place): Before you turn on a single burner, do everything else. Chop your onion and garlic. Get your canned tomatoes opened. Shred your cheese. Set up your three breading stations. This 10 minutes of prep will make the entire cooking process feel calm and controlled.
- Start Your Water: As soon as your prep is done, get a large stockpot of salted water on the stove and set it to boil.
- Bread & Sear: While the water is coming up to a boil, you can bread all of your chicken cutlets. Once the water is boiling, drop your pasta in, give it a stir, and then begin searing the chicken. They cook in about the same amount of time.
- Finish the Sauce: Once your chicken is seared and resting beautifully on its wire rack, use that same skillet to build your sauce. Your pasta should be perfectly al dente right when your sauce is ready. It all comes together beautifully.
Step-by-Step Instructions for the Ultimate Stovetop Chicken Parmesan Pasta
Follow these steps in order, and I promise you a fantastic result. Remember to read through them once before you begin so you know the flow. Let’s go!
Time Needed: 1h5minutes.
1. Prep and Cook the Pasta
- Boil the Water: Fill that large stockpot with generously salted water and bring it to a rolling boil.
- Cook the Pasta: Add your rigatoni or penne and cook according to package directions until it’s just al dente—firm, with a slight bite. You don’t want it mushy, as it will cook a little more in the sauce.
- Save That Water! Just before you drain the pasta, scoop out about a cup of the starchy, salty pasta water and set it aside. This liquid gold is the secret to a silky, perfectly emulsified sauce later on. Now, drain the pasta and set it aside.
2. Bread the Chicken Cutlets (The Crispy Crust Station)
- Set Up Your Station: Grab three shallow dishes.
- Dish 1: Add the all-purpose flour.
- Dish 2: Beat the 2 eggs until smooth.
- Dish 3: Combine the 1 ½ cups panko, ½ cup Parmesan, dried oregano, garlic powder, salt, and pepper. Give it a good mix with a fork.
- Coat the Chicken: Now, working one cutlet at a time:
- First, dredge the chicken in the flour, shaking off any excess. It should be just a light, dusty coating.
- Next, dip the floured cutlet into the beaten eggs, letting any excess drip back into the bowl.
- Finally, lay the egg-coated cutlet in the panko mixture. Use your dry hand to press the breadcrumbs firmly onto both sides of the chicken. This ensures a nice, thick crust.
- Place the finished, breaded cutlet on a clean plate and repeat with the remaining chicken.
3. Pan-Fry the Chicken to Golden Perfection
- Heat the Skillet: Place your large, oven-safe skillet over medium-high heat and add the ¼ cup of olive oil. We choose olive oil not just for its classic flavor in this dish, but because it is a primary source of heart-healthy monounsaturated fats, making it a fantastic choice for searing. Give it a minute or two to heat up. You’ll know it’s ready when you see it shimmer or when a single panko flake sizzles immediately upon contact.
- Sear the Chicken: Carefully place two chicken cutlets in the hot oil. Don’t overcrowd the pan, as that will lower the oil temperature and steam the chicken instead of frying it. Cook for about 3-4 minutes per side, until they are a deep golden brown and outrageously crispy. You should hear a constant, aggressive sizzle.
- Rest the Cutlets: As soon as they are perfectly cooked, transfer them to a wire rack to rest. Never put them on a plate! Repeat with the remaining two cutlets, adding a bit more oil to the pan if it looks dry.
4. Build Your Rich Pan Sauce
- Sauté the Aromatics: Reduce the heat to medium. There should still be a thin layer of olive oil in the pan, full of flavor from the chicken. If the pan is too dry, add another tablespoon. Add the chopped onion and cook, stirring occasionally, for about 4-5 minutes, until it softens and becomes translucent.
- Bloom the Garlic: Add the minced garlic and cook for just 30-60 seconds, stirring constantly. You just want to sizzle the raw bite out of it and unleash that incredible, nutty aroma. Don’t let it burn!
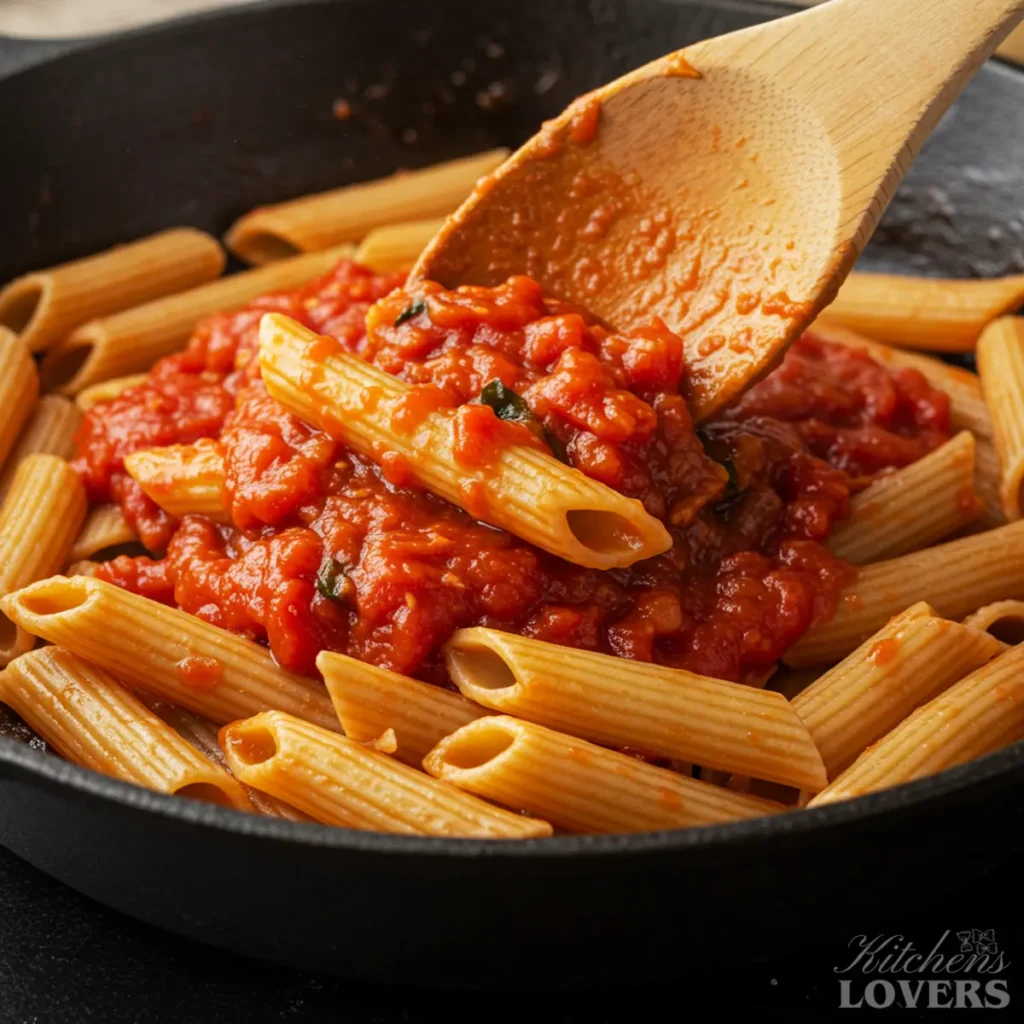
- Deglaze and Simmer: If you’re using wine, pour it in now. It will bubble up and sizzle. Use a wooden spoon to scrape up all those delicious brown bits (called ‘fond’) from the bottom of the pan. Let the wine cook off for a minute, then pour in your can of crushed tomatoes. Give it a good stir.
- Season and Simmer: Season the sauce with a pinch of salt and pepper. Bring the sauce to a gentle simmer and let it cook for about 5-7 minutes, just to let the flavors meld together. It will thicken up slightly, and the color will deepen.
5. Bring It All Together (The Stovetop Finale)
Your sauce is simmering, the chicken is resting, and the pasta is drained. Now, we’ll bring it all home in the final few minutes. It happens fast, so have your ingredients ready.
- Prepare the Crunchy Topping: While the sauce has its final simmer, make the topping. In a small bowl, combine the ½ cup of panko, ¼ cup of grated Parmesan, and ½ tsp of garlic powder. Pour the 2 tbsp of melted butter over the mixture and toss with a fork until all the crumbs are evenly coated. Toast this mixture in a separate small, dry skillet over medium heat, stirring constantly for 2-3 minutes, until it’s fragrant and a beautiful golden-brown. Remove from the heat and set aside. This is your secret weapon.
- Combine Pasta and Sauce: Turn the heat on the marinara to low. Add your cooked, drained pasta directly into the skillet with the sauce. Toss everything gently to coat every single noodle. If the sauce seems too thick, stir in a splash of that reserved pasta water until it’s silky and clings beautifully to the pasta.
- Finish with Basil: Stir in the fresh, chopped basil for a burst of fresh, herbal aroma. Now, give it a taste. Adjust for seasoning if you think it needs it.
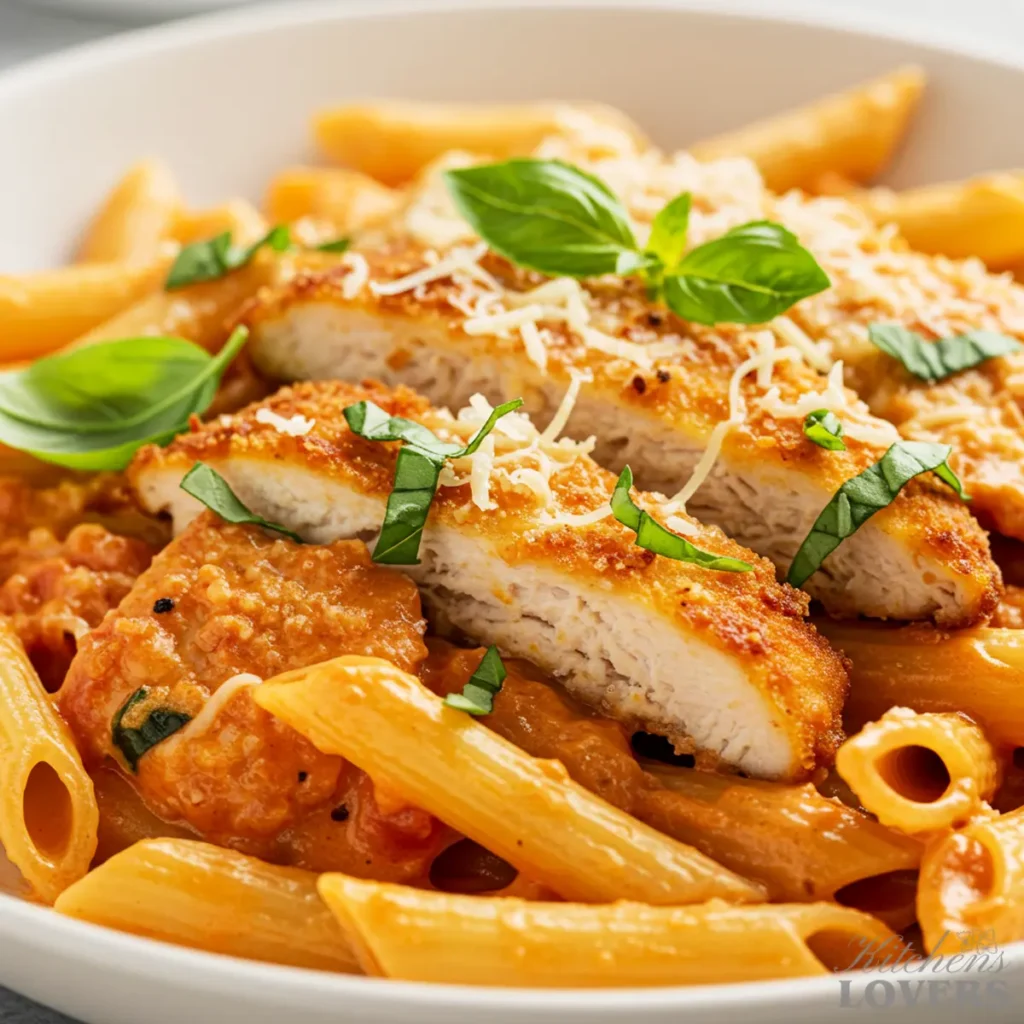
- Assemble and Crown the Dish: You can either plate the saucy pasta into individual bowls or serve it family-style right from the skillet. Slice your crispy chicken cutlets or leave them whole and arrange them directly on top of the pasta.
- Melt the Cheese & Serve: Immediately sprinkle the freshly shredded mozzarella over the hot chicken, followed by a generous spoonful of your prepared crunchy topping. To melt the cheese into a gooey blanket, simply place a lid on the skillet for 1-2 minutes. The trapped heat will melt the cheese perfectly without sogging the crust. Serve immediately, ensuring everyone gets a bit of everything in their first incredible bite.
Pro Variations to Make It Your Own
Once you’ve mastered the core recipe, you can start having fun and tailoring it to your specific tastes or what you have in the pantry. A great recipe should always be a starting point. Here are three tested, approved variations that I absolutely love.
The Ultimate Upgrade: Baked Chicken Parmesan Pasta
If you want that classic, casserole-style, bubbling-cheese-all-over experience, the oven is your best friend. This method creates a slightly more melded, super-cozy version where the edges of the pasta get a little toasty and the cheese is undeniably superior. It’s perfect for making just ahead of time.
- Preheat Your Oven: Get the oven preheating to 400°F (200°C).
- Follow the Recipe Through Step 5.1: Go through all the steps of making the sauce and tossing it with the cooked pasta right in your oven-safe skillet.
- Layer the Dish: Now, smooth the saucy pasta into an even layer in the skillet (or transfer it to a 9×13-inch baking dish if your skillet isn’t oven-safe). Nestle the crispy chicken cutlets right on top, sinking them slightly into the pasta.
- Blanket with Cheese: Sprinkle the shredded mozzarella evenly over the chicken cutlets and the exposed pasta around them.
- Bake to Bubbly Perfection: Slide the skillet into the hot oven and bake for 10-15 minutes. You’re not trying to cook anything, just to heat it through and melt the cheese until it’s bubbly and just beginning to brown in spots.
The Spicy ‘Arrabbiata Style’ Twist
Do you like a little kick? “Arrabbiata” literally means “angry” in Italian, and a little bit of heat makes this rich tomato sauce sing. It’s a simple, fiery upgrade.
How to do it: When you add the minced garlic in Step 4.2 of the main instructions, also add ½ to 1 teaspoon of red pepper flakes. Let them sizzle in the oil with the garlic for about 30 seconds to “bloom” their flavor before you deglaze with the wine. This will create a sauce with a gentle, warming heat throughout. Start with ½ teaspoon; you can always add a pinch more later if you feel it needs it.
The Creamy Tomato-Basil Dream
Sometimes you crave richness and luxury. A little bit of cream completely transforms the marinara into a silky, decadent rosé-style sauce that is pure comfort food.
How to do it: At the very end of cooking the sauce (in Step 5.1, right before you add the pasta), turn the heat to the absolute lowest setting and stir in ¼ cup of heavy cream. It’s crucial that you do not let the sauce boil after adding the cream, as it can cause it to separate. Stir gently until the sauce turns a uniform, beautiful pinkish-orange color, then proceed with the recipe as written. It creates a wonderfully rich sauce that clings perfectly to every noodle.
Storing, Freezing, & Reheating for Day-Two Success
Let’s face it, one of the best parts of making a big batch of Chicken Parmesan Pasta is knowing you have incredible leftovers waiting for you. But how do you keep that chicken from turning into a soggy mess in the fridge? The secret is simple: store the components separately.
Storing Leftovers in the Refrigerator
This is non-negotiable. If you just mix everything together and toss it in a container, you are guaranteeing a soft crust. Don’t do it!
- For the Pasta and Sauce: Combine the saucy pasta and store it in an airtight container in the refrigerator for up to 4 days.
- For the Crispy Chicken: Allow the chicken cutlets to cool completely to room temperature. This is key, as any warmth will create steam in the container. Once cool, place the cutlets in a separate airtight container. You can place a small piece of parchment paper between layers if you need to stack them. They will stay perfectly crisp this way for up to 3 days.
- For the Crunchy Topping: Store any leftover panko topping in a small airtight container at room temperature.
The Best Way to Reheat (To Make It Crispy Again!)
The microwave is the absolute worst enemy of your crispy chicken. It will make the breading steamy and soft in seconds. For the best results, you need a dry heat source. Trust me on this—it’s worth the extra five minutes.
- Preheat Your Oven or Air Fryer: Set your oven or toaster oven to 375°F (190°C). An air fryer also works wonders here, preheated to the same temperature.
- Reheat the Chicken: Place the cold chicken cutlets on a baking sheet or in the air fryer basket. Bake for 5-8 minutes, until the crust has re-crisped and the chicken is heated through. You’ll literally hear the crunch return.
- Reheat the Pasta: While the chicken is in the oven, gently reheat the pasta and sauce in a skillet over medium-low heat, stirring occasionally. You can also pop it in the microwave—it’s fine for the pasta, just not the chicken! Add a splash of water or broth if the sauce has gotten too thick.
- Assemble and Serve: Once everything is hot, assemble your plate just as you did on day one: a bed of hot pasta, topped with your gloriously crispy reheated chicken and a sprinkle of the panko topping. It will be almost indistinguishable from the first night.
A Note on Freezing
This dish freezes surprisingly well if you do it right. Again, separation is key.
- Freezing the Chicken: Lay the completely cooled, cooked chicken cutlets on a baking sheet and “flash freeze” them for 30 minutes until solid. Then, transfer them to a freezer-safe zip-top bag, pressing out as much air as possible. They will keep for up to 3 months.
- Freezing the Sauce: The tomato sauce freezes beautifully. Store it in a freezer-safe container for up to 3 months. I recommend freezing the sauce separately and just cooking fresh pasta when you’re ready to eat, but you can also freeze the cooked-pasta-and-sauce mixture.
To reheat from frozen, bake the chicken cutlets from frozen at 400°F (200°C) for 15-20 minutes, and thaw and reheat the sauce on the stovetop.
Unforgettable Sides That Go Beyond the Obvious
This dish is a powerhouse, so we need sides that can stand up to it while offering a genuinely interesting contrast in flavor and texture. Anyone can serve garlic bread; a great cook knows how to create a pairing that makes the main dish sing. Here are a few of my go-to, less-expected partners for a rich pasta dish.
Shaved Fennel and Orange Salad
This is my number one secret weapon against richness. It’s a classic Sicilian-inspired combination that is vibrant, elegant, and requires no cooking at all.
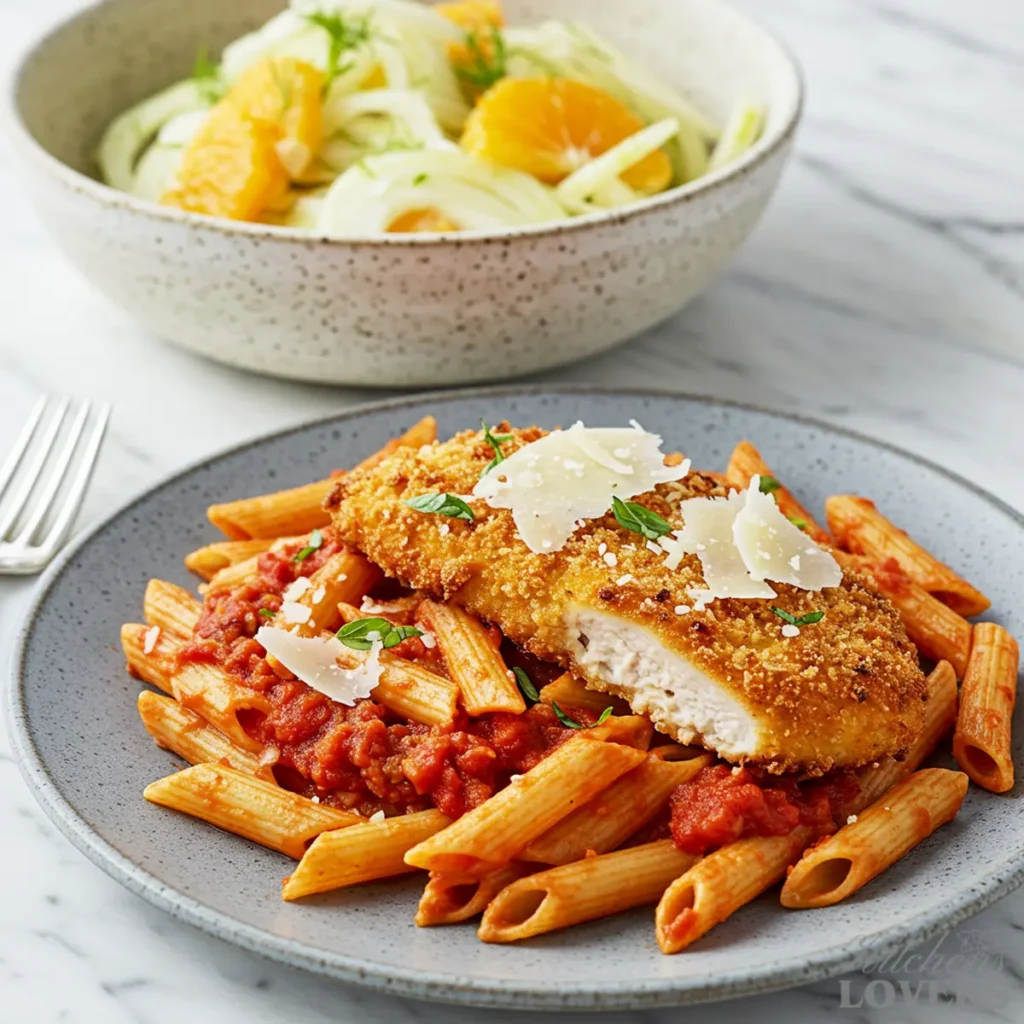
- The Flavor Logic: This salad is pure, clean contrast. You have the crisp, watery, slightly licorice-y crunch of the raw fennel, the bright, sweet acidity of fresh orange segments, and the bite of a simple red wine vinaigrette. It doesn’t just cut through the richness of the pasta—it provides a bright, refreshing explosion of flavor that resets your palate and makes the next bite of savory chicken taste even better. The beauty is in its powerful simplicity.
Sautéed Escarole with Garlic and White Beans
Instead of a simple green vegetable, let’s go with something that has more character. Escarole is a member of the chicory family with wide, tender leaves that have a gentle, pleasant bitterness.
- The Flavor Logic: In Italian cooking, bitterness is a feature, not a bug! It’s used strategically to balance out rich, fatty, or savory foods. Sautéing the escarole with plenty of garlic mellows the bitterness slightly and makes it wonderfully savory. Adding creamy cannellini beans turns it into a more substantial, rustic side that has an earthy depth to complement the bright tomato sauce beautifully.
Sweet & Sour Eggplant Caponata
If you want a truly show-stopping accompaniment that will have everyone talking, make a batch of caponata. This classic Sicilian relish is a tangle of cooked eggplant and celery in a sweet and sour sauce (known as agrodolce) studded with salty capers and olives.
- The Flavor Logic: This is the ultimate flavor acrobat. It hits every note—sweet, sour, salty, and savory. While the chicken parm is consistently rich and cheesy, the caponata provides exciting little bursts of everything else. It can be served warm or at room temperature, and a spoonful next to the pasta creates an incredibly dynamic, restaurant-level dining experience.
This Chicken Parmesan Pasta is a true pillar of my cooking philosophy. If you’re building out your own list of go-to dinners, be sure to explore my full guide to Crave-worthy chicken pasta recipes.
Frequently Asked Questions & Troubleshooting
Even the most seasoned cook runs into questions. Here are the answers to the most common issues that can pop up, turning a moment of panic into a simple, fixable step.
Crispy Chicken & Sauce Fixes
Soggy breading usually comes from three mistakes. First, your oil wasn’t hot enough—if it doesn’t sizzle instantly when a panko flake hits, the breading absorbs oil instead of crisping. Second, resting chicken on a flat plate traps steam, softening the crust. Always cool fried cutlets on a wire rack so air circulates and both sides stay crunchy. Third, storage matters. Never mix fried chicken with saucy pasta; the moisture will ruin the crust overnight. Instead, keep cutlets in a separate airtight container and add them to the pasta only when serving.
A bitter marinara usually comes from two culprits: garlic or tomatoes. Garlic burns quickly—going from fragrant to acrid in seconds. To avoid this, sauté it gently for just 30–60 seconds, stirring constantly, and add tomatoes or wine as soon as it becomes aromatic. Never let it brown.
Tomatoes can also be the problem. Some canned brands have a sharper, tinny flavor that turns the sauce bitter. Switching to a high-quality brand like Cento or Muir Glen makes a big difference. If your sauce is already made and tastes harsh, balance it by adding a pinch of sugar or a small knob of butter. Both sweetness and fat smooth out the edges and bring the flavors into harmony.
Substitutions & Dietary Options
Absolutely! This recipe adapts beautifully to be gluten-free. Here’s how:
Flour: Use a good-quality measure-for-measure gluten-free flour blend for the dredging step.
Breadcrumbs: Use gluten-free panko breadcrumbs. Many brands now offer them, and the texture is fantastic. In a pinch, finely crushed Rice Chex or cornflakes also work, but GF panko is your best bet. Keep a close eye when frying, as some GF breadcrumbs can brown a little faster.
Pasta: This is the easy part. Just use your favorite brand of gluten-free pasta and cook according to its specific package directions.
Yes, and I often do! Chicken thighs have a richer flavor and are more forgiving than breasts, so they stay incredibly moist.
You must use boneless, skinless chicken thighs. The key is that you still need to pound them to an even thickness. Place a thigh between two pieces of parchment paper and use a mallet or heavy pan to pound it to an even ½-inch thickness. This ensures it cooks at the same rate as the breading. Because thighs are naturally a bit more uneven, this step is non-negotiable for a perfect result. Cook them for the same amount of time, looking for that deep golden-brown crust.
Share Your Success!
I truly believe this is the best chicken parmesan pasta recipe you will ever make, and I’m so excited for you to try it. Cooking is all about sharing, and I’d love to know how your dinner turned out!
Did you make it? Please leave a comment and a star rating below! Your feedback helps other home cooks find this recipe and helps me know what you want to see more of. Did you go with the stovetop or the baked method? Did you try the spicy Arrabiata twist? Let me know in the comments!
The soul of this recipe is that rich, vibrant tomato sauce. If you loved making it from scratch and want to master other variations, don’t miss my deep dive on making the perfect Chicken pasta with marinara sauce. And if you enjoy rustic, deeply flavorful chicken and tomato dishes, my easy Chicken cacciatore pasta will be your next family favorite.
Want more foolproof recipes delivered right to your inbox?
Sign up for the KitchensLovers newsletter and get my best-tested, family-approved meals, along with expert tips to make you a more confident cook.
About the Author
Kate Thompson created KitchensLovers.com to simplify dinner for real-life families. She develops easy, flavor-packed chicken pasta recipes tested dozens of times to guarantee results. Her motto: ‘Easy Pasta, Every Time.’
A Final Word—The Flavor Science of the Perfect Marinara
Have you ever wondered why one tomato sauce can taste flat and boring, while another tastes vibrant, rich, and deeply satisfying? The answer isn’t a single secret ingredient; it’s the science of balancing the five basic tastes. Great cooks do this intuitively, but understanding it is the key to making any sauce taste incredible.
Sweet:
A truly great sauce has a subtle, underlying sweetness. This doesn’t come from adding heaps of sugar. It comes from using high-quality, ripe, crushed tomatoes. Good tomatoes, harvested at their peak, are naturally sweet. The pinch of sugar sometimes used in recipes isn’t to make the sauce “sugary”—it’s a tool to balance any excess acidity from the tomatoes.
Sour:
This is the bright, acidic note that makes your mouth water. It comes from the natural acidity of the tomatoes. Without enough acidity, a sauce tastes heavy, muddy, and one-dimensional. The sour notes are what “lift” all the other flavors and keep the sauce tasting fresh and lively.
Salty:
Salt is a flavor enhancer. Its job is far more important than just making something “salty.” The right amount of salt will quiet down bitter notes and dramatically intensify the natural sweetness and umami in the other ingredients. This is why we salt the pasta water, season the chicken, and season the sauce itself—each layer needs to be properly seasoned for the final dish to sing.
Bitter:
Bitterness is an important background note that adds complexity. A little bit comes from the herbs and the garlic. The key is to keep it in check. Sizzling garlic just until fragrant—not browned—is crucial, because browned garlic turns harshly bitter and can ruin a sauce.
Umami (The “X-Factor”):
This is the most important, and most often overlooked, element. Umami is a deep, savory, mouth-filling flavor that makes food taste incredibly satisfying. In this recipe, the browned bits from the chicken, the caramelized onions, and especially the Parmesan cheese are umami powerhouses. Here’s my ultimate pro tip: If you have a rind from a block of Parmesan cheese, toss it into the sauce while it simmers. The rind is packed with crystallized glutamate, and as it simmers, it will infuse your sauce with an incredible, long-simmered depth of savory flavor that nothing else can replicate. Just be sure to fish it out before serving.
When you learn to taste your sauce and ask, “Does it need more brightness (sour)? More depth (umami)? More salt to make the flavors pop?” —That’s when you’ve stopped just following directions and have truly started to cook.
This recipe was last tested and updated in August 2025 to ensure perfect results.
Chicken Parmesan Pasta Recipe
Equipment
- Large, Oven-Safe Skillet (12-inch cast iron recommended)
- Large Stockpot
- Three Shallow Dishes (for breading station)
- Sturdy Kitchen Tongs
- Wire Rack
Ingredients
For the Crispy Chicken Cutlets
- 1 ½ lbs Boneless Skinless Chicken Breasts (about 2 large breasts, sliced horizontally into 4 thin cutlets)
- ½ cup All-Purpose Flour
- 2 large Eggs beaten
- 1 ½ cups Panko Breadcrumbs
- ½ cup freshly Grated Parmesan Cheese
- 1 tsp Dried Oregano
- 1 tsp Garlic Powder
- 1 tsp Salt
- ½ tsp Black Pepper
- ¼ cup Olive Oil for frying
For the Rich Marinara Sauce & Pasta
- 12 oz Rigatoni or Penne Pasta
- 1 28-ounce can High-Quality Crushed Tomatoes
- 1 medium Yellow Onion finely chopped
- 4 cloves Garlic minced
- ½ cup fresh Basil chopped or torn
For the Cheese & Crunchy Topping
- 8 oz block Low-Moisture Mozzarella Cheese freshly shredded
- ½ cup Panko Breadcrumbs
- ¼ cup grated Parmesan Cheese
- 2 tbsp Unsalted Butter melted
Instructions
Prep and Cook the Pasta
- Bring a large stockpot of generously salted water to a rolling boil. Add pasta and cook according to package directions until al dente. Just before draining, reserve 1 cup of the starchy pasta water, then drain the pasta.
Bread the Chicken Cutlets
- Set up a breading station with three shallow dishes. In the first, place the flour. In the second, beat the eggs. In the third, combine 1 ½ cups panko, ½ cup Parmesan, oregano, garlic powder, salt, and pepper.
- Working one at a time, dredge a chicken cutlet in flour, then egg, and finally press firmly into the panko mixture to coat thoroughly. Set aside on a clean plate.
Pan-Fry the Chicken
- Heat olive oil in a large oven-safe skillet over medium-high heat. Once the oil shimmers, add two chicken cutlets. Cook for 3-4 minutes per side until deep golden brown and crispy. Do not overcrowd the pan.
- Transfer cooked chicken to a wire rack to rest and keep crisp. Repeat with the remaining two cutlets.
Build the Pan Sauce
- Reduce heat to medium. Add chopped onion to the same skillet and cook for 4-5 minutes until softened. Add minced garlic and cook for 30-60 seconds until fragrant.
- Pour in the crushed tomatoes, season with salt and pepper, and bring to a simmer. Cook for 5-7 minutes to meld the flavors.
Assemble the Dish
- Make the crunchy topping: In a small bowl, combine ½ cup panko, ¼ cup Parmesan, and melted butter. Toast in a small, dry skillet over medium heat for 2-3 minutes until golden brown. Set aside.
- Turn heat to low. Add the drained pasta to the skillet with the sauce and toss to combine. Add a splash of reserved pasta water if the sauce is too thick. Stir in the fresh basil.
- Serve the saucy pasta into bowls. Top with a crispy chicken cutlet, then sprinkle with the shredded mozzarella and the toasted panko topping. The heat from the dish will melt the cheese.
Notes
- Why This Recipe is Superior: We guarantee crispy chicken by pan-frying it separately and resting it on a wire rack. Our rich marinara is made from scratch in the same pan for maximum flavor.
- Pro Tips:
– For the best melt, always buy mozzarella in a block and shred it yourself.
– Use a wire rack, not a plate, to rest fried chicken. This prevents the bottom from getting soggy.
– Oil is hot enough when a panko flake sizzles instantly. If the oil is too cool, your breading will be greasy. - Storage & Reheating: Store the chicken and the saucy pasta in separate airtight containers in the fridge. To reheat, warm the pasta on the stove or microwave, and reheat the chicken in a 375°F oven or air fryer for 5-8 minutes until crisp.
