
I’ve been developing recipes for over thirty years, and if there’s one truth I’ve learned, it’s that life is too short for bland, grainy mac and cheese. We’ve all been there: a cheese sauce that just won’t come together, chicken that’s dry and gets lost in the pasta, and a final dish that feels… underwhelming.
After decades of testing—and frankly, serving some underwhelming dinners to my own family—I’ve finally perfected not just one chicken mac and cheese recipe, but the ultimate guide to making it yours. This is the recipe that finally won over my picky kids and became our go-to for busy weeknights and potlucks alike. This isn’t just about melting cheese into pasta. It’s about building layers of flavor—from the seasoned, juicy chicken to the velvety, from-scratch cheese sauce that clings to every single noodle. It’s the foundational recipe I’ve used as a launchpad for the most requested flavors on my blog. Think of this as your master class.
Ready to make the best chicken mac and cheese of your life?
Why You’ll Love This Chicken Mac and Cheese Recipe
This recipe is designed to be a total game-changer, built on years of experience to guarantee perfect results. Here’s why it works:
- The Dreamiest, Foolproof Cheese Sauce: We’re building a classic béchamel sauce from scratch. Don’t let that intimidate you! My method is simple and fast and guarantees a silky-smooth, gloriously rich sauce with zero graininess. It’s the secret to a restaurant-quality result.
- Three Recipes in One (Stovetop, Baked, or Crockpot!): Life is busy, and your recipe should adapt to your day. I’ve included precise, tested instructions for a quick 30-minute stovetop version, a classic bubbly baked casserole with a crispy top, and a fix-and-forget slow cooker method.
- Perfectly Juicy, Flavorful Chicken: The biggest complaint with chicken mac is dry, boring chicken. I’ll show you my simple seasoning and searing technique that locks in moisture and flavor, ensuring tender, delicious bites of chicken throughout the entire dish.
- The Ultimate Flavor Playbook: This is more than a recipe; it’s a system. Once you master the base, I’ll show you how to create the internet’s most-craved variations: a zesty Buffalo Chicken Mac, a sweet and smoky BBQ version, and yes, even a take on that famous Chick-fil-A flavor.
Key Ingredients for Next-Level Mac and Cheese
Great ingredients are the foundation of any unforgettable dish. For this recipe, we’re using simple pantry staples, but the quantities and quality are what make all the difference. This will yield about 6-8 generous servings.
- Pasta: 1 pound (16 oz) of a short, sturdy pasta. I prefer Cavatappi, but elbow macaroni, shells, or rotini also work beautifully.
- Chicken: 1 pound boneless, skinless chicken breasts or thighs.
- Unsalted Butter: 1/2 cup (1 stick).
- All-Purpose Flour: 1/2 cup.
- Whole Milk: 4 cups. For the richest sauce, do not substitute with a lower-fat milk.
- Sharp Cheddar Cheese: 8 ounces (2 cups), shredded from a block.
- Monterey Jack Cheese: 8 ounces (2 cups), shredded from a block.
- Garlic Powder: 1 teaspoon.
- Onion Powder: 1 teaspoon.
- Dijon Mustard: 1 teaspoon. This is a secret weapon for flavor, trust me.
- Salt: 1 teaspoon (for the sauce), plus more for boiling the pasta water.
- Black Pepper: 1/2 teaspoon, freshly cracked.
- Olive Oil: 1 tablespoon, for searing the chicken.
The Best Chicken to Use
You have options here, and the best choice really depends on your schedule and taste. For this recipe, you’ll need about 1 pound.
- Chicken Breast: This is a fantastic lean option. My trick is to slice two breasts in half horizontally to create four thinner cutlets. They cook faster and more evenly, which is your best defense against dry chicken. Just season them well with salt, pepper, and onion powder before searing.
- Chicken Thighs: For the richest, most tender chicken, you can’t beat thighs. They have a bit more fat, which means more flavor and moisture. They are incredibly forgiving and stay juicy.
- Rotisserie Chicken: This is my secret weapon for busy weeknights. Just pull the meat from one standard-sized rotisserie chicken (you’ll get about 3-4 cups, which is perfect), give it a rough chop, and you’re ready to go.
The Best Cheeses for a Perfect Sauce
This is where the magic really happens. We need a full 16 ounces of real, block cheese, which you will shred yourself. This is non-negotiable for a silky-smooth sauce.
- ⭐ Star Ingredient 1: Sharp Cheddar Cheese. You need an 8-ounce block. Pre-shredded cheeses are coated in starches to prevent clumping, and those starches will make your sauce grainy. Sharp cheddar provides that classic, tangy, unmistakable mac-and-cheese flavor. A mild cheddar will get lost, so go for the sharp.
- ⭐ Star Ingredient 2: Monterey Jack Cheese. You’ll also need an 8-ounce block of this. While cheddar brings the flavor, Monterey Jack brings the melt. It’s a softer cheese that gives our sauce an incredible, gooey, stretchy quality. This is the key to a “cheese pull” worthy of a picture.
Smart Swaps & Substitutions
| Ingredient | Substitution | Notes |
| Chicken | 1 lb Cooked Ground Turkey or Pulled Pork | Either would be delicious. Adjust seasonings as needed. |
| All-Purpose Flour | Gluten-Free All-Purpose Flour Blend | Use a 1-to-1 blend for an easy gluten-free version. |
| Monterey Jack | 8 oz Gruyère, Colby, or Fontina | For a different flavor profile. Gruyère will be nuttier, Colby will be milder. |
| Pasta | 1 lb Gluten-Free or Whole Wheat Pasta | Cook according to package directions. GF pasta can absorb more liquid, so be ready with a splash more milk. |
Essential Equipment
You don’t need a kitchen full of fancy gadgets for this recipe, but a few key tools will make the process practically foolproof. After making this dish hundreds of times, I can tell you that the right tools prevent the most common mistakes before they happen.
- A Heavy-Bottomed Pot or Dutch Oven: This is my number one piece of advice for a flawless cheese sauce. A heavy-bottomed pot (like a Dutch oven or a quality saucepan) distributes heat slowly and evenly. Why does that matter? It’s your insurance policy against scorching the milk or burning the roux—the two biggest culprits behind a bitter-tasting or broken sauce. A thin, cheap pot can create hot spots that ruin your sauce before it even begins.
- A Good Whisk: A spoon simply won’t do here. A whisk is the essential tool for creating a perfectly smooth, lump-free béchamel. From incorporating the flour into the butter to melting the cheese seamlessly into the milk, the whisk’s wires break up any potential clumps, guaranteeing that silky texture we’re after.
- Box Grater: As I mentioned, grating your own cheese is non-negotiable for the creamiest sauce. A simple box grater is all you need.
- Large Pot & Colander: For boiling the pasta, of course.
Expert Tips for Flawless Results
These are the questions I get asked most often. Let’s tackle the biggest fears head-on so you can cook with complete confidence.
“Help! My cheese sauce is grainy and greasy. What did I do wrong?”
This is the most common pitfall in making mac and cheese from scratch, but it’s incredibly easy to avoid. A broken sauce almost always comes down to two simple things: temperature and technique.
- The Roux Wasn’t Cooked Properly: The first step, cooking the butter and flour together, is critical. You must whisk them over medium heat for at least a full minute. This step cooks the raw flour taste out and, more importantly, prepares the flour to properly absorb the milk. If you rush this, the flour can’t do its job, which is a one-way ticket to a lumpy sauce.
- The Sauce Was Too Hot When You Added the Cheese: This is the #1 mistake people make. Never add cheese to a bubbling, boiling sauce. The extreme heat will cause the dairy proteins to curdle and seize up, forcing the fat to separate out. The result? A grainy, greasy mess.
The Foolproof Fix: Once your milk has been whisked into the roux and the sauce has thickened, turn the burner completely off. Let the pot sit off the heat for a minute to cool slightly. Then, add your handfuls of shredded cheese, stirring gently until everything is melted and smooth. The residual heat is all you need to get a perfectly creamy, restaurant-quality sauce.
“My sauce is smooth but tastes a little bland. What’s your secret to amazing flavor?”
A smooth sauce is great, but we’re aiming for a spectacular sauce. If you find the flavor a little one-note, it’s because rich dishes need a little something to cut through the fat and make the other flavors pop. I have two secret weapons I use every time.
- A Teaspoon of Dijon Mustard: I promise, your mac and cheese will not taste like mustard! The small amount of vinegar in the Dijon acts as an acid, brightening up the entire dish and sharpening the flavor of the cheddar. It’s like turning up the volume on your cheese.
- A Few Dashes of Hot Sauce (or a Pinch of Cayenne): Again, we’re not looking for overpowering heat. A little bit of warmth adds a background complexity that cuts through the richness and keeps you coming back for another bite.
“Can I make chicken mac and cheese ahead of time?”
Absolutely! This recipe is fantastic for meal prep or getting a head start on a busy day. Here is the best way to do it to ensure your final dish is perfect, not mushy.
You can prepare the core components one or two days in advance. Cook and cube your chicken and make the cheese sauce completely. Let the sauce cool, then store it in an airtight container in the refrigerator with a piece of plastic wrap pressed directly onto the surface to prevent a skin from forming.
When you’re ready to eat, do not cook the pasta in advance. Bring your pre-made cheese sauce to temperature in a pot over low heat, stirring gently. You may need to add a splash of milk to loosen it. While the sauce is reheating, boil your pasta. Here is the critical tip: undercook the pasta by 2 minutes less than the package directs. It should still be quite firm. Drain it and immediately fold it into your hot cheese sauce along with the cooked chicken. This method ensures the pasta finishes cooking in the sauce, absorbing all that flavor without ever becoming soft or overcooked.
Step-by-Step Instructions (The Master Stovetop Recipe)
This is the foundational recipe—our creamy, dreamy, 30-minute stovetop version. It’s ridiculously easy and forms the perfect base for any of the flavor upgrades you’ll find later. Master this, and you’ve mastered chicken mac and cheese.
Time Needed: 45 minutes.
1.Cook Your Pasta & Chicken
- Cook the Pasta (But Not All the Way!): Bring a large pot of generously salted water to a rolling boil. Add your pasta and cook for 2 minutes less than the package directions for al dente. It should be firm and taste decidedly undercooked. Just before draining, use a mug to scoop out and reserve about one cup of the starchy pasta water. Drain the pasta in a colander and set it aside for later.
- Sear the Chicken: While the pasta cooks, pat your chicken cutlets dry and season them generously on both sides with salt, pepper, and onion powder. Heat a tablespoon of olive oil or butter in a large skillet or your Dutch oven over medium-high heat. When the fat shimmers, it’s hot enough. Add the chicken and cook for 4-5 minutes per side, until a beautiful golden-brown crust forms and it’s cooked through. The most reliable way to check for doneness is with a meat thermometer; according to the USDA, all poultry must reach a safe internal temperature of 165°F. Let the chicken rest on a cutting board for a few minutes before dicing it into bite-sized pieces.
2.Build the Velvety Cheese Sauce
- Start the Magical Roux: In the same pot (don’t worry about wiping it out; those browned bits are flavor!), melt your butter over medium heat. Once it’s fully melted, sprinkle in the all-purpose flour. Immediately begin whisking. Cook for at least 60 seconds, whisking constantly. The mixture will form a smooth, thick paste. You’re cooking out that raw flour taste and creating the essential foundation for a lump-free sauce.
- Create the Creamy Base: While still whisking, slowly pour in the first cup of milk. Keep whisking vigorously as the roux absorbs the liquid and the mixture thickens. Once it’s smooth, you can pour in the remaining milk. Bring the sauce to a gentle simmer (you should see bubbles, but not a rolling boil), stirring frequently with a spatula to scrape the bottom of the pot. Cook for 5-7 minutes, until the sauce has thickened enough to coat the back of your spoon.
- Turn Off the Heat & Melt the Cheese: This is the most important step for a silky sauce! Remove the pot from the burner completely. Stir in the salt, pepper, garlic powder, Dijon mustard, and hot sauce. Now, add your freshly shredded cheddar and Monterey Jack cheeses. Stir gently and continuously until every shred has melted into the sauce, creating a glossy, glorious river of liquid gold. Do not return the pot to the heat.
3.Combine and Serve
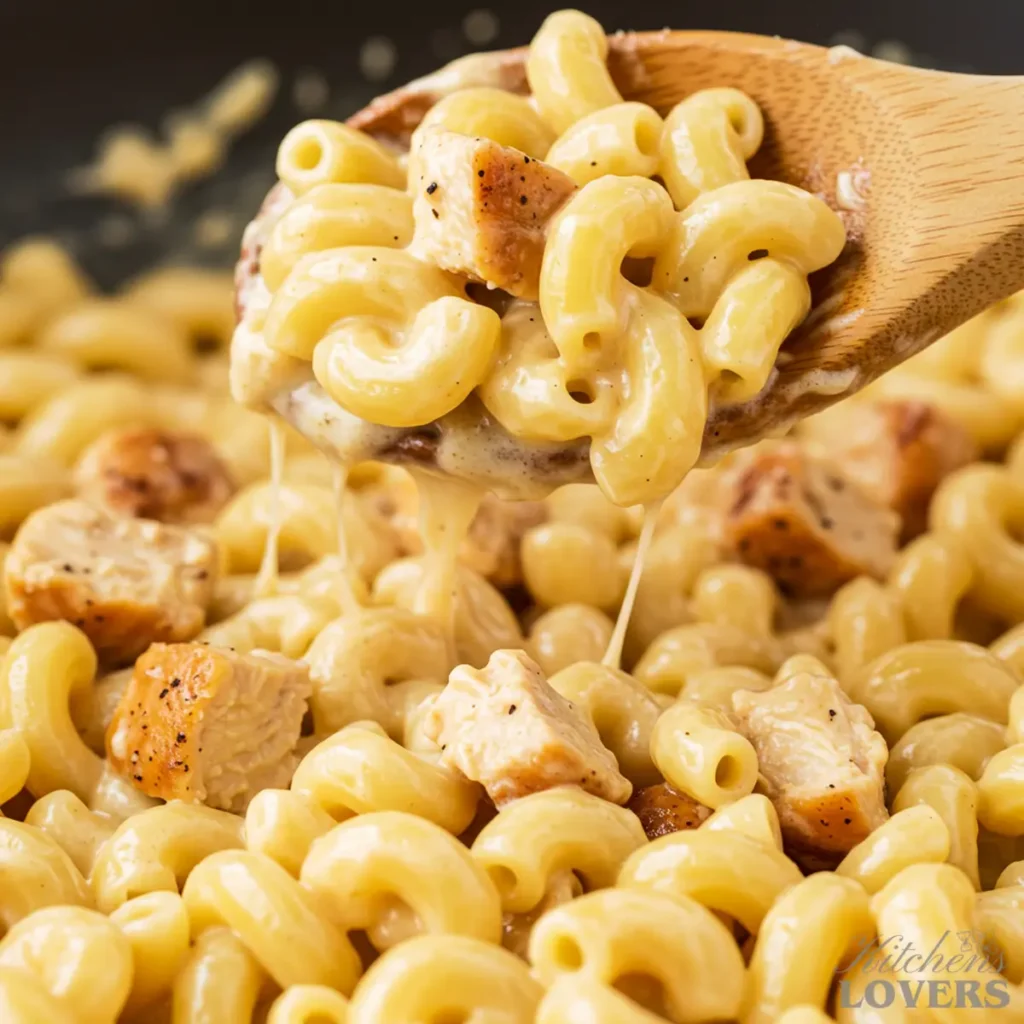
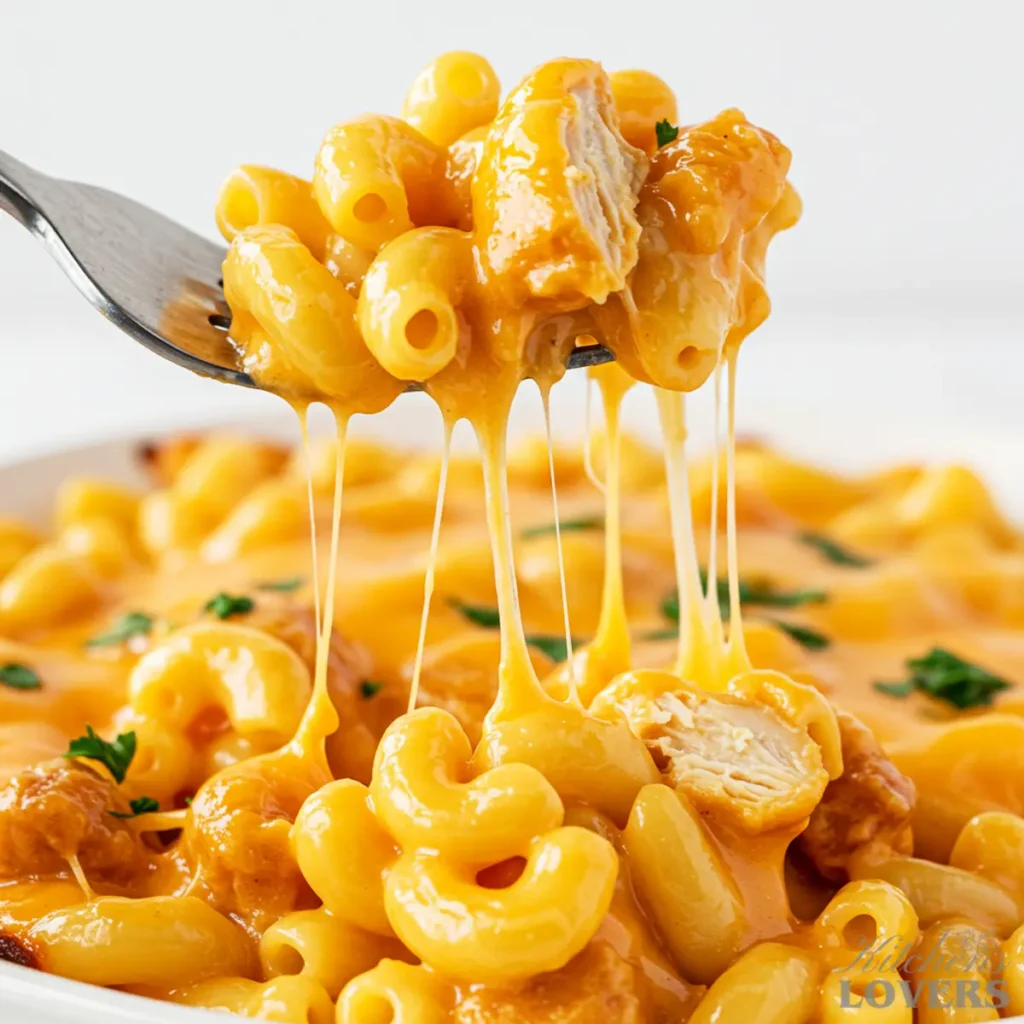
- Bring It All Together: Add the drained, undercooked pasta and the diced chicken to the pot with your beautiful cheese sauce. Fold everything together gently until every single noodle and piece of chicken is enveloped in cheesy goodness.
- Adjust and Serve: If the sauce feels a bit too thick (sometimes different pasta shapes absorb more sauce), stir in a splash of your reserved pasta water until it reaches the perfect consistency. Spoon the finished chicken mac and cheese into bowls immediately, and prepare for applause. This stovetop version is best enjoyed right away for peak creaminess.
The Holy Trinity: 3 Ultimate Variations
Once you have the master recipe down, you have the key to unlock a world of incredible flavors. These aren’t just minor tweaks; these are three complete, powerhouse transformations that I’ve tested dozens of times. Each one uses our perfect stovetop mac and cheese as the base.
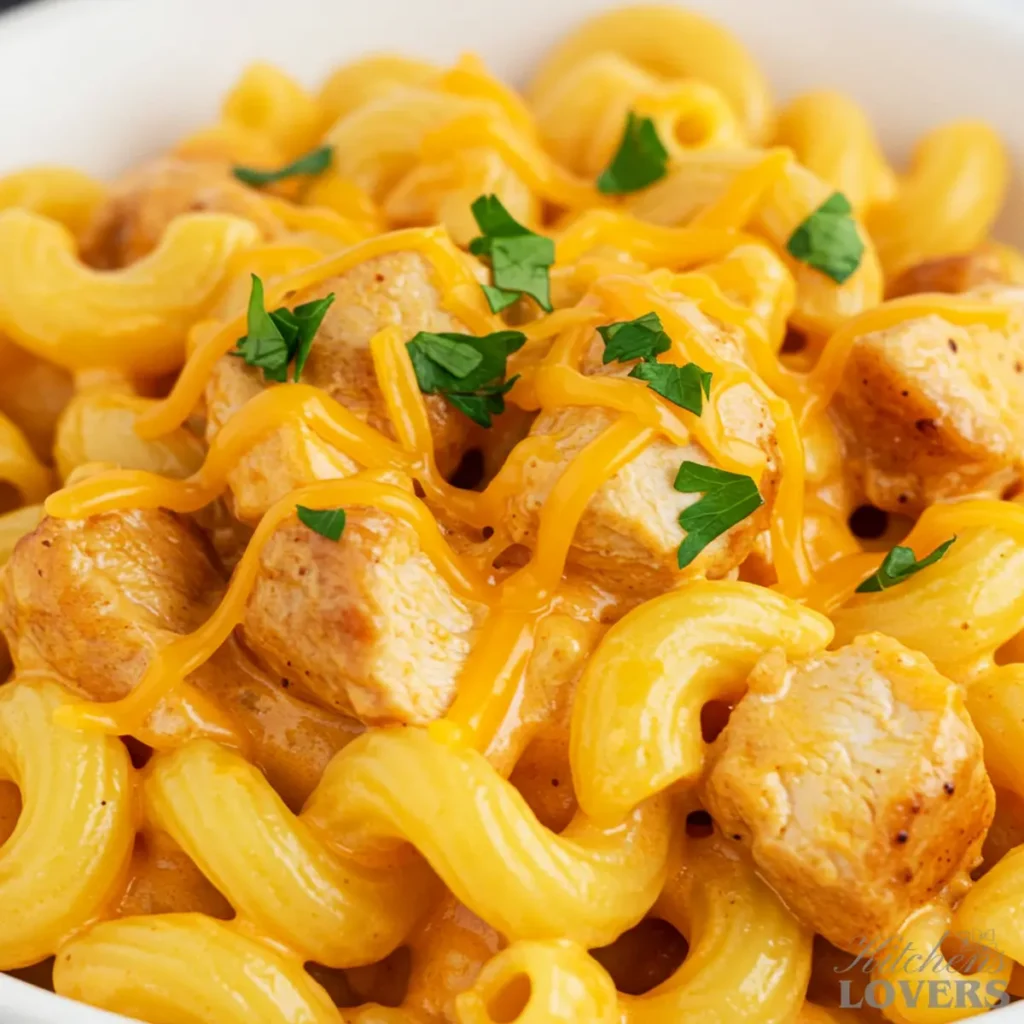
Variation 1: The Ultimate Buffalo Chicken Mac and Cheese
This is for anyone who craves that addictive, spicy, and tangy kick of classic buffalo wings. We’re not just stirring in hot sauce; we’re building layers of flavor for a truly authentic taste.
- The Chicken: After dicing your cooked chicken, toss it in a bowl with about 1/2 cup of your favorite buffalo wing sauce (I prefer Frank’s RedHot Wings sauce for its classic flavor) until it’s fully coated.
- The Sauce: Prepare the cheese sauce exactly as described in the Master Recipe. Once you have removed the pot from the heat and melted the cheese, stir in an additional 1/4 cup of the buffalo wing sauce.
- The “Blue Cheese” Element: Here’s the key. Along with the cheddar and Monterey Jack, add 1/3 cup of crumbled blue cheese or gorgonzola to the sauce. It will melt right in, providing that essential tangy, funky note that balances the spice perfectly.
- Bring it Together: Fold the buffalo-coated chicken and undercooked pasta into your finished sauce.
- Pro-Tip for a Crispy Top: For the full experience, pour the finished mac and cheese into a baking dish. In a small bowl, toss 1/2 cup of Panko breadcrumbs with 2 tablespoons of melted butter. Sprinkle this over the top. Bake at 375°F (190°C) for 15-20 minutes, or until the top is golden brown and the edges are bubbly. Serve with a drizzle of ranch or blue cheese dressing.
Variation 2: The Perfect Chick-fil-A Copycat Mac and Cheese
That famous mac and cheese has a distinctly rich, slightly sweet, and complex cheesy flavor. After many (many) taste tests, I’ve cracked the code. The secret is a specific blend of cheeses.
- The Cheese Blend is Everything: For the cheese sauce, reduce the sharp cheddar to 1 cup. Then, add 1 cup of Colby cheese, 1/2 cup of grated Parmesan cheese, and 1/2 cup of grated Romano cheese. The combination of creamy Colby with the salty, hard Italian cheeses is what creates that signature taste. Prepare the sauce exactly as instructed, melting this new cheese blend in at the end.
- The Chicken: This version shines with crispy breaded chicken. You can use your favorite frozen chicken nuggets (cooked according to package directions) or even leftover fried chicken tenders.
- Assembly: Once your unique cheese sauce is ready, fold in the cooked pasta. To keep the chicken perfectly crispy, you have two options: gently fold the nuggets in right before serving, or spoon the mac and cheese into bowls and top it with 3-4 warm nuggets. This is the version my kids beg me for.
Variation 3: Smoky BBQ Chicken Mac and Cheese
This is pure comfort food, combining the best of a summer barbecue with our favorite cheesy pasta. It’s smoky, a little sweet, and deeply satisfying.
- The Chicken: Just like the buffalo version, the best way to infuse flavor is to toss your cooked, diced chicken in about 1/2 cup of your favorite BBQ sauce. A thicker, sweeter sauce works beautifully here.
- The Sauce: In Step 5 of the Master Recipe, when you add the seasonings to the thickened milk sauce, also add 1 full teaspoon of smoked paprika and an extra 1/4 cup of BBQ sauce. The smoked paprika is non-negotiable; it adds a deep, smoky undertone that permeates the whole dish.
- Bring it Together: Prepare the rest of the sauce as directed. Fold in your BBQ-coated chicken and the cooked pasta.
- The Perfect Topping: This version is absolutely incredible topped with a generous handful of crispy fried onions (the kind from a can are perfect!). Their savory crunch is the perfect counterpoint to the sweet, smoky, and cheesy flavors. It’s a little touch that makes a huge difference.
Storing, Freezing & Reheating Like a Pro
Let’s talk leftovers. There’s nothing better than knowing you have a bowl of this amazing chicken mac and cheese waiting for you. But reheating it incorrectly can turn a creamy dream into a greasy, separated mess. Follow these steps, and your leftovers will be nearly as perfect as day one.
Storing in the Refrigerator
This is the best option for short-term storage.
- Cool It Down: Allow the mac and cheese to cool down for about 30-45 minutes at room temperature before refrigerating.
- Store It Right: Transfer to an airtight container. For an extra pro-level touch, press a piece of plastic wrap directly onto the surface of the mac and cheese before putting the lid on. This prevents a skin from forming and locks in moisture.
- Duration: It will keep beautifully in the fridge for up to 4 days.
Freezing for Later
Yes, you can absolutely freeze chicken mac and cheese! It’s a lifesaver for future busy nights.
- Cool Completely: This is non-negotiable. Freezing hot food leads to ice crystals and freezer burn. Let it cool completely.
- Portion Control: I recommend freezing it in individual or family-sized portions in freezer-safe, airtight containers or zip-top bags. This makes reheating so much easier.
- Duration: It’s best enjoyed within 2 to 3 months. While it’s safe to eat beyond that, the texture of the pasta and sauce can begin to degrade. For best results, thaw frozen mac and cheese in the refrigerator overnight before reheating using the superior stovetop method.
The Absolute Best Way to Reheat: The Stovetop
This is, by far, the superior method. It takes a few extra minutes, but it perfectly revives the original creamy texture. The gentle, even heat prevents the cheese sauce from breaking.
- Get Your Pot: Scoop your desired portion into a small saucepan.
- Add a Splash of Milk: This is the most important step! Add about a tablespoon of milk per cup of leftovers. This rehydrates the sauce as it heats, bringing the velvety texture back to life.
- Use Low Heat: Heat the mac and cheese over low heat, stirring gently and frequently. Be patient. High heat will make the sauce greasy.
- Serve When Creamy: Continue stirring until it’s heated through and has returned to its former creamy glory. It should take about 5-7 minutes.
If You Must Use the Microwave…
Sometimes you’re in a hurry, I get it. But don’t just blast it on high. Here’s how to do it right:
- Portion and Add Milk: Place a single serving in a microwave-safe bowl and stir in a splash of milk.
- Cover and Use Half Power: Cover the bowl with a microwave-safe lid or a damp paper towel. This traps steam and helps rehydrate the dish. Crucially, heat it at 50% power.
- Heat in Increments: Microwave in 1-minute intervals, stirring between each one. The stop-and-stir method, combined with lower power, heats the dish gently and prevents the sauce from getting oily. It’s a game-changer.
What to Serve with Your Chicken Mac and Cheese
This dish is the undeniable star of the show—it’s rich, creamy, and deeply satisfying. So, when I think about what to serve alongside it, I always look for something that will provide a bright, fresh contrast to balance out that wonderful decadence. You’re looking for acidity or a bit of crunch to cut through the richness and cleanse your palate between bites.
Here are my go-to, no-fail pairings:
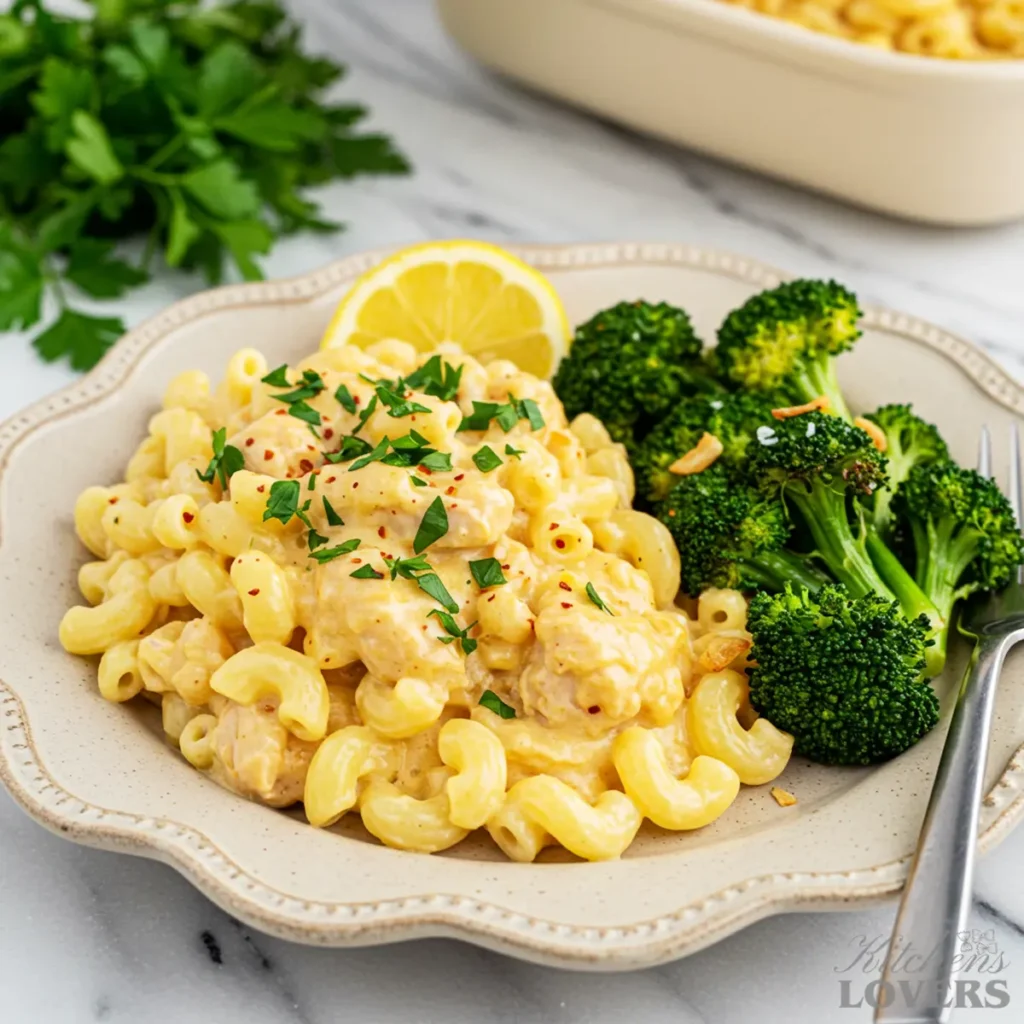
- A Simple, Zesty Arugula Salad: This is my number one choice. The peppery bite of the arugula is a perfect counterpoint to the creamy cheese sauce. Toss it with a simple lemon vinaigrette—just olive oil, fresh lemon juice, a pinch of salt, and a crack of black pepper. The acidity is key; it refreshes your taste buds and makes each new bite of mac and cheese taste just as good as the first.
- Garlic-Roasted Broccoli: Roasting broccoli transforms it. The florets get crispy and slightly charred at the edges, bringing out a nutty, earthy flavor that stands up beautifully to the cheese. Just toss broccoli florets with olive oil, salt, and minced garlic, then roast at 400°F (200°C) until tender and browned. That slight bitterness and crunchy texture are an incredible contrast.
- Quick Sautéed Green Beans: If you’re short on time, this is your answer. Sauté fresh green beans in a hot skillet with a bit of olive oil for a few minutes until they’re bright green and tender-crisp. Finish with a squeeze of fresh lemon juice and a sprinkle of salt. The snappy texture and vibrant freshness prevent the meal from feeling too heavy.
- The Ultimate Comfort Pairing: Sometimes, you just want to lean into the comfort. For those nights, a slice of crusty bread for sopping up every last bit of cheese sauce is heavenly.
Frequently Asked Questions (FAQs)
Spice & Texture
I love this question, as I’m a big fan of heat myself! There are a few fantastic ways to do it, depending on the kind of spice you’re after.
For a fresh, front-of-the-mouth heat: Sauté one or two finely diced jalapeños (ribs and seeds removed for less heat) in the butter for a minute before you add the flour to start your roux. This builds a vibrant, aromatic heat right into the base of the sauce.
For integrated, all-over warmth: Add 1/4 to 1/2 teaspoon of cayenne pepper or a generous amount of your favorite Louisiana-style hot sauce to the cheese sauce along with the other seasonings. This is the easiest method to control.
For a cheesy, lingering heat: Swap out the Monterey Jack cheese for a spicy cheese like Habanero Cheddar or Pepper Jack. This infuses the heat into the very soul of the dish.
This is a fantastic question, as the final texture is quite different. The stovetop version is the creamiest of the bunch. It’s a looser, more “saucy” mac and cheese that’s at its absolute peak the moment you serve it. The baked version transforms the dish into a thicker, more structured casserole. As it bakes, the pasta absorbs a little more of the sauce, creating a heartier, denser result that you can almost slice into squares. The undeniable advantage of the baked version is the textural contrast—you get that glorious, golden-brown, bubbly top combined with the ultra-gooey center. One is for immediate creamy indulgence; the other is for classic casserole comfort.
Shortcuts & Pasta Choices
While my from-scratch roux method gives you the best flavor and texture, I understand that sometimes you just need a quick-and-easy win. There are a couple of popular shortcuts, but be aware they will produce a different result.
The Velveeta/Evaporated Milk Hack: This is a classic. You can heat a can of evaporated milk over low heat and melt in cubes of Velveeta or slices of American cheese until smooth. It’s incredibly fast and won’t break, but it has the distinct flavor and texture of those processed cheeses.
The Sodium Citrate Trick: This is a more modern approach. Sodium citrate is an emulsifying salt that lets you melt virtually any real cheese into a liquid without it breaking or needing a thickener. It’s a neat trick for a fast, queso-like sauce, but it does require ordering a specialty ingredient online.
Think of these as fun alternatives, but the master recipe’s roux-based sauce remains my gold standard.
The pasta shape is more important than you’d think! The goal is to choose a pasta that can scoop up and hold onto that glorious, thick cheese sauce. For that reason, you should absolutely avoid long, skinny pastas like spaghetti, fettuccine, or linguine. The sauce will just slide right off, leaving you with a puddle of cheese in the bottom of your bowl instead of coating the noodles. I also recommend staying away from very small, delicate pasta shapes like ditalini or orzo. They tend to overcook quickly and can get lost or turn to mush in such a hearty, heavy sauce. Stick to the sturdy shapes like shells, elbows, cavatappi, or rotini for a perfect pasta-to-sauce ratio in every bite.
Share Your Creation!
I am so thrilled for you to try this recipe! It’s more than just a dish; it’s a method and a promise of an amazing home-cooked meal. Your feedback means the world to me and to other readers, so please leave a star rating and a comment below.
I’d love to know how your Ultimate Chicken Mac and Cheese turned out! Which variation did you try first?
Your Next Pasta Adventure
Now that you’ve mastered the art of a perfect, from-scratch cream sauce, a whole new world of pasta awaits!
- If you loved creating a perfect copycat of a restaurant classic, you’ll be obsessed with my foolproof recipe for the Four Cheese Pasta from Cheesecake Factory.
- And for another unbelievably rich and satisfying dish that’s guaranteed to get a reaction, my Marry Me Chicken Pasta is a must-try.
- For even more ideas, explore our full collection of Crave-Worthy Chicken Pasta recipes!
Get My Best Recipes Right in Your Inbox!
Want more foolproof, family-approved dinner ideas like this? Subscribe to the KitchensLovers newsletter for my latest recipes, pro tips, and exclusive content delivered straight to you.
About the Author
Kate Thompson created KitchensLovers.com to simplify dinner for real-life families. She develops easy, flavor-packed chicken pasta recipes tested dozens of times to guarantee results. Her motto: ‘Easy Pasta, Every Time.’
This recipe was last tested and updated in July 2025 to ensure perfect results.
Chicken Mac and Cheese Recipe
Equipment
- Heavy-Bottomed Pot or Dutch Oven
- Whisk
- Box Grater
- Large Pot (for pasta)
- Colander
Ingredients
- 1 pound Cavatappi pasta or other sturdy pasta like shells or elbows
- 1 pound boneless skinless chicken breasts or thighs
- 1/2 cup Unsalted Butter 1 stick
- 1/2 cup All-Purpose Flour
- 4 cups Whole Milk
- 8 ounces Sharp Cheddar Cheese freshly shredded from a block
- 8 ounces Monterey Jack Cheese freshly shredded from a block
- 1 teaspoon Garlic Powder
- 1 teaspoon Onion Powder
- 1 teaspoon Dijon Mustard
- 1 teaspoon Salt plus more for pasta water
- 1/2 teaspoon Black Pepper freshly cracked
- 1 tablespoon Olive Oil for searing the chicken
Instructions
Prepare Pasta and Chicken
- Cook the pasta in generously salted water for 2 minutes LESS than the package directions for al dente. Reserve 1 cup of pasta water, then drain.
- While pasta cooks, season chicken with onion powder, salt, and pepper. Heat olive oil in a large Dutch oven over medium-high heat. Sear chicken for 4-5 minutes per side until golden and cooked to 165°F. Rest on a cutting board, then dice.
Make the Cheese Sauc
- In the same pot, melt butter over medium heat. Sprinkle in the flour and whisk constantly for 1 full minute to cook out the raw flour taste and form a smooth paste (roux).
- Slowly whisk in the first cup of milk until smooth. Then, whisk in the remaining milk. Bring to a gentle simmer, stirring frequently, until thickened enough to coat a spoon (about 5-7 minutes).
- REMOVE THE POT FROM HEAT. Let it cool for one minute. Stir in salt, pepper, garlic powder, and Dijon mustard.
- Add the shredded cheeses and stir gently until completely melted and the sauce is glossy and smooth.
Combine and Serve
- Add the undercooked pasta and diced chicken to the cheese sauce. Fold everything together gently until coated. If the sauce is too thick, stir in a splash of the reserved pasta water.
- Serve immediately for the best creamy texture.
Notes
- Pro-Tip for a Perfect Sauce: Always shred your cheese from a block. Pre-shredded cheese contains anti-caking agents that make a sauce grainy.
- Foolproof Technique: The two most important steps are cooking the roux for a full minute and REMOVING the pot from the heat before adding your cheese to prevent a greasy, broken sauce.
- Pasta Water is Key: The starchy pasta water is perfect for thinning the sauce to your desired consistency if it gets too thick.
- Flavor Variations:
-For Buffalo Style: Toss cooked chicken in 1/2 cup buffalo wing sauce. Add 1/4 cup wing sauce and 1/3 cup crumbled blue cheese to the finished cheese sauce.
– For BBQ Style: Toss cooked chicken in 1/2 cup BBQ sauce. Add 1/4 cup BBQ sauce and 1 tsp smoked paprika to the cheese sauce. Top with crispy fried onions.
– For Chick-fil-A Copycat Style: Use a cheese blend of 1 cup cheddar, 1 cup Colby, 1/2 cup Parmesan, and 1/2 cup Romano. Serve with crispy breaded chicken nuggets.
