
I will never forget the first time I tried to make manicotti for a dinner party. It was a disaster. I spent 30 minutes trying to spoon a lumpy chicken filling into delicate pasta tubes—more of it ended up on the counter than in the pasta. It was frustrating and, frankly, embarrassing. That night, I vowed to develop a method that was not just easy but also completely foolproof and mess-free.
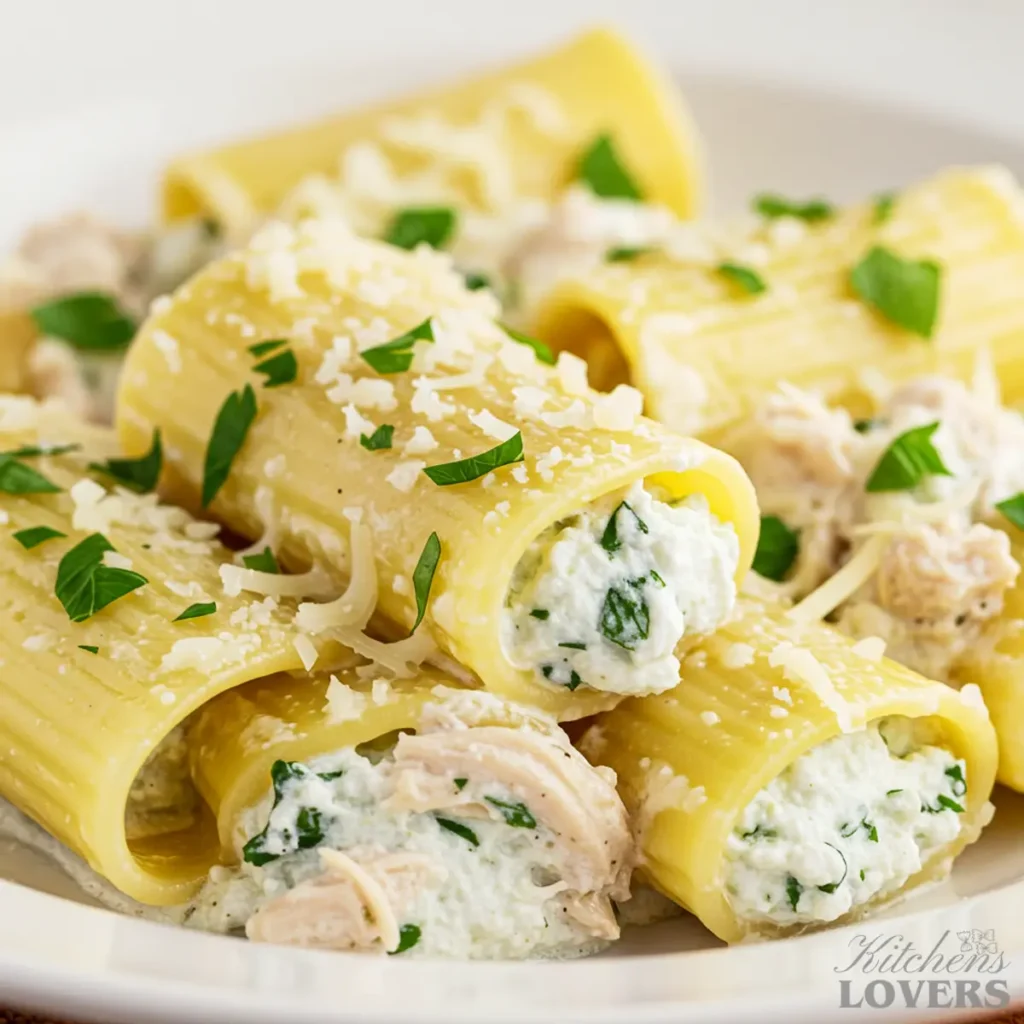
This recipe is the result of that promise. It’s how you get that stunning, restaurant-quality result without any of the kitchen chaos. We’re talking tender pasta shells stuffed with a savory, creamy chicken filling, swimming in a velvety homemade white sauce, and baked until golden and bubbly. It tastes like it took all day, but our simple, no-mess technique makes it a total breeze.
Why This Chicken Manicotti Recipe Works
- A Truly Foolproof Filling Method: My simple “piping bag” technique (hint: you don’t need a real one!) makes stuffing the pasta shells absurdly easy and clean. No more broken shells or messy counters.
- Luxurious, From-Scratch Sauce: We ditch the jarred stuff for a simple, homemade cream sauce that’s richer and more flavorful than any store-bought version. It makes all the difference.
- Flavor-Packed from the Start: We build layers of flavor by using high-quality rotisserie chicken and perfectly balanced seasonings, unlike basic recipes that require you to add more ingredients to make them taste good.
- Clear, No-Guesswork Instructions: Every ingredient is measured precisely, and every step is explained clearly. There’s no guessing “what size can” or “how much.” Just simple steps to a perfect result.
Key Ingredients for the Perfect Chicken Manicotti
The magic of this recipe is how simple, high-quality ingredients come together to create something truly special. There are no fancy, hard-to-find items here—just fresh, real ingredients that deliver maximum flavor.
For the Filling:
- Shredded Rotisserie Chicken (3 cups): This is our brilliant, time-saving secret weapon. It’s incredibly flavorful, moist, and shreds perfectly. It delivers that slow-roasted taste without any of the work. So much better than the bland, textureless canned chicken suggested elsewhere.
- Whole Milk Ricotta Cheese (15 ounces): Please don’t use skim or part-skim here! Whole milk ricotta is the key to a creamy, rich, and stable filling that won’t turn watery in the oven. It’s the structural backbone of that luxurious texture.
- Shredded Mozzarella Cheese (1 ½ cups, divided): Low-moisture, whole milk mozzarella is best for that glorious cheese pull. We’ll use some in the filling and reserve the rest for that beautiful golden-brown topping.
- Grated Parmesan Cheese (½ cup, freshly grated): Adds a nutty, salty depth of flavor that you just can’t get from the pre-shredded kind.
- Large Egg (1): This acts as a binder, helping the filling set up beautifully inside the pasta shells.
- Fresh Parsley (¼ cup, chopped): Adds a touch of bright, fresh, peppery flavor to cut through the richness.
- Seasoning: 1 tsp garlic powder, ½ tsp salt, and ¼ tsp black pepper.
For the From-Scratch Cream Sauce & Pasta:
- Manicotti Shells (1 box, 8 ounces): You will need about 10-12 shells. It’s always wise to cook a few extra just in case one or two split during boiling.
- Unsalted Butter (4 tbsp): The rich, flavorful base for our silky cream sauce.
- All-Purpose Flour (¼ cup): This thickens the sauce. I’ll show you how to cook out the raw flour taste completely.
- Minced Garlic (2 cloves): For that aromatic base note that makes the sauce so inviting.
- Whole Milk (2 ½ cups): Creates that velvety, creamy texture. You can use 2% in a pinch, but whole milk is best.
- Chicken Broth (1 cup): Adds a savory depth that you wouldn’t get from milk alone.
- A Pinch of Nutmeg: My secret ingredient for any cream sauce. You won’t taste “nutmeg,” but it enhances the dairy flavors and adds a professional touch.
Smart Swaps & Substitutions
I’ve tested this recipe countless times, but your kitchen is your own! Here are a few simple swaps you can make with confidence.
| Ingredient | Smart Swap | My Expert Notes |
| Rotisserie Chicken | Cooked, shredded chicken breast or thighs | You’ll need about 1 pound of boneless chicken. Just be sure to season it well with salt, pepper, and garlic powder as it cooks! |
| Manicotti Shells | Jumbo pasta shells or no-boil cannelloni tubes | Jumbo shells work great—just follow the package for cooking times. For cannelloni, you can often stuff them uncooked, but may need to add extra sauce. |
| Whole Milk Ricotta | Full-fat cottage cheese (strained) | For the best results, blend the cottage cheese first to make it smooth. The final flavor will be a bit tangier. |
| Mozzarella Cheese | Provolone or Fontina | Both of these cheeses melt beautifully and will give the dish a slightly sharper, nuttier flavor profile. Delicious! |
| All-Purpose Flour | 1-to-1 Gluten-Free Flour Blend | To make the sauce gluten-free, a good quality 1-to-1 GF blend is the easiest substitution. |
Essential Equipment for No-Mess Manicotti
You don’t need any highly specialized gear to pull off this dish. But there are a couple of humble kitchen tools that I consider non-negotiable for guaranteeing that easy, mess-free experience I promised.
- A Piping Bag (or a Gallon-Sized Ziploc Bag): This is it. This is the single biggest secret to making perfect manicotti without losing your mind. Forget patiently spooning the filling into each shell, or—even worse—trying to stuff whole, solid ingredients into a delicate, cooked pasta tube. Those methods are a fast track to broken pasta and a chicken-and-ricotta explosion all over your counter. With a bag, the job is not just easier, it’s downright enjoyable. You simply fill it with your creamy chicken mixture, snip off a corner (about a ½-inch opening), and pipe the filling cleanly into each shell. It’s fast, efficient, and 100% mess-free. Trust me, you’ll never make it any other way again.
- 9×13 inch Baking Dish: A classic glass or ceramic dish is perfect. It holds all 12 manicotti shells snugly in a single layer and promotes the even, bubbly baking that makes this dish so satisfying.
- Large Stockpot: This is for boiling the pasta. The key here is large. You need enough room for the manicotti shells to move around freely as they cook. If the pot is too crowded, they’ll stick together and tear. And please, salt your water generously!
- Medium Saucepan: You’ll need about a 2- or 3-quart saucepan to build our luscious cream sauce. It’s the perfect size to create a silky-smooth sauce without it scorching or boiling over.
My Expert Tips for Flawless Results
Over thirty years of making pasta dishes, I’ve learned that the difference between a good dish and a great one often comes down to a few small, but crucial, details. These are the “insider” tips that will make your chicken manicotti taste like it came from a high-end Italian restaurant kitchen.
1. The No-Break, Mess-Free Stuffing Technique
Let’s solve the single most frustrating part of making manicotti right now. Don’t even think about trying to use a spoon.
Grab a gallon-sized Ziploc bag—this is your new secret weapon.
- Set it up: Place the bag inside a measuring cup or bowl and fold the top edges over the rim. This holds it open for you.
- Fill it: Spoon the entire chicken and ricotta mixture into the bag. Squeeze out the excess air and seal it.
- Snip it: Cut off one of the bottom corners of the bag to create a hole about the size of a nickel (a ½- to ¾-inch opening is perfect).
- Pipe it: Now, simply hold a cooked pasta shell in one hand and gently pipe the filling in from the other. It fills the tube completely and cleanly in about 3 seconds flat. Zero mess. Zero broken shells. It’s a game-changer.
2. How to Add Spinach Without a Watery Mess
Want to sneak in some greens? Perfect. But adding spinach the wrong way is the #1 reason for a watery, bland filling. Here’s how to do it right:
- If using frozen spinach: Thaw a 10-ounce package completely. Then, you have to get aggressive. Place the spinach in a clean kitchen towel or several layers of paper towels and wring it out over the sink. Squeeze until it’s a tight, dry ball. You’ll be shocked at how much water comes out.
- If using fresh spinach: The better option! Sauté about 5-6 ounces of fresh spinach in a pan with a little olive oil and garlic until it’s fully wilted. This not only cooks off the water but also builds a layer of fantastic flavor that you’d otherwise miss. Let it cool slightly, chop it up, and then mix it into your filling. This guarantees a rich, flavorful addition that enhances—not dilutes—your creamy filling.
3. Cook Your Pasta Just Shy of Al Dente
It can be tempting to cook the manicotti shells until they are perfectly tender in the boiling water. Please don’t. This is a classic mistake that leads to mushy, fall-apart pasta after it’s baked.
- The Rule: Cook the pasta for 1-2 minutes less than the package directions for al dente. It should still have a significant bite and feel a little firm.
- The Reason: The shells are about to spend 20-25 minutes in a hot oven, bathing in sauce. They will finish cooking and absorb moisture there, becoming perfectly tender and holding their shape. If you cook them fully in the pot, they have nowhere to go but mush. After boiling, drain them and lay them flat on a piece of parchment paper you’ve lightly sprayed with cooking spray so they don’t stick together while you prepare the filling.
How to Make Creamy Chicken Manicotti, Step-by-Step
Follow these steps exactly, and you’ll get a perfect result on your very first try. Let’s get cooking!
Time Needed: 50 minutes.
1.Prep & Cook the Pasta
- First things first: get that oven preheating to 375°F (190°C).
- Bring a large stockpot of heavily salted water to a rolling boil. Add the manicotti shells and cook them for 1-2 minutes less than the package directions for al dente. They should be firm but pliable. Remember, they will finish cooking in the oven!
- Gently drain the pasta. Lightly spray a sheet of parchment paper with cooking spray and lay the shells flat in a single layer to prevent them from sticking together.
2.Mix the Creamy Chicken Filling
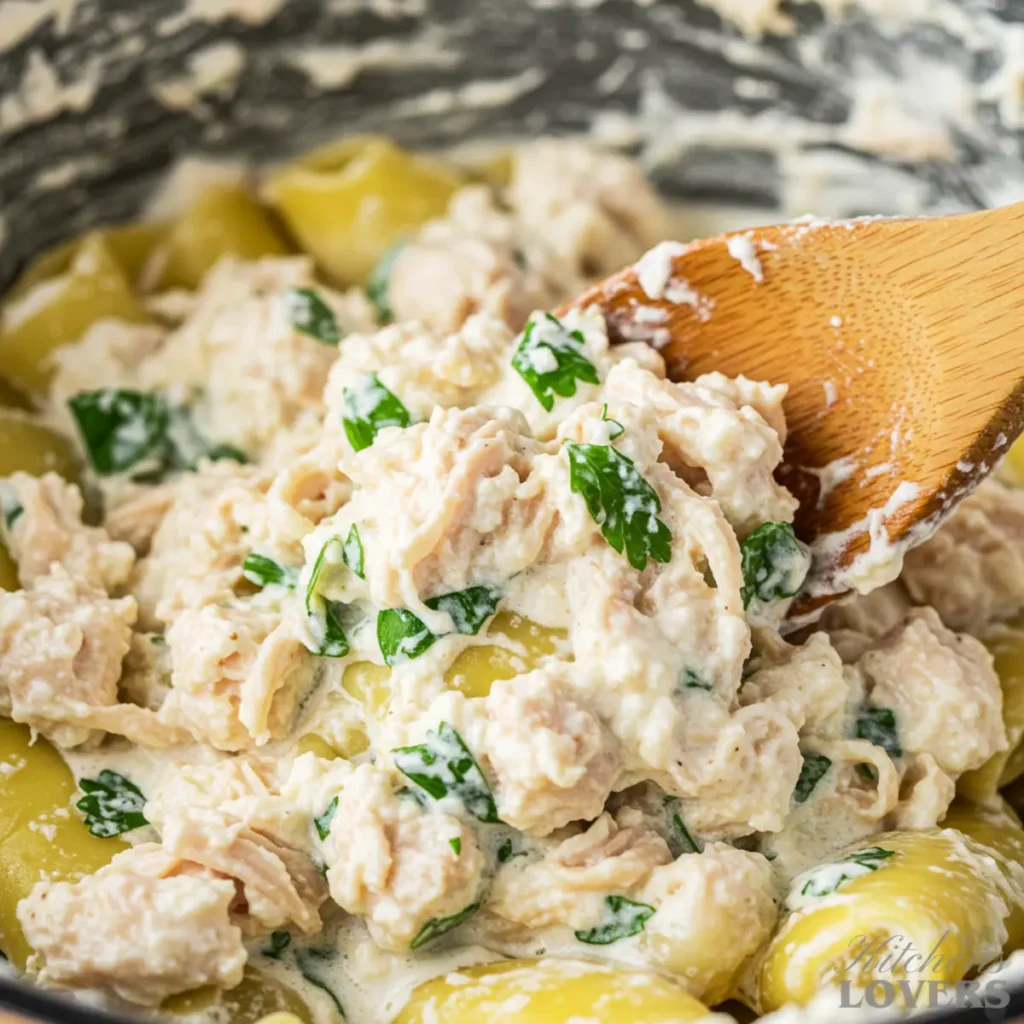
- In a large bowl, combine the 3 cups of shredded rotisserie chicken, the 15-ounce container of whole milk ricotta, 1 cup of the shredded mozzarella, ½ cup of grated Parmesan, the chopped parsley, the large egg, and the seasonings (garlic powder, salt, and pepper).
- Mix everything together until it’s well combined. This beautiful, thick mixture is what we’ll be piping into the shells. Set it aside for a moment.
3.Craft the Luxurious, From-Scratch Cream Sauce
- Now for the part that puts this recipe leagues above the rest—the homemade sauce. Don’t worry, it’s easy. In a medium saucepan over medium heat, melt the 4 tablespoons of butter.
- Add the 2 cloves of minced garlic and let it sizzle for just 30-60 seconds until that irresistible, nutty aroma fills your kitchen.
- Sprinkle the ¼ cup of all-purpose flour over the melted butter and whisk it constantly for about one minute. This is called a “roux,” and cooking it for a moment toasts the flour and gets rid of any raw taste. It’s a crucial step for a silky, not pasty, sauce.
- Gradually pour in the 2 ½ cups of whole milk and 1 cup of chicken broth, whisking vigorously the entire time to keep it lump-free.
- Bring the sauce to a gentle simmer. Continue to cook, stirring frequently, for about 5-8 minutes, or until the sauce has thickened enough to coat the back of a spoon. You’ll feel it transform from watery to wonderfully creamy.
- Remove it from the heat and stir in the salt, pepper, and that little pinch of nutmeg. Give it a taste—see the difference fresh makes?
4.Assemble Your Manicotti
- Spread about 1 cup of your beautiful, homemade cream sauce evenly over the bottom of a 9×13 inch baking dish. This creates a bed for the pasta so it won’t stick and helps infuse it with flavor from the bottom up.
- Transfer your chicken filling to your piping bag (or Ziploc bag). Snip the corner and pipe the filling into each of your partially cooked manicotti shells. Arrange the filled pasta in a single layer in the prepared baking dish.
- Pour the remaining cream sauce all over the top of the shells, making sure to coat them generously.
- Sprinkle the remaining ½ cup of mozzarella cheese over the top.
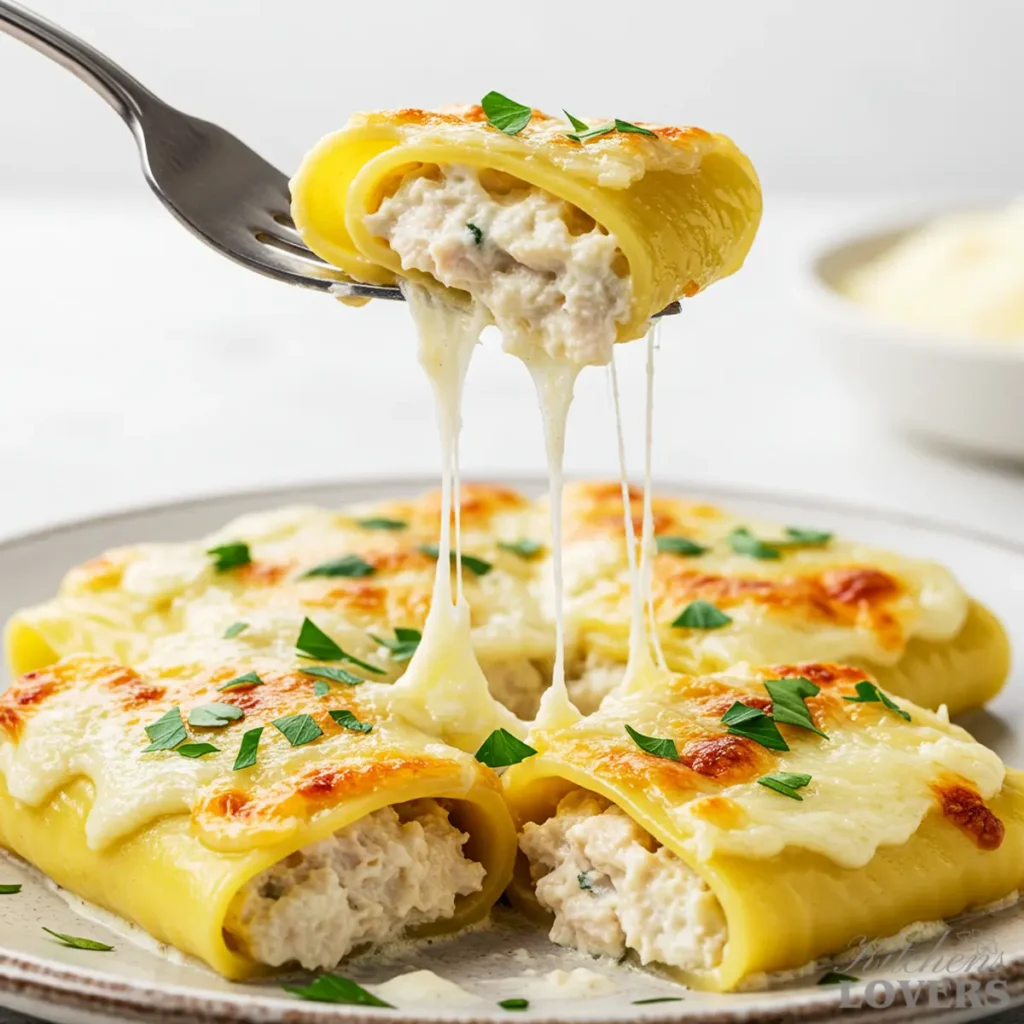
5.Bake to Golden Perfection
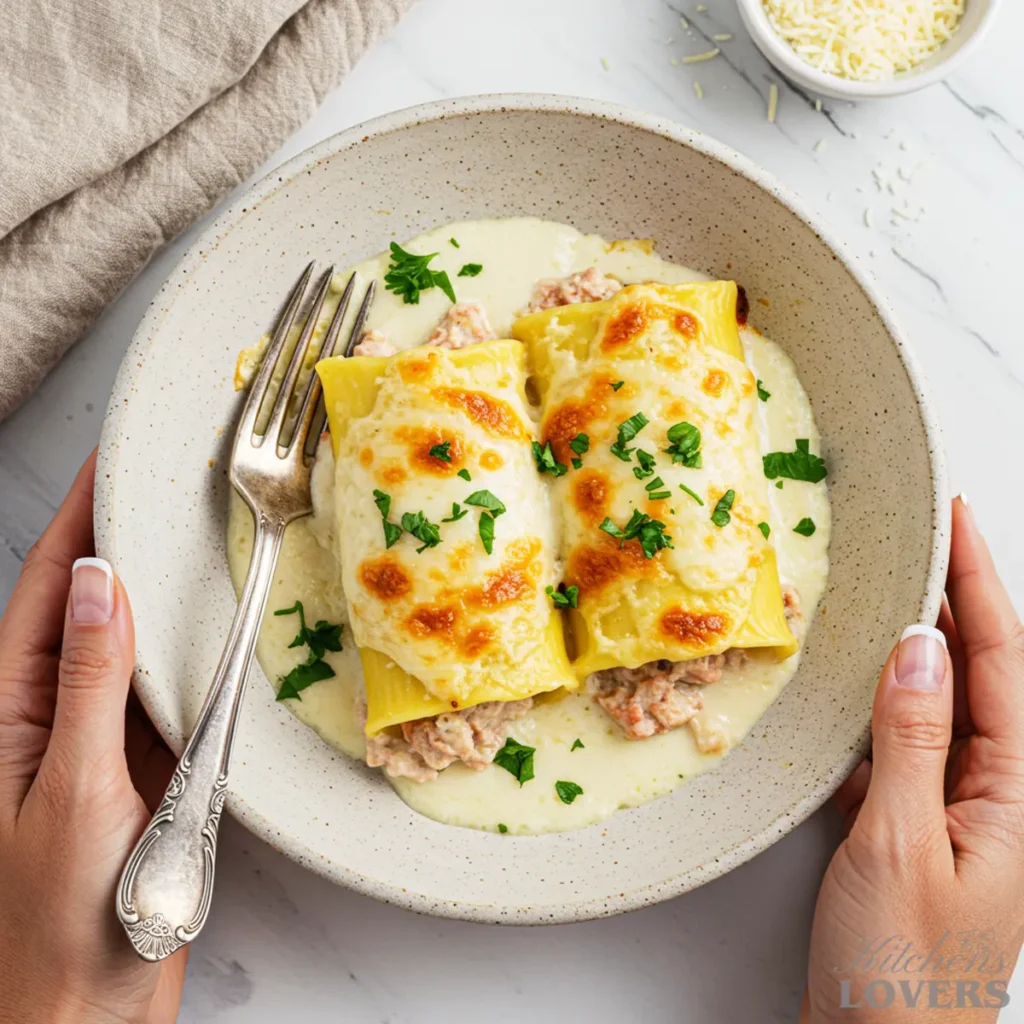
- Bake, uncovered, at 375°F for 20-25 minutes. You’ll know it’s ready when the sauce is bubbling around the edges and the cheesy topping is melted and turning a beautiful golden brown.
- Let the manicotti rest for about 5-10 minutes before serving. This allows the filling and sauce to set up a bit, ensuring your manicotti holds its shape when you serve it. Garnish with a little extra fresh parsley, if you like. Enjoy your delicious homemade manicotti!
Pro Variations to Customize Your Dish
This chicken manicotti recipe is a fantastic canvas for a little creativity. Once you’ve mastered the base recipe, you can easily adapt it. Here are a couple of my tested-and-perfected variations.
1. Easy No-Boil Manicotti Variation
Yes, you can absolutely make this without boiling the pasta first! This is perfect for those extra-busy nights. To make this work, we need to adjust the sauce liquid and baking time to ensure the shells cook through perfectly in the oven.
- The Adjustment: Follow all the recipe steps as written, but increase the chicken broth in the sauce from 1 cup to 2 ½ cups. This extra liquid is essential and will be absorbed by the dry pasta as it bakes.
- The Technique: Stuff the uncooked manicotti shells with the filling (the piping bag method still works perfectly here!). Arrange them in the pan, pour over your thinned-out sauce, and cover the baking dish tightly with aluminum foil.
- New Baking Time: Bake covered for 45 minutes. The foil traps the steam, which cooks the pasta. After 45 minutes, remove the foil, top with your mozzarella, and bake for another 10-15 minutes, until the cheese is melted and golden brown.
2. Chicken, Mushroom & Spinach Manicotti
For an earthy, restaurant-quality flavor boost, add sautéed mushrooms and spinach. This variation is a go-to in my house.
- Prep the Veggies: In a skillet over medium heat, melt a tablespoon of butter. Add 8 ounces of sliced cremini mushrooms and cook until they have released their water and started to turn golden brown. Add 2 cloves of minced garlic and 5 ounces of fresh spinach. Sauté until the spinach has wilted completely. Let the mixture cool, then chop it finely.
- How to Incorporate: Squeeze any excess moisture from the cooled mushroom and spinach mixture. Then, simply fold it into the chicken and ricotta filling in Step 2 of the main recipe. Proceed with the recipe as written. The savory depth this adds is simply incredible.
Storing, Freezing & Making Ahead: Your Game Plan
One of the best things about this chicken manicotti recipe is how wonderfully it adapts to your schedule. Whether you’re planning for a dinner party tomorrow or stocking your freezer for a busy month, I’ve got you covered. This dish is a fantastic make-ahead option.
Storing and Reheating Leftovers
- To Store:If you have leftovers (and that’s a big ‘if’!), simply cover the baking dish tightly with foil or transfer individual portions to an airtight container. While they will keep beautifully in the refrigerator for 3 to 4 days, for specific questions on temperature and food safety, it’s always best to consult the Official USDA guidelines on leftovers to be sure.
- To Reheat: The oven is your best friend for restoring that just-baked taste. Place the manicotti in an oven-safe dish, add a splash of milk or chicken broth to revive the sauce, and cover with foil. Bake at 350°F for about 15-20 minutes, or until it’s heated through. The foil is key—it traps steam and prevents the pasta from drying out.
How to Make Manicotti Ahead (Assemble Now, Bake Later)
This is the perfect strategy for entertaining. You do all the work ahead of time and simply pop it in the oven when you’re ready.
- Assemble Completely: Follow all the recipe instructions right up to the final step of baking. Prepare the sauce, stuff the shells, arrange them in the baking dish, and pour the sauce over top.
- Hold the Cheese: For the best texture, I recommend waiting to add the final layer of mozzarella until just before you bake.
- Cover & Chill: Cover the dish tightly with plastic wrap and store it in the refrigerator for up to 2 days.
- Bake It: When you’re ready to eat, let the dish sit on the counter for about 30 minutes to take the chill off (this prevents your cold glass dish from cracking in a hot oven). Add the mozzarella, and bake as directed, adding about 10-15 extra minutes to the baking time since you’re starting from cold.
How to Freeze Chicken Manicotti (Two Ways)
This dish freezes like a dream. A disposable aluminum pan is a great choice here.
Option 1: Freezing Unbaked (My Preferred Method)
This method gives you a result that’s closest to a freshly made dish.
- Assemble the manicotti completely in a freezer-safe dish.
- Wrap it tightly—first with a layer of plastic wrap, then with a layer of heavy-duty aluminum foil. This double barrier is crucial for preventing freezer burn.
- Label the dish with the date and “Chicken Manicotti,” and freeze for up to 3 months.
- To Bake From Frozen: Do not thaw! Preheat your oven to 375°F. Remove the plastic wrap, but keep the foil on. Bake covered for 50-60 minutes. Then, remove the foil, and bake for another 15-20 minutes, or until the top is golden and the sauce is bubbly.
Option 2: Freezing Baked
- Bake the recipe as directed and let it cool completely. This is very important.
- Wrap, label, and freeze as described above. It will also last for up to 3 months.
- To Reheat: Let it thaw in the refrigerator overnight. Reheat in a 350°F oven, covered with foil, for 20-25 minutes, or until heated through.
What to Serve With This Creamy Chicken Manicotti
This chicken manicotti is the undeniable star of the show, so I love to pair it with sides that bring contrast in texture and flavor. The goal is to balance the beautiful richness of the dish, creating a complete and memorable meal. Choosing the right partners is a signature part of all my Crave-worthy chicken pasta creations, and these unique pairings are designed to make your manicotti dinner feel truly special.
Shaved Fennel & Orange Salad:
This is my absolute favorite pairing. It’s an elegant, refreshing salad that looks and tastes like something from a fine Italian restaurant. The flavor logic is about sharp contrast. The crisp, slightly licorice-y crunch of the raw shaved fennel and the sweet, bright acidity of fresh orange slices cut through the creamy sauce beautifully, cleansing the palate and keeping the meal from feeling too heavy. Just toss with a light olive oil dressing and some toasted pine nuts.
Sautéed Broccolini with Garlic & Chili Flakes:
Forget simple steamed vegetables. This side adds a sophisticated, savory bite. We’re charring the broccolini just slightly to bring out its sweetness, then hitting it with sizzled garlic and a pinch of red pepper chili flakes. That subtle touch of heat is the magic trick—it awakens the palate and offers a fantastic counterpoint to the rich, cheesy manicotti without overpowering it.
Warm Rosemary Focaccia with Flaky Sea Salt:
While any good bread works, rosemary focaccia elevates the experience. It’s softer and more aromatic than standard garlic bread. The distinct, pine-like fragrance of the rosemary beautifully complements the chicken and cream sauce. Its plush, airy texture is perfect for wiping the plate clean, ensuring not a single drop of that homemade sauce goes to waste. A sprinkle of flaky sea salt on top adds a final, delicious crunch.
Frequently Asked Questions
Filling & Sauce Choices
Without a doubt, the easiest and cleanest way is the piping bag method I outlined in the tips section. Don’t have a piping bag? No problem. A large gallon-sized Ziploc bag is the perfect substitute. You just fill the bag with the chicken-ricotta mixture, seal it, snip a corner, and pipe the filling directly into the cooked shells. It’s incredibly fast and completely eliminates the frustrating mess of trying to use a spoon.
Absolutely! This recipe is fantastic with a rich marinara sauce if you’re not in the mood for a cream sauce. Simply substitute your favorite marinara for the homemade white sauce in this recipe. I often say that a great red sauce is the foundation of so many amazing meals, and my popular Chicken Pasta Marinara Sauce recipe is a perfect example of a baked chicken pasta that celebrates that classic flavor combination.
Cheese & Pasta Know-How
This is a super common issue, and it almost always comes down to two things. First, use part-skim or skim ricotta. These have a higher water content and will break down and get watery in the oven. Using whole milk ricotta is essential for a creamy, stable filling. The second culprit is adding vegetables (like spinach or mushrooms) without getting rid of their excess moisture first. You absolutely must squeeze thawed frozen spinach dry or sauté fresh vegetables to cook off their water before adding them to the cheese mixture.
It’s easy to get them confused! While they are used in similar baked dishes, the main difference is the pasta itself. Manicotti are preformed, ridged tubes made from dried pasta. Cannelloni, on the other hand, are traditionally made from fresh pasta sheets that you roll into smooth tubes around the filling. Manicotti’s ridges are great for helping the sauce cling to the pasta. You’ll often see cannelloni recipes suggesting “manicotti shells” as an easy substitute, and vice versa.
I Want to Hear From You!
This really is my pride-and-joy chicken manicotti recipe, and nothing makes me happier than seeing it come to life in your kitchen. If you make it, please leave a comment and a star rating below! I’d love to know how it turned out and if you tried any fun variations. Your feedback helps other home cooks find and enjoy this recipe, too!
And if you loved the cozy, satisfying feeling of this baked pasta, you have to try my rustic Chicken Cacciatore Pasta next—it’s a true one-pan wonder packed with bell peppers and a rich tomato sauce. For even more ideas on turning simple ingredients into weeknight magic, explore our full collection of Crave-Worthy Chicken Pasta recipes.
Get My Best Recipes, Straight to Your Inbox!
Want more foolproof, family-tested dinner ideas? Sign up for my email list, and I’ll send my newest easy pasta recipes right to you.
About Kate
Kate Thompson created KitchensLovers.com to simplify dinner for real-life families. She develops easy, flavor-packed chicken pasta recipes tested dozens of times to guarantee results. Her motto: “Easy Pasta, Every Time.”
The Secret to a Silky, From-Scratch Pasta Sauce
I’ve decided to add this section because, frankly, understanding why this homemade sauce is so much better than anything from a jar is the key that will elevate your cooking forever. The word “Béchamel” might sound fancy, but it’s just the French term for the simple, classic cream sauce we made today. And learning how to do it properly is one of the most valuable skills you can have in your kitchen.
The entire secret lies in one simple, powerful step: making a proper roux.
A roux is nothing more than equal parts fat (in our case, butter) and flour, cooked together at the beginning of the sauce-making process. That 60-second step where you whisk the flour into the melted garlic butter is where all the magic happens.
So, why do we do it?
It Banishes the Raw Flour Taste:
Have you ever had a sauce that tasted a bit pasty or chalky? That’s because raw flour was just dumped into the liquid. By cooking the flour in the butter first, you toast it. You get rid of that raw flavor and replace it with a subtle, nutty depth that instantly makes your sauce taste more complex and professional. It’s the moment you can smell the change in your kitchen.
It Creates a Silky, Stable Foundation:
This is the science behind the perfect texture. The fat in the butter coats the flour starches. Then, when you whisk in your milk and broth, those starches can swell up and absorb the liquid evenly and gradually, without clumping together. This process is what creates a sauce that is naturally thick, glossy, and beautifully smooth. Jarred sauces, by contrast, often rely on chemical emulsifiers and gums to create a texture that can sit on a shelf for months. They can’t replicate the genuinely luxurious feel of a sauce thickened with a well-made roux.
This is why our sauce tastes so much cleaner and richer. We’re not using preservatives, excess salt, or artificial flavorings. We are using butter, flour, milk, and broth to build something pure and delicious from the ground up.
Once you realize that a roux is the simple secret behind everything from a perfect mac and cheese to a creamy soup or a stunning gratin, it feels like unlocking a new level of cooking. It’s a fundamental technique, and now, it’s yours.
This recipe was last tested and updated in July 2025 to ensure perfect results.
Chicken Manicotti Recipe
Equipment
- 1 9×13 inch Baking Dish
- 1 Piping Bag (or Gallon-Sized Ziploc Bag)
- 1 Large Stockpot
- 1 Medium Saucepan
Ingredients
For the Filling
- 3 cups Shredded Rotisserie Chicken
- 15 ounces Whole Milk Ricotta Cheese
- 1 ½ cups Shredded Mozzarella Cheese divided
- ½ cup Grated Parmesan Cheese freshly grated
- 1 Large Egg
- ¼ cup Fresh Parsley chopped
- 1 tsp Garlic Powder
- ½ tsp Salt
- ¼ tsp Black Pepper
For the From-Scratch Cream Sauce & Pasta
- 1 box 8 ounces Manicotti Shells
- 4 tbsp Unsalted Butter
- ¼ cup All-Purpose Flour
- 2 cloves Garlic minced
- 2 ½ cups Whole Milk
- 1 cup Chicken Broth
- 1 pinch Nutmeg
Instructions
- Preheat oven to 375°F (190°C). Bring a large stockpot of heavily salted water to a boil. Cook manicotti shells for 1-2 minutes LESS than package directions. Gently drain and lay them flat on parchment paper sprayed with cooking spray.
- In a large bowl, combine shredded chicken, ricotta, 1 cup mozzarella, Parmesan, parsley, egg, garlic powder, salt, and pepper. Mix until well-combined.
- In a medium saucepan over medium heat, melt the butter. Add the minced garlic and sizzle for 30-60 seconds until fragrant. Sprinkle in the flour and whisk constantly for 1 minute to form a roux.
- Gradually whisk in the whole milk and chicken broth until smooth. Bring to a gentle simmer and cook, stirring frequently, for 5-8 minutes until thickened. Remove from heat and stir in salt, pepper, and a pinch of nutmeg.
- Spread 1 cup of the cream sauce on the bottom of a 9×13 inch baking dish. Transfer the chicken filling to a piping bag (or a Ziploc bag with a corner snipped off) and pipe the filling into each shell. Arrange shells in the dish.
- Pour the remaining cream sauce over the shells and top with the remaining ½ cup of mozzarella cheese.
- Bake, uncovered, for 20-25 minutes, until the sauce is bubbling and the cheese is golden brown. Let rest for 5-10 minutes before serving.
Notes
- Cook Pasta Shy of Al Dente: Pull the pasta from the water when it is still very firm. It will finish cooking in the oven, ensuring it doesn’t get mushy.
- Use Whole Milk Ricotta: For the creamiest, most stable filling that won’t get watery, whole milk ricotta is a must.
- No-Boil Variation: Increase chicken broth in the sauce to 2 ½ cups. Stuff uncooked shells. Cover dish tightly with foil and bake for 45 minutes. Remove foil, top with cheese, and bake for another 10-15 minutes until golden.
- Make-Ahead: Assemble the dish completely (but do not bake) and refrigerate for up to 2 days. Let sit at room temp for 30 mins before baking, then add 10-15 minutes to the bake time.
- To Freeze: Assemble in a freezer-safe dish, wrap tightly in plastic then foil. Freeze up to 3 months. Bake from frozen, covered with foil, for 50-60 mins, then uncover and bake 15-20 mins more.
