
I’ll never forget the frustration. Standing over my skillet, staring at a greasy, separated mess that was supposed to be a luxurious piccata sauce. It’s a moment every home cook knows—that sinking feeling when the sauce breaks. After thirty years of chasing restaurant-quality results in my own kitchen, I can tell you the secret to restaurant-worthy chicken piccata pasta isn’t a mystery ingredient; it’s the method.
And that’s what I’m going to share with you today.
Forget watery, disappointing sauces for good. This isn’t just another recipe. This is your masterclass in creating an elegant, unbelievably flavorful Chicken Piccata Pasta at home. We’re talking tender, golden-brown chicken sizzling hot from the skillet and a bright, glossy sauce that zings with the aroma of lemon and briny capers as it perfectly coats every strand of pasta. It’s the kind of meal that silences the table, and it’s so much easier than you think. You’ve got this.
Why This Recipe Works
- The Foolproof Pan Sauce: I’ve perfected a technique that builds flavor in layers and uses the starchy pasta water to create a stable, silky, and utterly seamless sauce. No breaks, no grease slicks, just pure liquid gold.
- Juicy, Tender Chicken, Guaranteed: We use thinly sliced cutlets and a specific dredging technique, not just for a beautiful golden crust, but to protect the chicken and keep it unbelievably moist.
- The Perfect Pasta Pairing: I’ll show you why delicate angel hair pasta is the ideal choice for this dish, creating the perfect sauce-to-pasta ratio in every single bite.
- Proactively Solves Problems: This recipe is loaded with the kind of real-world tips and advice you only get from making a dish hundreds of times. We’ll tackle the pitfalls before they happen.
Key Ingredients for Piccata Perfection
This recipe comes together with a handful of simple, powerful ingredients. Quality matters here, as each one plays a crucial role in building our signature silky sauce and juicy chicken.
- For the Chicken:
- 1.5 lbs thin-sliced chicken breast cutlets (about ¼-inch thick)
- ½ cup Wondra flour (or all-purpose flour)
- Kosher salt and freshly cracked black pepper
- 2 tbsp olive oil
- 4 tbsp unsalted butter, divided and kept cold
- For the Pasta:
- 1 lb angel hair pasta (or capellini)
- For the Pan Sauce:
- 3 cloves garlic, minced
- ¾ cup dry white wine (like Pinot Grigio or Sauvignon Blanc)
- ¾ cup low-sodium chicken broth
- ⅓ cup brined capers, drained
- Juice of 1 large lemon (about ¼ cup)
- ½ cup reserved pasta water
- ¼ cup chopped fresh parsley, plus more for garnish
Star Ingredients: The “Why” Behind the “What”
Thin-Sliced Chicken Cutlets
For this dish, you absolutely must use thinly sliced chicken cutlets, about ¼-inch thick. You can buy them this way or simply slice regular chicken breasts in half horizontally (what we call “butterflying”) and gently pound them to an even thickness. Why? It’s a non-negotiable for two reasons. First, thin cutlets cook incredibly quickly and evenly, which is the secret to avoiding dry, tough chicken. Second, this creates the maximum surface area for that beautiful, golden-brown crust we get from dredging in flour. More crust means more flavor in your pan, which is the foundation of our entire sauce.
Angel Hair Pasta
Through years of making this for family and clients, I’ve found one clear winner: angel hair pasta. A classic, elegant piccata sauce is light and zesty, not heavy and thick. It needs a pasta that it can cling to without being overwhelmed. The delicate, fine strands of angel hair (or its cousin, capellini) are the perfect vehicle. Every single strand gets coated in that shimmering lemon-butter sauce, giving you the perfect, balanced bite every time. Heavier pastas like fettuccine or penne just can’t achieve the same effect; they simply drown out the sauce’s nuance.
Wondra Flour
My secret weapon for the perfect dredge. This ultra-fine, “instant” flour creates a light, delicate crust that won’t turn gummy or heavy. It also dissolves beautifully, helping to ever-so-slightly thicken the pan sauce later. If you don’t have it, AP flour works well—just be sure to tap off any excess.
Cold, Unsalted Butter
The temperature here is critical. We finish the sauce by swirling in cold pats of butter off the heat. This process, called “monter au beurre” in French kitchens, is the key to emulsifying the sauce, making it glossy, rich, and stable. Adding warm or melted butter can cause it to break.
Smart Swaps
| Instead Of… | You Can Use… | The Result |
| Wondra / AP Flour | 1:1 Gluten-Free All-Purpose Flour Blend | A great gluten-free crust. GF flours can brown a bit faster, so watch your heat. |
| Garlic | 1 large shallot, finely chopped | A slightly milder, sweeter aromatic base. |
| Capers | Finely chopped green olives | A different kind of salty, briny kick. |
| Angel Hair | Thin spaghetti or linguine | A good alternative, but with a slightly heavier bite. |
Essential Equipment for Piccata Perfection
You don’t need a kitchen full of fancy gadgets for this recipe, but one piece of equipment is non-negotiable for achieving that perfect pan sauce: the right skillet.
- A Large, Stainless-Steel Skillet: This is the MVP of this recipe… The large size (12 inches is perfect) gives the chicken cutlets plenty of room so they sear beautifully instead of steaming. This kind of skillet is a true kitchen workhorse, and learning the simple pro techniques for How to keep stainless-steel cookware shining like new will ensure it lasts a lifetime and performs flawlessly for you.
- A Large Pot: You’ll need this for boiling the angel hair pasta. Don’t skimp on the size; pasta needs plenty of water to cook properly without clumping. We also need that starchy, salty water for our sauce, so it’s doing double duty.
- Tongs: Essential for flipping the chicken without piercing it and for swirling the pasta directly in the skillet with the finished sauce.
- A Fine-Mesh Strainer or Juicer: This is my non-negotiable trick for a perfect sauce. Always juice your lemon through a small strainer to catch any seeds or excess pulp. A single bitter seed can compromise the entire pan sauce, and this simple step guarantees a clean, pure lemon flavor every time.
Expert Tips for Flawless Results
After making this dish more times than I can count, I’ve learned that success comes down to a few key techniques. These aren’t just suggestions; they are the bedrock principles that separate a good chicken piccata pasta from an unforgettable one.
The Secret to a Silky, Never-Broken Pan Sauce
This is where kitchen magic happens, but it’s not magic—it’s science. The goal is an emulsion, and the enemy is high heat. After you’ve built your flavors with wine and broth, and you’re ready to finish the sauce, you must take the skillet off the burner. With the pan off the heat, add your cold butter pats one or two at a time. Now, swirl the skillet constantly. Don’t whisk, don’t stir violently—just a firm, continuous swirl. You are coaxing the cold fat to melt slowly into the warm liquid, creating a stable, glossy, and beautifully thick sauce. If you add the butter to a boiling-hot pan, it will simply melt into a greasy layer and break the sauce. Patience here is everything.
Give Your Chicken Room: The Secret to a Golden Crust
You’ve seen recipes warn you not to overcrowd the pan, but let me tell you why. A hot skillet is designed to sear. When you place a piece of chicken in it, the pan’s temperature drops slightly. If you add too many cutlets at once, the temperature plummets dramatically. Instead of a sizzle, you get a sad simmer. The chicken begins to steam in its own juices, turning it pale and rubbery. It also prevents the formation of that golden-brown fond on the bottom of the pan—which is pure, concentrated flavor that forms the soul of our sauce. Cook in two batches if you have to. Those extra five minutes are the single best investment you can make for incredible texture and flavor.
The Lemon & Caper Power Play
The signature taste of piccata comes from a perfect balance of rich, savory, salty, and bright. The lemon and capers are your primary tools for achieving this. Think of capers as little briny bombs that cut through the richness. Sizzling them for just a minute with the garlic makes them “bloom,” intensifying their flavor. But the real pro move is how you handle the lemon. Always add the fresh lemon juice at the very end, with the pan off the heat. If you boil lemon juice, its fresh, zesty aroma cooks off, leaving a dull, sometimes bitter flavor behind. By adding it last, you preserve all of its bright, electric acidity, which is what makes the whole dish pop.
How to Make Perfect Chicken Piccata Pasta, Step by Step
Follow these steps precisely, and I promise you a restaurant-quality meal. Read through them once before you begin to get the rhythm of the dish. The whole process moves quickly once you start searing!
Time Needed: 40 minutes.
1. Prepare the Chicken and Cook the Pasta
- Prep Your Station: Set up a simple dredging station. On a large plate or in a shallow dish, combine the Wondra flour with a generous pinch of kosher salt and about 10-12 grinds of fresh black pepper. Place your thin-sliced chicken cutlets next to the plate. Have another clean plate ready for the cooked chicken.
- Start the Pasta Water: Get a large pot of water on the stove over high heat. Once it comes to a rolling boil, salt it generously. It should taste like the sea. This salty water seasons the pasta from the inside out.
- Dredge the Chicken: One by one, press a chicken cutlet firmly into the flour mixture, making sure to coat both sides completely. Give it a gentle shake to tap off any excess flour. You want a light, even dusting, not a thick, cakey layer. Set the dredged cutlets on your workspace.
2. Sear the Chicken to Golden Perfection
- Heat the Skillet: Place your large, stainless-steel skillet over medium-high heat. Add the olive oil and 2 tablespoons of the butter. Let it heat up until the butter is fully melted and begins to foam. You’ll know it’s ready when you see a faint shimmer across the surface.
- Sear in Batches: Carefully lay half of the chicken cutlets in the hot skillet, leaving space between them. You should hear an immediate, confident sizzle. That’s the sound of success. Cook for about 2-3 minutes per side, turning only once with your tongs. The goal is a deep, golden-brown crust. Transfer the cooked chicken to the clean plate. Repeat with the remaining chicken. If the pan looks dry, add another drizzle of olive oil before searing. Do not wipe out the pan!
3. Build the Signature Pan Sauce
- Cook the Pasta: By now, your water should be boiling. Drop in the angel hair pasta. It cooks fast—usually just 2-4 minutes. Keep a close eye on it.
- Sauté the Aromatics: Reduce the skillet heat to medium. Add the minced garlic to the pan and sizzle it in the chicken drippings for about 30-45 seconds, just until that nutty, irresistible aroma starts to perfume your entire kitchen. Don’t let it brown, or it will turn bitter.
- Deglaze and Reduce: Pour the white wine into the skillet. It will steam and bubble aggressively—this is good! Use a wooden spoon or spatula to scrape up all those prized brown bits (fond) from the bottom of the pan. Let the wine simmer and reduce by about half, which should take 2-3 minutes. Add the chicken broth and capers, bringing it back to a lively simmer.
- Important: Reserve the pasta water. Before you drain, scoop out at least 1 cup of the starchy cooking water. This liquid gold is non-negotiable; it’s the emulsifier that binds our entire sauce together. Drain the pasta.
4. Bring It All Together
- Finish the Sauce: Take the skillet completely off the heat. Add the juice of your lemon (strained!), the chopped parsley, and about ½ cup of the reserved pasta water. Now, add the final 2 tablespoons of cold butter. Swirl the pan continuously until the butter has melted and the sauce has transformed into a glossy, slightly thickened, and unified liquid. Your pro check: The sauce should be thick enough to lightly coat the back of a spoon.
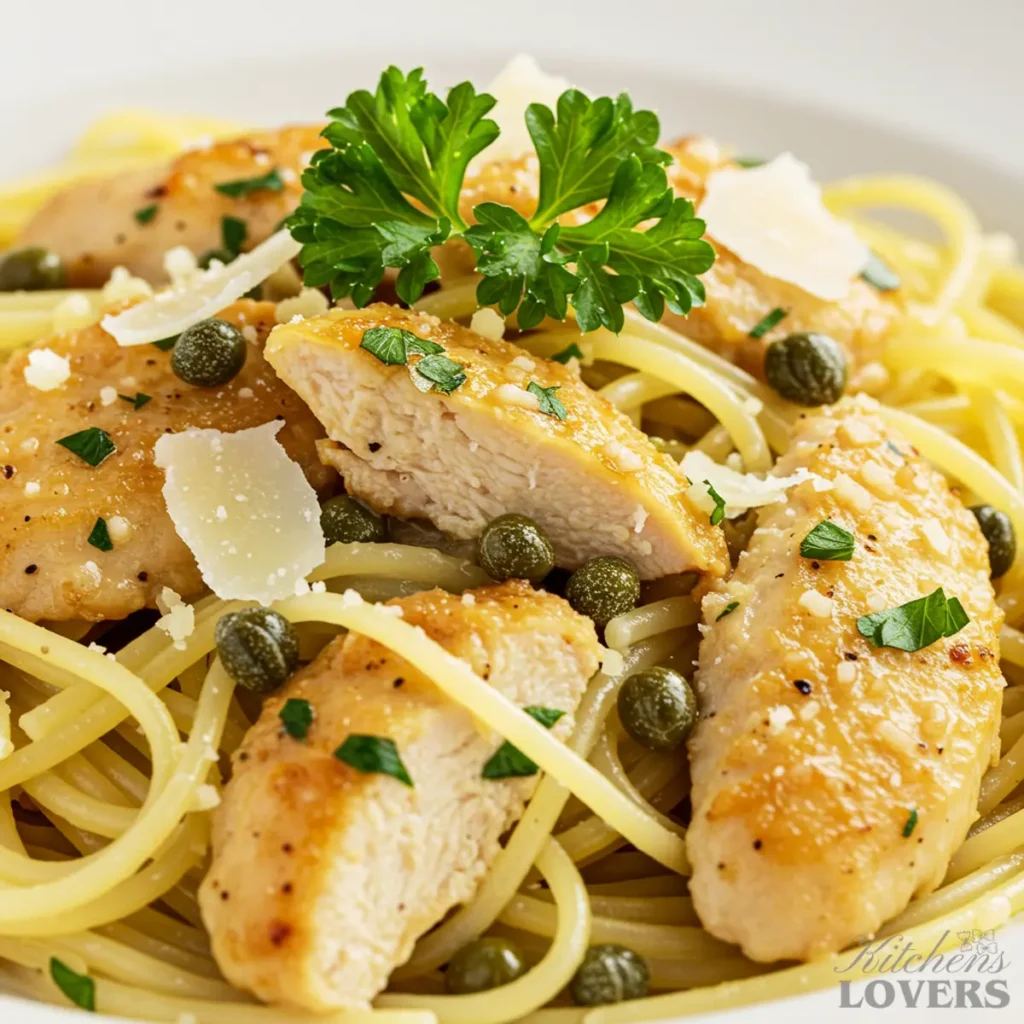
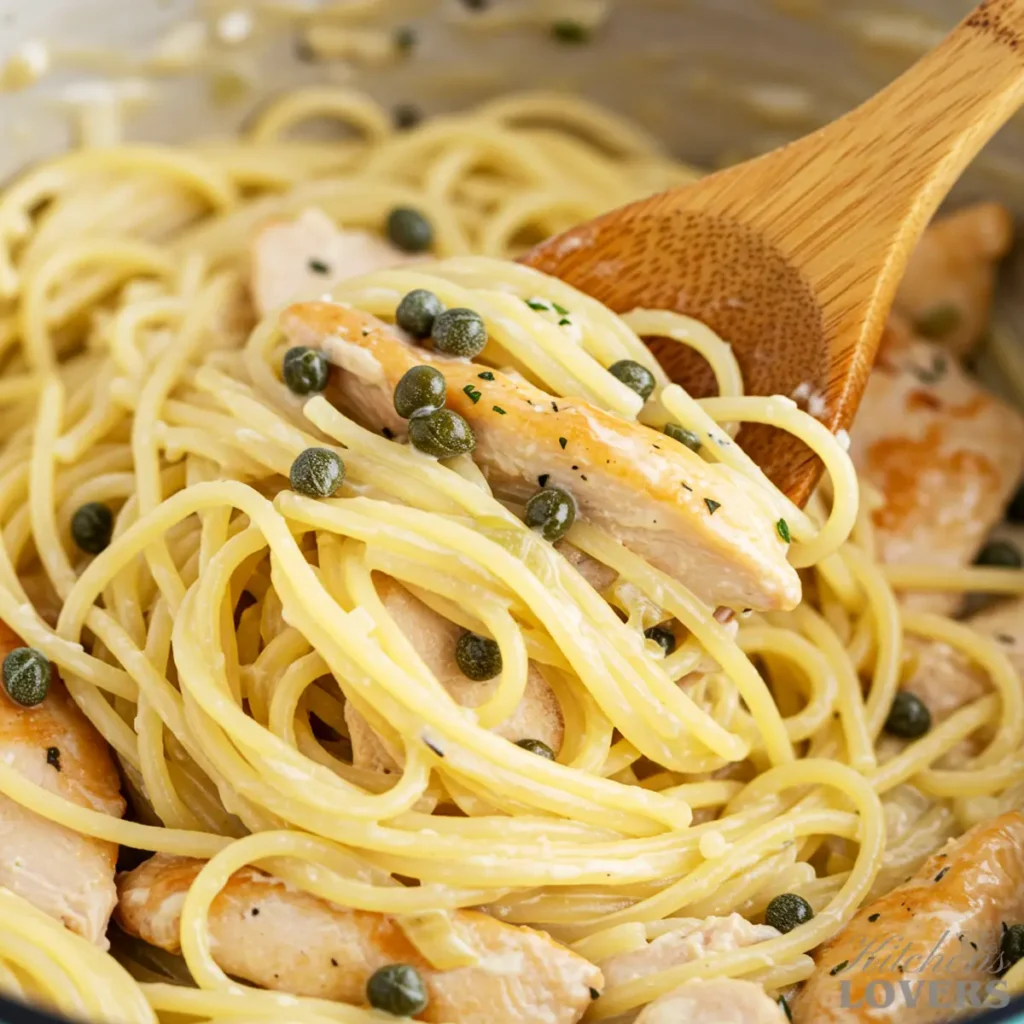
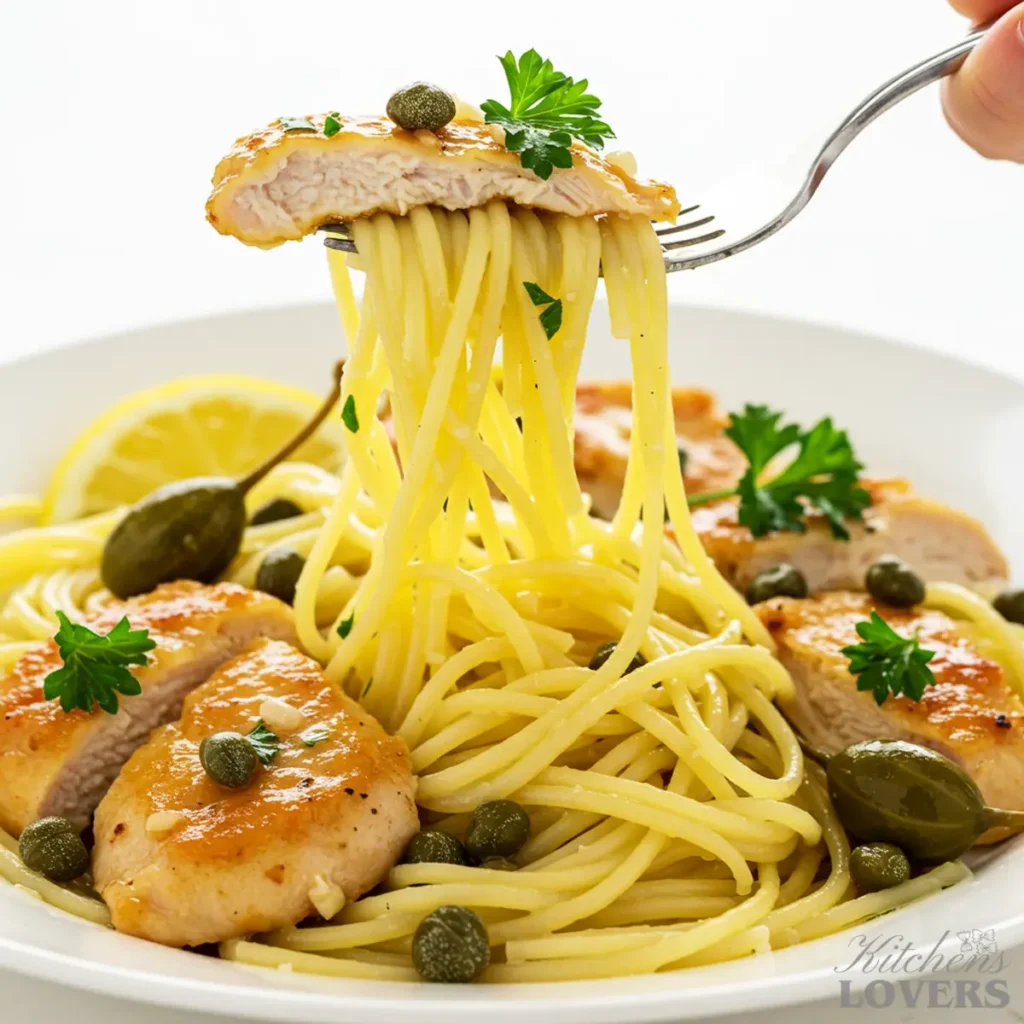
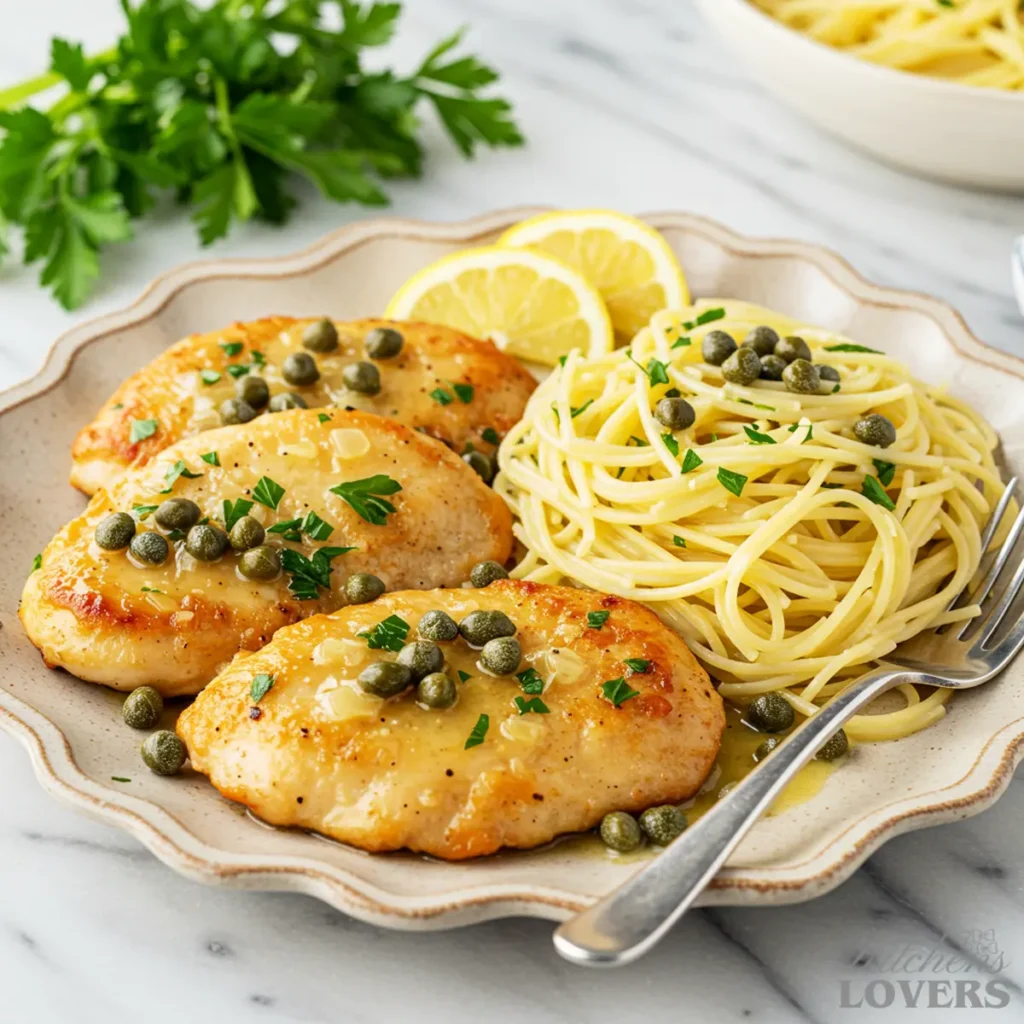
- Combine and Serve: Add the cooked pasta directly into the skillet with the sauce. Use your tongs to toss everything together gently but thoroughly, coating every strand. If the sauce seems a little too thick, add another splash of the reserved pasta water until it’s the perfect consistency. Arrange the pasta on plates and top with the golden-brown chicken cutlets. Garnish with a little more fresh parsley and serve immediately. This dish waits for no one.
Pro Variations to Customize Your Piccata
Once you’ve mastered the classic recipe, you can easily adapt it. Here are a few of my favorite, thoroughly tested variations that add another layer of flavor while respecting the soul of the dish.
How to Make Creamy Chicken Piccata Pasta
This is the most requested variation, and for good reason—it turns the dish into a more decadent, rich affair. The key is to add the cream at the right moment to ensure the sauce stays silky and doesn’t curdle the lemon juice.
- Follow the Master Recipe exactly as written through Part 5, Step 3, Point 3. Sear the chicken and set it aside. Sauté the garlic, deglaze the pan with wine, and simmer with the chicken broth and capers.
- Add the Cream: Reduce the heat to low and pour in ½ cup of heavy cream. Stir it into the broth mixture. Let it come to a very gentle simmer (do not boil rapidly) and cook for 2-3 minutes, stirring occasionally, until the sauce has thickened slightly.
- Finish Off the Heat: Now, proceed with the recipe as planned. Take the skillet off the heat, and then add your strained lemon juice and parsley. Because the heavy cream adds significant richness, a single tablespoon of finishing butter is all you’ll need to create that final, signature gloss.
- Combine and Serve: Toss the cooked pasta directly in the creamy sauce, top with your chicken, and serve immediately. The result is a richer, more luxurious sauce that beautifully balances the bright lemon and briny capers.
Easy Upgrades: Add Mushrooms or Spinach
Looking to add more texture or a serving of vegetables? These are my go-to additions.
- For Golden-Brown Mushrooms: After searing the chicken and removing it from the skillet (before you sauté the garlic), add 8 ounces of sliced cremini mushrooms to the hot pan. Let them cook, stirring only occasionally, for 5-7 minutes until they release their water and turn deeply golden-brown. Remove them from the skillet, set them aside with the chicken, and then proceed with building your pan sauce. Add the cooked mushrooms back in at the end with the pasta.
- For a Touch of Green: For the easiest-ever addition, simply add 2-3 large handfuls of fresh baby spinach to the finished sauce (classic or creamy) along with the pasta. Use your tongs to toss everything together. The residual heat of the sauce and pasta will perfectly wilt the spinach in less than a minute, with no extra cooking required.
A Final Note on Balance: A word of advice: Stick to additions that complement, not overwhelm. The beauty of piccata is its delicate balance. I recommend avoiding overpowering vegetables like bell peppers or broccoli, which can bully the lemon-caper sauce. The simple suggestions above are guaranteed to work in harmony with the dish.
Storing & Reheating Instructions
Let’s be honest: chicken piccata pasta is at its absolute peak the moment it comes out of the skillet. However, with the right technique, you can enjoy leftovers that are nearly as stunning as the original meal. The secret is gentle heat and rebuilding that beautiful sauce.
Storing Leftovers
For the best results, store the chicken and the sauced pasta in a high-quality airtight container. It will keep beautifully in the refrigerator for up to 3 days. While you can store the components separately, I find most families store them combined, so this method is tested for real-world use.
A Note on Freezing
I do not recommend freezing the fully assembled dish. The delicate lemon-butter sauce is an emulsion that will break upon thawing, resulting in a separated, greasy texture. Furthermore, the angel hair pasta will become overly soft and mushy. If you absolutely must freeze something, freeze the pan-seared chicken cutlets alone in a freezer-safe bag for up to a month, but always make the pasta and sauce fresh for the best experience.
The Foolproof Reheating Method (The Skillet Is Your Friend)
Do not use the microwave. I repeat: do not use the microwave. It will heat the pasta unevenly, make the chicken rubbery, and, worst of all, it will destroy your carefully crafted sauce.
The only way to properly reheat this dish is gently on the stovetop.
- Place Leftovers in a Skillet: Add your leftover chicken piccata pasta to a cold skillet.
- Add a Splash of Liquid: Pour in a small splash of chicken broth or water (about 1-2 tablespoons per serving). This extra liquid is crucial; it creates steam and gives the cold, congealed sauce the moisture it needs to become silky again.
- Use Low, Slow Heat: Place the skillet over low to medium-low heat. As it warms up, gently toss and stir the pasta with your tongs. Be patient. The goal is to slowly coax the sauce back to life, allowing the fat and liquid to re-emulsify.
- Serve Immediately: Once it’s warmed through and the sauce is once again clinging to the pasta, plate it immediately. It will be surprisingly close to its original glory.
What to Serve With This Dish
Chicken Piccata Pasta is a powerhouse of flavor, so the perfect side dish is one that offers a pleasing contrast in texture and taste without stealing the spotlight. Instead of the usual suspects, here are a few elegant pairings I turn to for a truly memorable meal.
Creamy Parmesan Polenta:
This is my favorite way to elevate the dish. While you have pasta, a small scoop of soft, creamy polenta on the side offers a wonderful, velvety texture that is heavenly with the bright piccata sauce. The corn’s subtle sweetness balances the lemon and capers, and it’s perfect for capturing any sauce left on the plate.
Shaved Fennel & Parmesan Salad:
For a bright, crunchy contrast, nothing beats this simple salad. Thinly shave a fresh fennel bulb and toss it with high-quality olive oil, a squeeze of lemon juice, salt, and generous shavings of Parmesan cheese. The fennel’s crisp, slightly licorice-like note is an incredible palate cleanser against the rich, savory sauce.
Sautéed Zucchini with Garlic:
For a simple, wholesome vegetable side, you can’t go wrong here. Slowly sauté slices of zucchini in olive oil with a sliver of garlic until they are just tender and lightly caramelized. It’s a mild, classic Italian side that provides a lovely, tender bite without competing with the main course.
Planning a perfectly balanced, restaurant-quality meal is one of the most rewarding parts of cooking. If you enjoyed this approach, my full guide to Crave-Worthy Chicken Pasta has even more iconic centerpiece dishes waiting for the perfect side.
Your Recipe Questions, Answered
These are the questions I hear most often. Let’s tackle them head-on so you can cook with complete confidence.
Sauce Troubleshooting
This is the most common issue, and it almost always comes down to two things: a lack of reduction or not using your starchy pasta water. First, when you add the wine and broth, it’s crucial to let it simmer and visibly reduce. This step concentrates the flavors and boils off excess water. Second, the cloudy, starchy water left over from cooking your pasta is liquid gold. It’s packed with starch that acts as a natural emulsifier and thickener. Without it, your sauce won’t have the body it needs to cling to the pasta. Make sure you’re adding at least a half cup of that reserved water when you finish the sauce.
This is the classic frustration! A “broken” sauce happens for one reason: the heat was too high when you added the fat (the ‘butter’). An emulsion is a delicate bond between fat and liquid, and excessive heat shatters it. That’s why my instructions are so specific: you must take the skillet completely off the stove before you swirl in the cold butter pats. This allows the butter to melt slowly and emulsify into the sauce, creating that signature silky, unified texture instead of melting into a greasy oil slick on top.
Chicken & Dietary Adaptations
Tough chicken is almost always a result of being overcooked, even by a minute. There are two culprits here. First, your cutlets might have been too thick. If they’re thicker than about ¼-inch, the outside will be done long before the inside, forcing you to cook it longer. Second, you may have overcrowded the pan. When you don’t leave enough space, the chicken steams instead of searing, which cooks it slowly and unevenly, resulting in a rubbery texture. Use thin cutlets and a screaming hot pan, and always cook in batches for that perfect, juicy result.
Absolutely! It’s very simple to adapt. First, substitute the flour for your favorite 1-to-1 gluten-free all-purpose flour blend to dredge the chicken. My only note here is that some gluten-free flours can brown a little more quickly, so keep a close eye on your heat. Then, simply use your preferred brand of gluten-free pasta. Angel hair or spaghetti styles work best. The rest of the sauce ingredients are naturally gluten-free, so the results will be just as delicious.
From My Kitchen to Yours
I am so thrilled for you to bring this recipe into your kitchen. Cooking for others is an act of love, and mastering a classic dish like this is something to be proud of.
I’d love to know how your chicken piccata pasta turned out! Please leave a comment and a star rating below to share your experience. Did you try the creamy version? Did you add mushrooms? Every comment helps the next home cook who visits.
If you love bright, citrusy pasta dishes, you absolutely must try my Creamy Lemon Chicken Pasta, which takes that zesty flavor in a wonderfully decadent direction. And if you’re ready to tackle another impressive Italian-American classic, my foolproof guide to Chicken Carbonara is waiting for you.
Ready to stop just following recipes and start understanding why they work? Subscribe to my weekly newsletter for exclusive techniques, kitchen secrets, and new recipes that are tested to be as foolproof as this one.
About the Author
Kate Thompson created KitchensLovers.com to simplify dinner for real-life families. She develops easy, flavor-packed chicken pasta recipes tested dozens of times to guarantee results. Her motto: ‘Easy Pasta, Every Time.’
The Science of a Perfect Pan Sauce (A 60-Second Guide to Emulsification)
Ever wonder how that final pat of butter transforms your pan drippings from a thin liquid into a glossy, clingy sauce? It’s not magic—it’s a beautiful bit of kitchen chemistry called an emulsion. And once you understand it, you’ll never fear a broken sauce again.
Here’s the simple science of what you’re actually doing:
An emulsion is just a stable mixture of two things that normally refuse to mix; in this case, fat (the butter) and liquid (the wine, broth, and lemon juice). The secret lies in two things: two powerful emulsifying agents and a gradual temperature change.
Your stick of butter conveniently contains its own emulsifying agent: milk solids that include lecithin. When you add cold butter to the warm (not boiling!) liquid and begin to swirl, you’re accomplishing two things simultaneously. First, the slow melting prevents the fat from separating out into an oil slick. Second, the constant motion breaks the melting fat into microscopic droplets. The lecithin rushes in, grabbing onto both the tiny fat droplets and the water-based molecules of the sauce, linking them together and forcing them to coexist peacefully. The result is a thickened, stable, and creamy-feeling sauce that is perfectly homogenous. This is where your reserved pasta water provides critical support. The starch granules suspended in that water swell up and act as a natural thickener, getting between the fat and water droplets and creating an even sturdier, more foolproof safety net for your emulsion.
So when you add your pasta water and swirl in your cold butter off the heat, you aren’t just adding flavor. You are physically changing the structure of the liquid, creating a restaurant-quality sauce with pure technique. It’s the ultimate kitchen secret for turning simple ingredients into something truly elegant.
This recipe was last tested and updated in August 2025 to ensure perfect results.
Chicken Piccata Pasta Recipe
Equipment
- A Large, Stainless-Steel Skillet
- A Large Pot
- Tongs
- A Fine-Mesh Strainer or Juicer
Ingredients
For the Chicken
- 1.5 lbs thin-sliced chicken breast cutlets about ¼-inch thick
- ½ cup Wondra flour or all-purpose flour
- Kosher salt and freshly cracked black pepper
- 2 tbsp olive oil
- 4 tbsp unsalted butter divided and kept cold
- [For the Pasta]
- 1 lb angel hair pasta or capellini
For the Pan Sauce
- 3 cloves garlic minced
- ¾ cup dry white wine like Pinot Grigio or Sauvignon Blanc
- ¾ cup low-sodium chicken broth
- ⅓ cup brined capers drained
- Juice of 1 large lemon about ¼ cup, strained
- ½ cup reserved pasta water
- ¼ cup chopped fresh parsley plus more for garnish
Instructions
Prepare the Chicken and Cook the Pasta
- Prep Your Station: Set up a simple dredging station. On a large plate or in a shallow dish, combine the Wondra flour with a generous pinch of kosher salt and about 10-12 grinds of fresh black pepper. Have another clean plate ready for the cooked chicken.
- Start the Pasta Water: Get a large pot of water on the stove over high heat. Once it comes to a rolling boil, salt it generously.
- Dredge the Chicken: One by one, press a chicken cutlet firmly into the flour mixture, making sure to coat both sides completely. Shake off any excess.
Sear the Chicken to Golden Perfection
- Heat the Skillet: Place your large, stainless-steel skillet over medium-high heat. Add the olive oil and 2 tablespoons of the butter. Let it heat until shimmering.
- Sear in Batches: Carefully lay half of the chicken cutlets in the hot skillet, leaving space between them. Cook for about 2-3 minutes per side, turning only once, until deep golden-brown. Transfer to a clean plate. Repeat with the remaining chicken, adding more oil if needed. Do not wipe out the pan!
Build the Signature Pan Sauce
- Cook the Pasta: Drop the angel hair pasta into the boiling water. It cooks fast—usually just 2-4 minutes.
- Sauté the Aromatics: Reduce the skillet heat to medium. Add the minced garlic and sizzle for 30-45 seconds until aromatic. Do not let it brown.
- Deglaze and Reduce: Pour in the white wine, scraping up all the brown bits. Let it reduce by half, 2-3 minutes. Add the chicken broth and capers and return to a simmer.
- Reserve the Pasta Water: Before you drain the pasta, scoop out at least 1 cup of the starchy cooking water. Drain the pasta.
Bring It All Together
- Finish the Sauce: Take the skillet completely off the heat. Add the strained lemon juice, chopped parsley, and about ½ cup of the reserved pasta water. Add the final 2 tablespoons of cold butter. Swirl the pan continuously until the sauce is glossy and slightly thickened.
- Combine and Serve: Add the cooked pasta directly into the skillet. Toss to coat everything thoroughly. Arrange the pasta on plates and top with the chicken cutlets. Garnish and serve immediately.
Notes
- How to Make Creamy Chicken Piccata Pasta
- Easy Upgrades: Add Mushrooms or Spinach
- Storing & Reheating
- The Science of a Perfect Pan Sauce
